From Scrap to Harvest: How to Build a Pallet Greenhouse That Looks Great and Grows Real Food
A greenhouse doesn’t have to be expensive to be effective. With a stack of sturdy wooden pallets, basic tools,
and a clear plastic cover, you can build a practical backyard greenhouse that protects plants, extends the season,
and keeps your garden organized. This guide is designed for real DIY builders: clear steps, smart planning,
and the little details that separate an “okay” build from an excellent one.
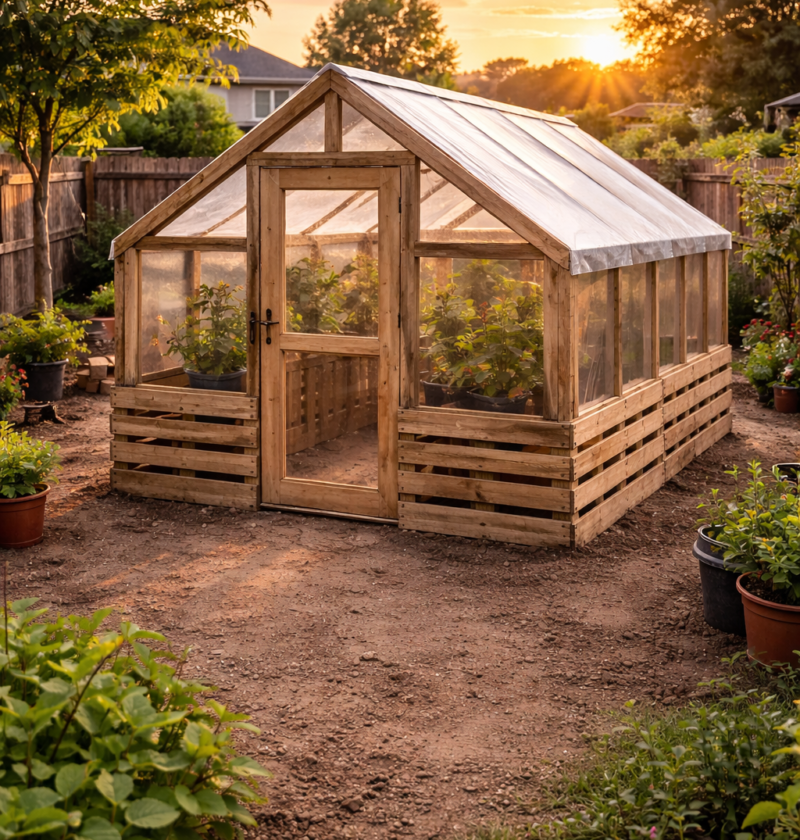
The structure we’re building here matches the popular pallet-greenhouse style:
pallet walls, a triangular roof frame, and a clear plastic covering.
It’s perfect for tomatoes, cucumbers, peppers, leafy greens, and starter seedlings—especially if you want a clean,
tidy interior that looks impressive on camera.
you’ll avoid the most common mistakes: wobbly walls, sagging plastic, poor airflow, and a greenhouse that
overheats or leaks water.
Why a Pallet Greenhouse Works So Well
Pallets are one of the best “free” building materials for garden projects because they’re already structured.
The slats create natural rigidity, the frames are easy to screw into, and the gaps can help with airflow
when used correctly. When you combine pallet walls with a well-pitched roof and tight plastic, you create
a microclimate that’s warmer, calmer, and more stable than the outside environment.
- Extends your season: Start earlier in spring and harvest later in fall.
- Protects from wind + cold nights: Plants grow steadier and suffer less stress.
- Reduces rain splash: Helps lower the risk of soil-borne disease on leaves.
- Cleaner interior: Organized beds and a walkway make watering and pruning easier.
- Low cost: Most of the “big” material is reclaimed wood.
Before You Build: Safety and Smart Pallet Selection
Not every pallet should be used in a garden build. Some pallets have been exposed to chemicals or spills.
Your greenhouse will be a food-growing space, so choose pallets with care.
Prefer pallets marked HT (heat treated). If you can’t confirm the pallet’s history,
don’t use it for a food-garden structure.
How to choose the best pallets
- Condition: No rot, minimal cracks, strong corners.
- Weight: Heavier pallets are often sturdier.
- Consistency: Matching pallet sizes make the build easier and cleaner.
- Cleanliness: Lightly weathered is fine, but avoid oily stains.
Tools and Materials Checklist
Core materials
- 8–14 wooden pallets (depending on greenhouse size and whether you double-layer walls)
- 2×4 lumber for roof framing (or similar sturdy lumber)
- Pressure-treated boards for the base perimeter (recommended)
- Exterior screws: 2″ and 3″ (coated for outdoor use)
- Metal corner brackets / mending plates (for strength)
- Door hinges + latch
- 6 mil UV-resistant greenhouse plastic (or polycarbonate sheets if upgrading)
- Staple gun + heavy-duty staples (or battens/wood strips for clamping plastic)
- Optional: weather-stripping for door, silicone sealant, vent hardware
Tools
- Drill/driver + bits
- Circular saw or hand saw
- Measuring tape
- Level
- Hammer
- Utility knife
- Work gloves + eye protection
with weather. Screws hold better and make repairs easier later.
Pick the Best Location in Your Yard
The location determines how successful the greenhouse will be. A greenhouse in shade won’t heat well.
A greenhouse in a wind tunnel will cool down quickly and stress the plastic cover. Choose a spot with
strong sun exposure and decent shelter.
- Sun: Aim for 6–8 hours of sun daily (morning sun is especially valuable).
- Drainage: Avoid low spots where water pools.
- Wind: Use a fence, hedge, or building as a windbreak if possible.
- Access: Make sure you can reach it with a hose and carry tools easily.
Choose Your Size: Simple Dimensions That Work
A common and practical beginner size is about 8 ft long × 6 ft wide. This is big enough
for two interior growing beds with a center walkway, but not so big that it becomes expensive or hard to keep warm.
If you want bigger, scale up in length first (like 10–12 ft) while keeping width manageable.
- Length: 8 ft
- Width: 6 ft
- Wall height: ~4 ft (pallet height)
- Roof peak height: ~7 ft (comfortable inside + good airflow)
Step-by-Step Build: Pallet Greenhouse Construction
Step 1 — Prep the ground and base
Start by leveling the ground. You don’t need a concrete slab, but you do need stability.
A simple base perimeter makes everything easier: squarer walls, cleaner roof lines, and a door that closes properly.
- Mark your footprint (example: 8×6).
- Remove grass and roots where the base will sit.
- Add a thin layer of gravel (optional but recommended for drainage).
- Build a base frame using pressure-treated boards.
- Check square by measuring diagonals (they should match).
your base is square. This one step prevents “crooked greenhouse syndrome.”
Step 2 — Build and anchor the pallet walls
Stand pallets upright around the perimeter. Fasten them to each other and to the base.
Reinforcement is what makes this structure feel solid and “professional.”
- Place corner pallets first, then fill between.
- Screw pallets into the base frame (3″ screws).
- Connect pallets to each other at the edges using screws + metal mending plates.
- Check level as you go. Adjust before everything is locked in.
- Leave a clean opening for a door (front or side, your choice).
and add 2×4 vertical supports inside corners if needed.
Step 3 — Add interior supports for the roof
The roof is where most DIY greenhouse builds fail—usually due to weak supports or a flat pitch that collects water.
Before you build the triangular roof, install vertical supports at key points.
- Add 2×4 corner posts inside the pallet corners.
- Add at least one center support on each long side if your greenhouse is longer than 8 ft.
- Secure these posts to both the base and the pallets.
Engineer Blueprint Plan (Text-Based “Plo” Section)
This section is the “engineer brain” of the build—the plan that keeps everything consistent.
Use it like a blueprint: measurements, pitch, spacing, and a clean structure sequence.
Adjust dimensions if your pallets are different, but keep the logic the same.
- Footprint: 8 ft (L) × 6 ft (W)
- Wall height: 4 ft (using upright pallets)
- Roof pitch: 30°–35°
- Roof peak height: ~7 ft (comfortable working height)
- Rafter spacing: every 24 inches (2 ft)
- Ridge beam: one continuous beam along the roof peak
Side view blueprint (concept)
         Ridge beam
            ▲
            │
          /   \
         /     \     Roof pitch 30–35°
        /       \
       /_________\
      |           |   Pallet wall (~4 ft)
      |           |
      |___________|
         6 ft width
Top view blueprint (footprint)
      8 ft length
    ┌───────────────────┐
    │  Bed   Walkway  Bed│
    │  18"   18–24"  18" │
    └───────────────────┘
         6 ft width
Roof framing method (engineer sequence)
- Build triangle trusses: Cut 2×4 rafters so two rafters meet at the peak.
- Install ridge beam: Attach a beam at the peak running the full length.
- Install trusses: Place trusses every 24 inches and fasten to wall top plates.
- Add collar ties: Add a horizontal tie across rafters to prevent spreading.
- Add purlins: Add horizontal supports for plastic to grab onto and to reduce sag.
than a flat roof. It also improves airflow: warm air rises to the peak, making ventilation more effective.
Continue the Build: Roof + Covering
Step 4 — Build the triangular roof frame
Once your walls are sturdy and supported, build the triangular roof. Work slowly and check alignment.
A roof that’s slightly off will make the plastic cover wrinkle, flap, and wear out faster.
- Install top plates (2×4 boards) along the wall tops to create a clean surface.
- Build the roof triangles (trusses) on the ground first.
- Lift and attach each truss, spacing every 24 inches.
- Attach the ridge beam at the peak to lock everything in.
- Add cross bracing to reduce wobble.
Step 5 — Cover the roof with greenhouse plastic (tight and clean)
The difference between a “DIY look” and a “professional look” is plastic tension and edge finishing.
Tight plastic lasts longer, looks cleaner, and handles wind better.
- Choose a calm day (wind makes plastic miserable).
- Roll plastic over the roof evenly with extra overlap on edges.
- Pull it tight, starting from the center and working outward.
- Staple or clamp with wood strips (battens) so staples don’t tear through.
- Seal edges using wood strips screwed over the plastic (best practice).
creates micro-tears, and shortens lifespan.
Door Build: Simple, Strong, and Sealed
A greenhouse door should open smoothly and close tightly. A door that doesn’t seal leaks heat
and invites pests. Build a basic door frame from 2×2 or 2×4 lumber, then cover with plastic.
- Measure the door opening and build a rectangular frame.
- Add a diagonal brace to prevent sagging.
- Cover with plastic and clamp edges with thin wood strips.
- Install hinges and latch.
- Add weather-stripping if possible for a clean seal.
Interior Setup: Neat, Mature Plants, and a Camera-Friendly Layout
You asked specifically for the inside to look organized and “mature.” That comes from layout and routine.
Even a small greenhouse can look like a mini farm when beds are straight, plants are supported,
and the walkway is clean.
Best interior layout (for 6 ft width)
- Two side beds: ~18 inches wide each (or up to 24 inches if you prefer fewer plants)
- Center walkway: 18–24 inches (comfortable for watering and pruning)
- Trellis line: Add string/trellis for cucumbers along one side
- Tomato line: Tomatoes on the other side with cages or vertical string
How to make plants look “mature and thriving” inside
- Consistent pruning: Remove lower tomato leaves to improve airflow.
- Strong support: Stakes, cages, or strings keep plants upright and clean.
- Mulch: Straw or dry leaves keep beds tidy and reduces splashing.
- Water routine: Water early; avoid wet leaves at night.
- Feeding schedule: Use balanced compost or gentle organic feed as needed.
and helps the final reveal feel satisfying.
Ventilation and Temperature Control
The biggest greenhouse problem is not cold—it’s heat. On sunny days, temperatures can spike fast.
Ventilation is what keeps plants healthy and prevents disease.
Simple ventilation options
- Door venting: Open the door for 30–60 minutes during peak heat.
- Top vent flap: Create a small vent near the roof peak (hot air escapes upward).
- Side vent: A small window cut into plastic can help cross-breeze.
- Shade cloth (optional): If your summers are intense, shade cloth saves plants.
Airflow keeps leaves dry, reduces fungus risk, and helps pollination.
What to Grow in a Small Pallet Greenhouse
Choose crops that benefit from warmth and protection. The best performers are usually tomatoes, cucumbers,
peppers, herbs, and early greens.
High performers
- Tomatoes: Love warmth; easier to protect from cold nights.
- Cucumbers: Thrive with vertical support; greenhouse boosts production.
- Peppers: Benefit from stable temperatures.
- Lettuce/greens: Great for early spring and late fall.
- Herbs: Basil, parsley, cilantro, mint (mint in a pot so it doesn’t take over).
Maintenance: Keep It Looking Great and Working Great
A greenhouse can last years with basic upkeep. The most important checks are plastic tension,
screw tightness, and wood condition.
- Monthly: Inspect plastic for tears, tighten loose battens or staples.
- Seasonally: Re-tighten screws, check door alignment, clean interior beds.
- Yearly: Replace plastic if it becomes brittle or heavily torn.
- After storms: Check edges, corners, and roof connections immediately.
Common Mistakes (and How to Avoid Them)
Mistake 1: Weak foundation
If the base isn’t square and stable, everything above it will fight you. Take your time on leveling,
squaring, and anchoring.
Mistake 2: Flat or low-pitch roof
Flat roofs collect rainwater. Low pitch creates sagging plastic. Your roof pitch is your roof’s survival plan.
Stick with that 30–35° target.
Mistake 3: Poor ventilation
Heat buildup stresses plants, invites pests, and increases disease. Make ventilation easy, not complicated:
door + a small vent is often enough for a small build.
Mistake 4: Loose plastic
Loose plastic flaps, tears, and looks messy on camera. Clamp it with wood strips for a cleaner finish.
Mistake 5: Messy interior
When the interior is cluttered, watering becomes harder and plants grow unevenly.
Straight beds, a clear walkway, and good support systems make everything healthier—and look far better in your final reveal.
Optional Upgrades That Make a Big Difference
- Polycarbonate roof panels: Longer-lasting than plastic, better insulation.
- Rainwater collection: A simple gutter + barrel can supply water.
- Thermal mass: Black water jugs store heat and stabilize nighttime temps.
- Automatic vent opener: Helps prevent overheating if you’re away.
- Raised beds: Better soil control and cleaner look.
FAQ: Pallet Greenhouse Questions People Ask
How long does it take to build?
Most DIY builders can complete a small version in a weekend, especially if pallets are already collected and cleaned.
If you’re filming and want perfect results, plan for two phases: build day + interior setup day.
Will it survive wind?
Yes—if you anchor the base, reinforce corners, and clamp the plastic properly.
Wind problems usually come from loose plastic edges and weak corner connections.
Can I build it without a base frame?
You can, but a base frame improves stability and keeps everything square. If you want an “excellent” result,
use the base frame.
What’s better: plastic or polycarbonate?
Plastic is cheaper and easier for beginners. Polycarbonate lasts longer and insulates better.
For a first build, start with quality greenhouse plastic and upgrade later if you love the greenhouse.
How do I keep pests out?
Keep the door closed, repair small tears quickly, and avoid leaving food scraps nearby.
If pests are a major issue, add a fine mesh vent cover.
Final Reveal Checklist (For That “Excellent” Look)
- Plastic tight, smooth, and clamped with wood strips
- Door opens cleanly and closes with a snug seal
- Interior beds straight and evenly spaced
- Walkway clean, no clutter
- Plants supported (strings/cages) and leaves pruned for airflow
- Visible mature produce (tomatoes/cucumbers) for a strong final shot
Related Ideas (Optional Reads)
If you like practical, simple DIY projects and home-friendly routines, you may also enjoy quick kitchen ideas
for after-garden meals. Here are a few helpful reads you can explore:
Conclusion: Build It Once, Harvest for Seasons
A pallet greenhouse is one of the most rewarding backyard builds because it gives you something real:
protection, structure, and a place where plants can thrive. When you combine a solid base, reinforced pallet walls,
a correctly pitched roof, and tight plastic, you get a greenhouse that looks great, works well, and lasts.
And the best part? You can start small, learn as you go, and upgrade later—without ever needing an expensive kit.
Build it carefully, keep it clean inside, and you’ll have a final reveal that looks “excellent” every time:
organized beds, mature plants, and a greenhouse you’re proud to show.