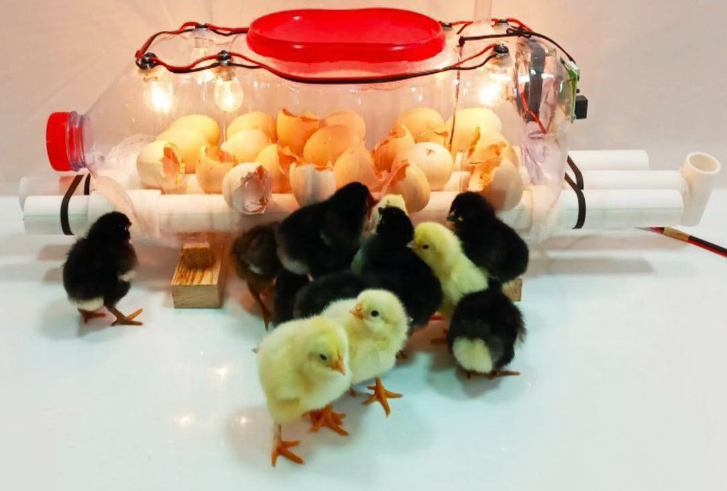
How to Build a Homemade Egg Incubator Using a Water Bottle
Hatching eggs at home is a fascinating and educational experience. While commercial incubators are convenient, they can be expensive or unavailable in many regions. Fortunately, it is possible to build a simple, functional egg incubator using a common household item: a plastic water bottle.
This guide explains how to create a homemade incubator using safe materials, basic tools, and careful monitoring. The goal is not speed, but steady, healthy development that mimics natural incubation as closely as possible.
Understanding How Egg Incubation Works
Before building an incubator, it is important to understand the three essential conditions eggs need to hatch:
- Stable temperature: Around 37.5°C (99.5°F) for chicken eggs
- Proper humidity: Usually between 45–55%, rising to 65–70% near hatching
- Regular egg turning: Prevents the embryo from sticking to the shell
A homemade incubator must provide these conditions consistently. Even small fluctuations can affect hatch rates, so patience and attention are key.
Why Use a Water Bottle Incubator?
A plastic water bottle offers several advantages:
- Low cost and easy to find
- Lightweight and portable
- Transparent walls for easy monitoring
- Simple shape that retains warmth efficiently
This type of incubator is best suited for small batches of eggs and educational purposes rather than large-scale hatching.
Materials You Will Need
- Large clear plastic water bottle (5–10 liters)
- Small incandescent bulb or low-wattage heat source
- Bulb holder with wire and plug
- Thermometer (digital preferred)
- Hygrometer (optional but recommended)
- Small shallow dish for water
- Egg tray or soft cloth
- Utility knife or scissors
- Tape or glue
- Clean fertile eggs
All materials should be clean to reduce the risk of bacterial contamination.
Preparing the Water Bottle
Choose a clear plastic bottle with smooth sides. Wash it thoroughly and allow it to dry completely.
Steps:
- Cut a rectangular opening on one side to serve as a door.
- Leave one side attached to act as a hinge.
- Make small ventilation holes near the top of the bottle.
- Ensure edges are smooth to avoid damage or injury.
Ventilation is essential. Eggs need oxygen, but too many holes can cause heat loss, so balance is important.
Installing the Heat Source
Temperature control is the most critical part of incubation.
- Place the bulb holder near the top or side of the bottle
- Ensure the bulb does not touch plastic
- Use a low-watt bulb (15–25W)
- Secure wiring safely outside the bottle
The heat source should warm the air gently, not directly heat the eggs.
Setting Up the Interior
Inside the bottle:
- Place a shallow dish of water at the bottom to control humidity
- Position the egg tray or cloth above the water
- Keep eggs away from direct heat
Eggs should lie horizontally or slightly tilted, similar to natural nesting conditions.
Temperature Management
Ideal temperature for most poultry eggs is 37–38°C.
- Place thermometer at egg level
- Check temperature several times daily
- Adjust ventilation or bulb distance if needed
Sudden temperature changes are more harmful than slight steady deviations.
Humidity Control
Humidity affects how moisture escapes from the egg shell.
- Maintain 45–55% humidity for the first 18 days
- Increase to 65–70% during the final days
- Add or remove water surface area to adjust humidity
Too little humidity causes chicks to stick inside the shell, while too much prevents proper development.
Egg Selection and Handling
Choose only clean, fertile eggs from healthy birds.
- Avoid cracked or misshapen eggs
- Do not wash eggs with water
- Store eggs at room temperature before incubation
- Begin incubation within 7 days of laying
Handle eggs gently to protect the developing embryo.
Turning the Eggs
Eggs must be turned at least 3–5 times per day.
- Turn gently, rotating side to side
- Mark shells with an “X” and “O” to track turns
- Stop turning on day 18
Turning mimics the natural behavior of a brooding hen.
Daily Monitoring Routine
Successful incubation requires consistency:
- Check temperature morning and evening
- Monitor humidity daily
- Turn eggs regularly
- Refill water dish as needed
Avoid opening the incubator too often, as this causes heat loss.
Signs of Development
After 7–10 days, eggs can be candled using a flashlight:
- Visible veins indicate development
- Clear eggs may be infertile
- Remove non-developing eggs carefully
Candling should be quick and gentle.
The Final Days Before Hatching
Around day 18:
- Stop turning eggs
- Increase humidity
- Do not open the incubator unnecessarily
Chicks may take up to 24 hours to fully hatch. Do not assist unless absolutely necessary.
After the Chicks Hatch
Once hatched:
- Allow chicks to dry inside the incubator
- Move them to a warm brooder area
- Provide clean water and appropriate feed
The incubator should be cleaned thoroughly before reuse.
Common Mistakes to Avoid
- Overheating the incubator
- Neglecting humidity control
- Turning eggs irregularly
- Opening the incubator too frequently
- Using dirty or damaged eggs
Advantages and Limitations
Advantages
- Low cost
- Educational and rewarding
- Simple construction
Limitations
- Requires close monitoring
- Limited egg capacity
- Less precise than commercial incubators
Frequently Asked Questions
Can this incubator hatch different types of eggs?
Yes, but temperature and humidity requirements may vary for ducks, quail, or other birds.
Is electricity required?
Yes, a stable power source is necessary to maintain temperature.
How many eggs can I incubate?
Usually 3–8 eggs depending on bottle size.
Is this method safe?
When built carefully and monitored closely, it is safe for educational and small-scale use.
Final Thoughts
Building a homemade egg incubator using a water bottle is a practical way to learn about life cycles, responsibility, and animal care. While simple, this setup demands patience, observation, and consistency.
When done correctly, it can successfully hatch healthy chicks and provide a deeply rewarding experience. The key is not perfection, but steady care, respect for the process, and attention to detail.