Easy Steps to Multiply Roses from Cuttings 🌹: Choose Your Preferred Method for Reliable Results
Few flowers capture the heart of a garden lover quite like roses. From velvety deep reds to rare striped heirlooms, roses bring elegance, fragrance, and personality to outdoor spaces. Yet many unique varieties are expensive or difficult to find in nurseries. That’s where propagation from cuttings becomes a game-changer.
Multiplying roses from stems is one of the most cost-effective and satisfying gardening techniques. With proper preparation, the right growing medium, and careful attention to moisture and temperature, you can turn a single healthy stem into a thriving new plant.
In this comprehensive guide, we’ll walk through step-by-step instructions, compare popular propagation methods (soil, potatoes, and water), explore rooting hormones, discuss humidity control, and highlight common mistakes to avoid. Whether you’re a beginner or a seasoned home gardener, this guide will help you choose the method that fits your style and environment.
Why Propagate Roses from Cuttings? 🌿
Propagation from cuttings allows you to:
- Preserve rare or sentimental rose varieties
- Save money compared to buying mature plants
- Clone a plant with known bloom color and fragrance
- Expand your garden naturally
Chef Maria Lawson, an avid backyard gardener, says: “Growing roses from cuttings is like recreating your favorite recipe — you already know the result will be beautiful.”
Preparing Rose Cuttings the Right Way ✂️
Step 1: Select the Right Stem
Choose a healthy stem that recently bloomed. It should be green but firm — not too woody and not too soft.
Step 2: Make Proper Cuts
- Cut the top diagonally just above a bud.
- Trim the bottom horizontally below a node.
Step 3: Remove Leaves
Remove most leaves to reduce moisture loss. Keep only one or two small leaves if desired.
Step 4: Optional Bark Scraping
Lightly scraping the lower bark can expose cambium tissue, encouraging root formation.
Step 5: Apply Rooting Hormone (Optional but Helpful)
Rooting hormones contain auxins that stimulate root development. While optional, they increase success rates.
Culinary Instructor James Holloway explains: “Think of rooting hormone as a booster — not required, but beneficial for consistency.”
Method 1: Traditional Soil Propagation 🌱
This is the most reliable and widely recommended method.
What You Need:
- Small pot with drainage holes
- High-quality potting mix
- Compost blend
- Spray bottle
Steps:
- Fill pot with well-draining soil.
- Insert cutting 2–3 inches deep.
- Water gently.
- Cover loosely with clear plastic to maintain humidity.
Best For: Most gardeners, especially beginners.
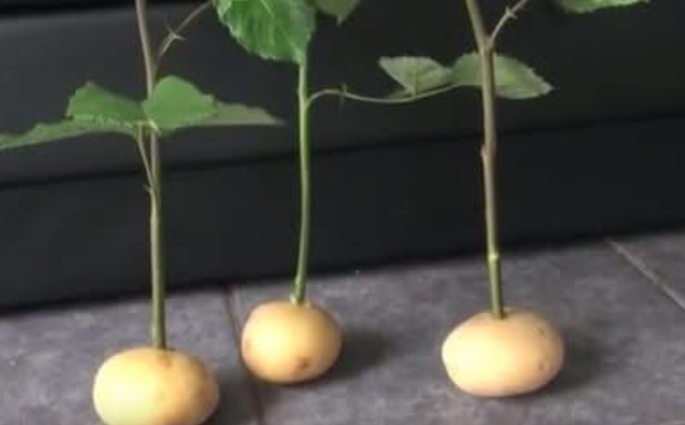
Method 2: Reproducing Roses in Potatoes 🥔
This popular method involves inserting the prepared cutting into a fresh potato before planting it in soil.
Why It May Work:
- Potatoes retain moisture
- They decompose slowly, adding organic matter
- They buffer against sudden drying
Important: You still need to plant the potato into soil. It is not a soil substitute.
Best For: Gardeners experimenting with moisture stabilization.
Method 3: Water Propagation 💧
Water propagation allows you to observe root development directly.
Steps:
- Place cutting in a clean container of room-temperature water.
- Ensure at least one node is submerged.
- Change water every 2–3 days.
Advanced growers sometimes use a mix of peat, vermiculite, and perlite to transition water roots into soil-friendly roots.
Nutritionist Sarah Coleman notes: “Water propagation is visually satisfying, but roots formed in water can be more fragile when transferred to soil.”
Best For: Gardeners who want to monitor progress closely.