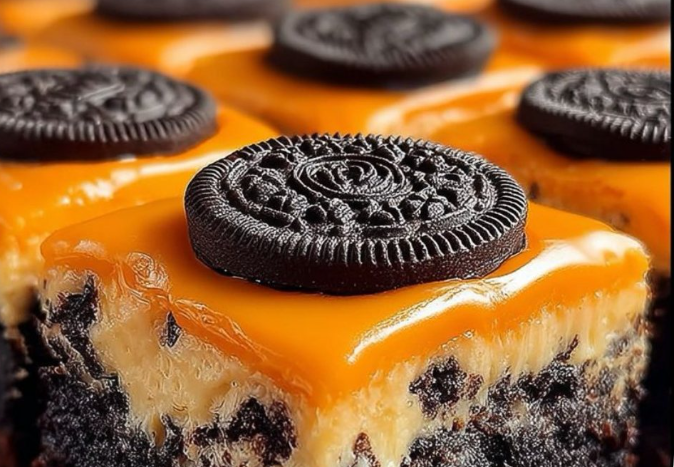
Oreo Layered Halloween Brownies: A Spooky, Decadent Treat
Get ready to cast a dessert spell this Halloween 🎃. Imagine rich, fudgy brownies with a hidden layer of Oreo cookies, topped with candy eyeballs or festive sprinkles—mouthwatering, fun, and perfect for haunting any party. In this ultimate guide, we dive deep into the recipe, technique, chef tips, health notes, troubleshooting, and FAQs so your brownies come out flawlessly every time.
Introduction: Why These Brownies Are a Halloween Hit
When it comes to Halloween treats, you want something that’s not just delicious—but also visually fun and a little theatrical. **Oreo Layered Halloween Brownies** deliver on both fronts. The surprise Oreo layer adds textural contrast and a fun “twist” in the middle of the brownie. Plus, with themed decorations (candy eyes, orange and black sprinkles, Halloween Oreos), they become a festive centerpiece.
As Chef Gordon Ramsay might warn, **texture is everything**—you don’t want a brownie that’s too cakey or too undercooked. Our mission is to balance fudginess with structure, and to make sure the Oreo layer integrates without ruining the batter’s integrity.
What This Guide Covers
By the end, you’ll have:
- A fully detailed recipe (with metric and US units)
- Chef’s tips and tricks for perfect brownies
- Variations and decorative ideas
- Nutrition estimate and health tips
- Food safety guidelines and storage advice
- 10 FAQs to anticipate your questions
Core Ingredients & Why They Matter
You began with partial ingredients:
- 1 cup (2 sticks) unsalted butter, melted
- 1 cup packed brown sugar
- 4 large eggs
Those make a great start. But to build a full, layered Oreo Halloween brownie, you’ll need additional components:
- Granulated sugar (if needed depending on sweetness goal)
- All‑purpose flour
- Cocoa powder (or melted chocolate)
- Salt
- Vanilla extract
- Oreo cookies (standard or Halloween themed)
- Optional chocolate chips
- For topping: frosting or ganache, sprinkles, candy eyes, crushed Oreos
Role of Each Ingredient
- Butter & sugar: Provide richness, moisture, and sweetness. The melted butter helps produce fudgy texture.
- Eggs: Act as binding and structure, adding richness and helping the brownie set.
- Flour & cocoa: Provide structure and chocolate flavor. Too much flour can make the brownie cakey; too little yields poor binding.
- Salt & vanilla: Enhance flavor, cut sweetness, and deepen chocolate notes.
- Oreos: Create the surprise layer. When embedded between layers of batter, they yield contrast in texture and flavor.
- Optional chocolate chips or mix‑ins: Add pockets of extra chocolate richness.
- Toppings (frosting, candy eyes, sprinkles): Provide visual flair and finishing touches for Halloween theme.
Master Recipe: Oreo Layered Halloween Brownies
Yield, Time & Equipment
- Yield: ~12 to 16 brownies (depending on cut size)
- Prep time: ~15 minutes
- Bake time: ~25–30 minutes
- Total time: ~45 minutes including cooling
- Equipment: 9×13 or 8×12 (or 9×9) baking pan, parchment paper (optional but recommended), mixing bowls, spatula, whisk
Ingredients (US / Imperial)
- 1 cup (2 sticks / 226 g) unsalted butter, melted
- 1 cup packed brown sugar (≈ 220 g)
- ½ cup granulated sugar (optional; adjust to your sweetness preference)
- 4 large eggs
- 2 tsp vanilla extract
- ½ tsp salt
- 1 cup all‑purpose flour (≈ 120 g)
- ½ cup cocoa powder (≈ 50 g) or equivalent melted chocolate
- 1 to 1½ cups Oreo cookies (≈ 12–20 cookies), whole or halved, Halloween style if available
- Optional: ½ cup chocolate chips or chunks
- For topping:
- Chocolate frosting or ganache
- Crushed Oreos, candy eyes, orange & black sprinkles, Halloween decor
Ingredients (Metric Approximation)
- 226 g unsalted butter, melted
- 220 g packed brown sugar
- ~100 g granulated sugar (optional)
- 4 eggs
- 10 mL vanilla extract
- 2.5 mL salt
- 120 g all‑purpose flour
- 50 g cocoa powder (or equivalent chocolate)
- ~170–250 g Oreo cookies (depending on count)
- Optional: ~85 g chocolate chips
- Toppings as desired
Step‑by‑Step Instructions
- Preheat your oven to **350 °F (175 °C)**. Grease your baking pan or line with parchment paper to ease removal later.
- In a large bowl, whisk together the **melted butter**, **brown sugar**, and (optionally) **granulated sugar** until smooth.
- Add the **eggs**, one at a time, whisking after each addition until fully incorporated. Stir in **vanilla extract** and **salt**.
- Whisk in the **cocoa powder** (or melted chocolate) until evenly blended.
- Gently fold in the **flour**, stirring just until no streaks remain—be careful not to overmix.
- If using, fold in **chocolate chips** or chunks gently.
- Pour about **half of the brownie batter** into the prepared pan and spread evenly.
- Arrange the **Oreo cookies** (whole or halved) in a single layer across the batter. You can press them in slightly but leave most of them visible.
- Pour the **remaining batter** over the Oreo layer, trying to cover them as evenly as possible.
- Optional: reserve some Oreo pieces to sprinkle on top for visual effect.
- Bake for **25–30 minutes**, or until a toothpick inserted into the center comes out with a few moist crumbs (not wet batter). If you prefer more fudgy, err on the shorter side; for a more set brownie, bake a few minutes longer.
- Remove from oven and let cool completely in the pan on a wire rack (2 hours or more). This cooling is crucial so the internal structure sets and the Oreo layer doesn’t collapse.
- Once cooled, spread **frosting** or **ganache** over top (if using). Immediately decorate with **crushed Oreos**, **candy eyes**, **sprinkles**, or other Halloween decor.
- Slice into squares (12–16) and serve. Use a sharp knife wiped between cuts for clean edges.
Chef’s Tips & Tricks
- Line the pan with parchment paper with overhang—makes removing and slicing much easier.
- Use high quality cocoa or chocolate for best flavor depth.
- Don’t overmix once you add flour; overworking will produce a cakey rather than fudgy texture.
- If your Oreo layer tends to sink or collapse, reduce how much batter you pour on top, or leave some batter “gaps” near the edges so pressure distributes more evenly.
- Let the brownies cool fully before slicing—warm brownies cut messily and may crumble.
- Decorate just before serving so candy eyes or sprinkles stay intact (don’t melt or bleed).
- You can press Oreo pieces at angles or partially exposed so they peek through the top—fun for spooky effect.
- For bonus flair, tint some frosting orange or green and pipe ghost faces, web lines, or spider legs.
- If using a dark pan, reduce bake time slightly; in a light pan, bake a bit longer—adjust based on how your oven behaves.
Variations & Theme Ideas
Ghost, Monster & Eyeball Brownies
Use candy eyeballs stuck into top or sides. Use white chocolate drizzle to draw ghost shapes or spider webs over the top. You can embed eyeball candies partially into the Oreo layer before baking so they peek through. (See “Monster Eyeball” version in similar recipes) :contentReference[oaicite:0]{index=0}
Colored Creme Oreos or Halloween Oreos
If you can source Halloween or colored Oreos (orange creme, green creme), use them for the layer to add seasonal color. Some bloggers layer these chocolate‑Oreo combinations for visual surprise. :contentReference[oaicite:1]{index=1}
Peanut Butter / Caramel Swirl
Before baking, drizzle melted peanut butter or caramel over the top batter and swirl with a knife. The combination of chocolate, Oreo, and peanut butter or caramel is irresistible.
Salted Caramel / Sea Salt Finish
After baking, drizzle salted caramel, then sprinkle flaky sea salt over the top for contrast—sweet vs savory.
Layered Brownie + Cheesecake + Oreo
Start with a cheesecake layer (cream cheese + sugar + egg) at the bottom, then follow with the Oreo brownie batter above it. The result is a triple‑layer dessert with creamy cheesecake, Oreo crunch, and fudgy brownie. Use light beating so you don’t collapse the cheesecake. (Requires slightly more bake time)
Mini or Bar Version / Bite Size
Use a smaller pan (8×8) and slice into bite-sized bars or squares. Or use muffin tins (lined) and stuff one Oreo per cup with batter above and below to make Oreo brownie “cups.”
Nutrition, Health Considerations & Estimates
Below is an approximate nutrition table based on a recipe yielding 12 brownies. Use exact ingredient brands for more accurate values.
| Component | Estimate per Serving (1 brownie, 1/12) |
|---|---|
| Calories | ~ 320–380 kcal |
| Total Fat | 18–22 g |
| Saturated Fat | 10–12 g |
| Carbohydrates | 38–48 g |
| Sugars | 28–35 g |
| Protein | 4–5 g |
| Dietary Fiber | 2–3 g |
| Sodium | ~ 150–250 mg |
Health & Moderation Tips:
- This is an indulgent dessert—enjoy in moderation.
- To reduce sugar, you might reduce granulated sugar, or use semi‑sweet or dark chocolate with high cocoa content (less added sugar).
- Oreo cookies are mostly sugar, so the Oreo layer contributes significantly to the sweetness—choose standard or “light” Oreos if available.
- Serve with fresh fruit or a small scoop of plain yogurt to balance richness.
Storage, Safety & Serving Tips
Storage Guidelines
- Once cooled and frosted, store brownies in an airtight container at room temperature (if climate is cool) or in the fridge (if warm) for up to 3–4 days.
- If stored in fridge, allow them to come to room temperature before serving for better texture.
- Separate layers with parchment paper if stacking brownies to prevent sticking.
- Freezing: you *can* freeze in airtight freezer bag or wrap, up to 2 months. Thaw overnight in fridge, then bring to room temp. Note: frosting may lose some texture; re-frost or add fresh decorations after thawing.
Food Safety Tips
- Ensure eggs are fresh and properly handled (refrigerated until use).
- Use clean utensils and bowls; cross-contamination from raw egg is possible.
- Cool the brownies fully before frosting to prevent frosting melting or sliding.
- If using dairy in frosting (butter, cream cheese), keep refrigerated and don’t leave at room temp for long periods.
Troubleshooting & Common Issues
Here are problems you might face, with fixes:
- Brownies too cakey: You likely overmixed after adding flour, or used too much flour. Use gentler folding and measure flour properly (fluff and spoon, then level).
- Brownies undercooked / too gooey: Bake slightly longer, but monitor carefully. Use the toothpick test: moist crumbs are okay, but raw batter indicates more time needed.
- Oreo layer sinking or disintegrating: Use more batter above and below, or press Oreos gently into the first layer rather than embedding too deeply. Avoid too thin “cap” of batter over Oreos.
- Edges too crisp, center soft: Your pan or oven may heat unevenly. Use a metal pan, rotate halfway, and reduce bake time slightly at edges.
- Frosting sliding or bleeding: Cool completely before frosting. Use a thicker frosting or chilled brownies. Decorate just before serving.
- Crumbly texture when slicing: Use a sharp knife, warm it slightly (dip in hot water, wipe dry), and cut in one motion. Wipe between slices.
10 FAQs You Might Have
1. Can I use boxed brownie mix?
Yes! Use a high-quality boxed mix, then follow layering steps: pour half the prepared batter, add Oreo layer, then top with remaining batter. Bake as per box instructions, adjusting time slightly if needed.
2. How many Oreos should I use?
It depends on your desired layer thickness and pan size. Typically 12–20 Oreos in a 9×13 pan is good. For smaller pans, use fewer. You can halve or quarter the cookies to distribute more evenly.
3. Should Oreos be whole or halved?
You can use whole, halved, or quartered. Whole ones give a bold layer, but halved/quartered ensure more uniform coverage and easier cutting.
4. Do I press the Oreos into the batter?
Press lightly so they stick, but don’t submerge them fully. They should partially remain exposed so the batter “wraps” around them.
5. Can I skip the topping/frosting?
Yes, they’ll still be delicious. The topping is mostly for aesthetics and extra sweetness. You could dust with powdered sugar or cocoa instead.
6. How do I make them extra fudgy?
Reduce bake time slightly and don’t overbake. Use a slightly higher fat ratio (e.g., more butter or chocolate) and avoid overmixing. Also use good quality chocolate and a slightly lower flour ratio.
7. Can I use gluten‑free flour?
Yes. Substitute a 1:1 gluten‑free baking blend. Texture may vary slightly, so monitor bake time carefully.
8. What pan size is best?
A 9×13 or 8×12 will give you thinner but more servings; a 9×9 gives a thicker brownie. Adjust baking time accordingly (smaller pan, thicker brownies → longer bake). Use a metal pan for more even baking.
9. How to store decorated brownies without smearing decorations?
Once decorated, store in a container where the lid doesn’t touch decorations (use parchment or toothpicks to prop lid). Cool and set decorations before stacking.
10. Can I layer multiple flavors?
Yes — for example, layer a salted caramel layer, a peanut butter layer, then your Oreo brownie batter. Or you can mix in peanut butter or butterscotch chips for variation.
Serving Suggestions & Presentation Ideas
These brownies are dramatic enough to be the star of your dessert table. Here are some styling ideas:
- Cut into irregular “monster” shapes instead of uniform squares.
- Drizzle white or colored chocolate to draw spider webs.
- Add candy eyes peeking out from the Oreo layer or placed on top.
- Serve on black or orange plates or with decorative Halloween picks.
- Pair them with vanilla ice cream, whipped cream, or salted caramel sauce for contrast.
- Sprinkle edible glitter or dust for a magical/mystical look.
Conclusion & Final Notes
Oreo Layered Halloween Brownies are a festive, show-stopping dessert that combine timeless chocolate brownie goodness with a fun, crunchy surprise in the middle. With the layering technique, chef tips, and decorative flair, you’ll wow your guests and enjoy every bite yourself.
Let me know if you want a printable recipe card, a scaled version (for fewer or more servings), or video tutorial suggestions. I’m happy to help!