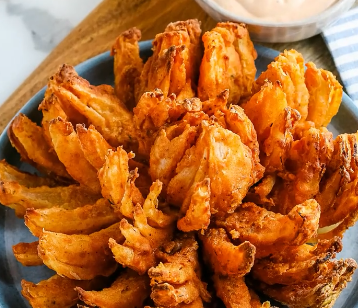
Air Fryer Blooming Onion Recipe: Crispy, Flavorful & Healthier
If you love that golden, crispy “bloom” of an onion — petals fanned out, crunchy edges, with a zesty dipping sauce — but don’t want the deep‑fried guilt, this Air Fryer Blooming Onion is for you. It delivers all the visual wow and much of the flavor, with far less oil. Whether for a gathering, game night, or just a fun side/appetizer, this recipe brings the crunch and taste without overwhelming your kitchen or waistline.
—
Why an Air Fryer Blooming Onion?
- Less oil, less mess: Air frying uses a spray or small amount of oil rather than deep‑frying, so you get crispiness with far fewer calories and fat.
- Retains flavor: All those breading spices, garlic, paprika, a bit of heat — they all come through.
- Easy to customize: Adjust the heat (cayenne, smoked paprika), the dipping sauce, or even make it gluten‑free if needed.
- Great appetizer or side: Looks impressive, tastes indulgent, but you can keep it balanced with healthy sides or dipping sauce portions.
—
Ingredients
For the Onion
- 1 large sweet onion (like Vidalia)
- 2‑3 large eggs
- 1 cup buttermilk (optional, for soaking / tenderizing)
For the Breading
- 1 cup all‑purpose flour
- ½ cup cornstarch (optional, adds extra crispiness)
- 1 tsp garlic powder
- 1 tsp paprika
- ½ tsp smoked paprika (optional, for smokiness)
- ½ tsp onion powder
- ½ tsp salt
- ½ tsp black pepper
- ¼ tsp cayenne pepper (adjust to taste)
For the Dipping Sauce
- ½ cup mayonnaise
- 2 tbsp ketchup
- 1 tbsp horseradish (prepared)
- ½ tsp paprika
- ¼ tsp garlic powder
- ¼ tsp salt
- Dash of cayenne pepper or hot sauce (optional)
Other & Tools
- Spray oil (avocado, canola, or other high‑smoke point oil)
- Air fryer (basket or tray style, large enough for onion to sit comfortably)
- Cutting board, sharp knife
- Bowls for breading, whisk
- Tongs or spatula for removing onion
—
Step‑by‑Step Instructions
1. Cut & Prepare the Onion
- Trim and peel: Cut off about ½‑inch from the top (not the root end). Peel the outer layers of skin.
- Place cut‑side down: Put the onion on the board with the root down.
- Make vertical cuts: Starting about ½‑inch from the root, slice straight down. First make 4 main cuts to quarter it, then 3‑4 more cuts in between each quarter to yield **12‑16 sections / petals**. Stop before cutting through the root so the onion stays intact.
- Flip and fan: Gently flip the onion over, and carefully spread the petals apart — this creates the “bloom.”
2. Optional Soak
If using buttermilk, soak the cut onion in the buttermilk for about **1 hour** in the refrigerator. This helps tenderize and mildly flavor the onion. After soaking, shake off excess buttermilk so it doesn’t make the breading too wet. This step is optional but recommended for better texture.
3. Prepare Breading & Egg Wash
- Mix all the dry breading ingredients (flour, cornstarch, garlic powder, paprika, smoked paprika, onion powder, salt, pepper, cayenne) in a large bowl.
- In another bowl, whisk the eggs until smooth (2‑3 eggs depending on onion size).
4. Bread the Onion
- Shake excess buttermilk (if used).
- Generously sprinkle the flour/cornstarch mix over the onion, making sure it gets between the petals. You may need to press gently between petals so the mix reaches inside.
- Dip onion into the egg wash, turning to coat all over, again ensuring the petals are covered.
- Coat again with the flour mixture (this double‑dredge gives crunch), pressing the mixture into petals if needed so it adheres well.
- Spray the onion with oil on all sides (top, edges, underside) so that it crisps properly in the air fryer.
5. Air Frying
- Preheat your air fryer to **350°F (175°C)** for about **3‑5 minutes**.
- Place the breaded onion cut‑side up in the basket or tray. If the root end is uneven so it wobbles, flatten it slightly so it sits level (use a small cut or trim carefully).
- Set timer for **15‑20 minutes**. Halfway through cooking, pause and *spray more oil* on all exposed sides, especially edges, to promote even crisping.
- Continue cooking until the onion is golden brown, crispy on edges, and the interior petals are tender (not raw). Watch carefully near the end to avoid burning.
- Remove carefully using tongs or a spatula (it will be delicate when hot). Let it rest a minute or two to firm up a bit before trying to move or slice into the petals.
—
Dipping Sauce
This sauce pairs beautifully with the blooming onion’s crispy, spicy exterior.
How to Make
- In a small bowl, combine mayonnaise, ketchup, horseradish, paprika, garlic powder, salt. Mix well.
- Add a dash of cayenne or a few drops of hot sauce if you want heat. Taste and adjust seasoning (salt, pepper) as needed.
—
Nutrition & Health Insights
Estimated Nutrition (per Serving, assuming 4 servings)
| Component | Amount | Approx Calories | Protein (g) | Fat (g) | Carbs (g) | Fiber (g) |
|---|---|---|---|---|---|---|
| Breading + Onion + Eggs + Spray Oil (1/4 of recipe) | ~ 1 blooming onion portion | ≈ 320‑380 kcal | ≈ 6‑8 | ≈ 20‑25 | ≈ 30‑35 | ≈ 3‑5 |
| Dipping Sauce (½ cup divided among 4) | ~2 Tbsp | ≈ 90‑110 kcal | ≈ 0‑1 | ≈ 9‑11 | ≈ 1‑2 | 0 |
| Total per Serving | — | ≈ 410‑490 kcal | ≈ 7‑9 g | ≈ 30‑35 g | ≈ 32‑37 g | ≈ 3‑5 g |
Health Benefits & Trade‑Offs
- Onion benefits: Onions are rich in fiber, vitamin C, antioxidants like quercetin; anti‑inflammatory effects; help with digestive health.
- Reduced oil usage: Air frying dramatically cuts down the amount of oil compared to deep‑frying—less saturated fat & calories.
- Complex/flavorful seasoning: Garlic, paprika, onion powder, smoked paprika bring antioxidants and flavor without many calories.
- Potential downsides: The breading/flour components add refined carbs; mayonnaise is high in fat (especially if using full‑fat). Also, sodium in breading & sauce can be high depending on how much salt is used.
—
Tips for Making It Healthier / Variations
- Use whole wheat flour or a blend of whole grain flour + all‑purpose to increase fiber.
- Use less flour or thinner coating to reduce carbs/calories.
- Swap mayonnaise in the sauce for Greek yogurt or a yogurt‑mayo blend to cut fat while keeping creaminess.
- Make dipping sauce lighter by reducing portion or serving it on the side so people can control how much they use.
- Use low‑sodium or reduced salt versions of spices / seasoning blends / salt itself.
- Optional soak in buttermilk enhances tenderness; if you skip, ensure onion petals are well washed and dried so breading adheres better.
—
Chef’s Pro Tips
- Bobby Flay: “Don’t rush seasoning—let spices bloom in the flour mix before breading. Smoked paprika adds depth. Also, spray oil generously on edges during cooking for even browning.”
- Ina Garten: “Treat this like a showstopper. Present it straight from the air fryer, let guests pull petals apart. A squeeze of lemon on top or sprinkle of fresh herbs finishes beautifully.”
- Gordon Ramsay: “Ensure your onion is dry inside the petals before breading—moisture is enemy of crisp. And let the air fryer preheat properly so the bottom doesn’t undercook.”
- Ree Drummond: “If you’re doing this for a crowd, prep breading and sauce ahead. Cut onions and soak ahead of time; then on event day just bread and cook.”
—
Frequently Asked Questions (FAQs)
1. Can I use different onion types?
Yes. Sweet onions (Vidalia, Walla Walla, etc.) are especially good because of their mild flavor and natural sweetness. But you can also use yellow or white onions. Avoid very small onions—too many petals means more breading and longer cook time.
2. How crispy will it be compared to deep‑fried?
Air fryer gives good crispness, especially on the edges, but it may not be *exactly* the same as deep‑fried. The edges and flour/cornstarch double‑coat help. Spraying oil well and flipping (or spraying halfway) improves the crisp. But expect slightly less oil saturation and maybe a little lighter crunch.
3. How do I know it’s done inside?
The outer petals should be golden brown and crisp. Interior petals should be tender when poked with a fork (not raw). If the middle is still firm/unpleasant, you can cook a few more minutes but watch it so breading doesn’t burn.
4. Can I make this gluten‑free?
Yes. Substitute all‑purpose flour with a gluten‑free blend or use rice flour, sorghum flour, or a gluten‑free mix. Use gluten‑free cornstarch or potato starch. Check all labels (especially sauces). The texture may differ, slightly less wheaty but still tasty.
5. What about dairy allergies / vegan version?
For dairy allergies: buttermilk soak can be omitted or use plant‑based substitute (almond milk + a little vinegar or lemon). For breading, ensure dairy‑free flour mix; the sauces may need substitution (use vegan mayo, etc.). For vegan version: use vegan mayo, plant egg substitute (if needed) or skip egg wash (use a milk substitute + arrowroot or flax/water mix) for binding.
6. How do I store leftovers / reheat?
Leftovers will lose some crispiness. To reheat, use air fryer or toaster oven: place at ~350°F (175°C) for a few minutes until crispy. Avoid microwave (makes soggy). Store in airtight container; separate sauce until just before serving.
7. Can I prep ahead?
Yes. You can cut and soak the onion ahead of time (refrigerate). Breading can be mixed in advance. Sauce can be made ahead. Then on cook day, do the breading and air fry fresh for best texture.
8. What oil works best? Do I need an oil spray?
High‑smoke point oils like avocado, canola, or grapeseed are best. Using a spray oil helps you apply a thin, even coat, which is critical for crispiness in the air fryer. You can brush if you don’t have a spray, but spraying tends to coat petals more evenly.
9. Temperature variations / air fryer models?
Air fryers vary. Some may run hotter or cooler. If yours seems to overbrown quickly, reduce temp by 10‑15°F or reduce cooking time slightly. If not browning enough, increase time or spray more oil. Watch the first time to adapt to your model.
10. How spicy is this, and can I adjust it?
Spiciness comes from the cayenne and optional hot sauce in dipping. To reduce heat, omit or reduce cayenne, skip hot sauce. To increase, add more cayenne or use chili powder, or serve with a spicy dipping sauce. The smoked paprika adds mild warmth, not heat.
—
Timing, Portions & Serving Suggestions
- Prep Time: ~ 15 minutes (includes cutting onion, prepping breading/sauce). If you soak onion, add ~1 hour soak time.
- Cook Time: ~ 15‑20 minutes in air fryer (depends on size of onion & model).
- Serves: 2‑4 people, depending on hunger/appetizer vs side servings.
- Best served with: crisp side salads, roasted vegetables, or a light protein to balance the richness. Also with extra dipping sauce portions and maybe some fresh lemon juice squeeze or chopped fresh herbs (parsley, chives) for brightness.
—
Potential Weaknesses & Workarounds
- Soggy interior petals: If onion inside isn’t cooked, adjust by cooking a little longer, but reduce browning speed. Preheat air fryer well; flatten root so onion sits stably; spray oil under and between petals to avoid dry interior.
- Breading falling off: Make sure onion petals are dry (after soak), press flour/cornstarch mix into petals well, double dredge (flour → egg → flour), work carefully. Also spray oil to help set the crust.
- Bitter or raw onion bite: Use sweet varieties; soak helps remove harshness; cook fully; maybe slightly sugar in soak or sauce helps balance.
—
Conclusion
The Air Fryer Blooming Onion is one of those dishes that feels like a treat — dramatic, crispy, flavourful — yet with many ways to make it healthier and more manageable. Whether you’re serving friends, feeding picky eaters, or just craving something crunchy and satisfying, this recipe gives the best of both worlds: indulgence minus the heaviness. With smart prep, good seasoning, and attention to heat & timing, you can nail it every time.
So the next time you want a fun appetizer or side that makes people smile, try this blooming onion in your air fryer. Pair it with a bright salad or lean protein, manage your sauce portions, and enjoy the crunch with less guilt!
—