How to Make Drip Irrigation with Plastic Bottles for 15 Days of Slow Drip 💧🌱
Efficient watering is one of the most important elements of successful gardening. For busy gardeners, travelers, or anyone facing a period when daily watering isn’t possible, a plastic bottle drip irrigation system can be a game-changer. This low-cost, eco-friendly solution provides plants with a steady, controlled supply of water for up to 15 days. 🕒
By recycling plastic bottles, you not only save money but also reduce waste — giving your garden a hydration boost while contributing to environmental sustainability. With the right setup, this method ensures your plants remain healthy, hydrated, and stress-free even in your absence.
Why Choose Plastic Bottle Drip Irrigation? 🌍
Expert Insight: Dr. Leila Nour, an irrigation specialist, notes: “Slow-drip systems deliver water directly to the root zone, minimizing evaporation and water waste. This technique is especially useful in hot climates or for potted plants prone to rapid drying.”
Benefits of Bottle Drip Irrigation
- ♻️ Eco-friendly – Repurposes used bottles, reducing plastic waste.
- 💰 Cost-effective – No need for expensive irrigation kits.
- 💧 Water-saving – Directly targets roots, reducing evaporation.
- 🌱 Healthier plants – Consistent hydration prevents stress.
- 🕒 Long-lasting – Works for up to 15 days without refilling.
Materials You’ll Need 🛠️
- 1 or 2-liter plastic bottles (depending on plant size)
- A sharp needle, pin, or small drill
- A lighter or candle (optional, for heating the needle)
- String or wire for securing the bottle (optional)
- Water
Step-by-Step Guide to Making a 15-Day Drip Irrigation System 📏
Step 1: Prepare the Bottle
Rinse the bottle thoroughly to remove any residue. Remove the label for better visibility of water levels.
Step 2: Create the Drip Hole
- Heat the needle over a flame for easier puncturing (optional).
- Poke 1–2 tiny holes in the bottle cap for a slow, controlled drip.
- Test the drip rate — the water should drop slowly, not pour out.
Step 3: Position the Bottle
- Fill the bottle with water.
- Cap it tightly.
- Bury the bottle neck-down into the soil near the plant roots, leaving the base above the surface.
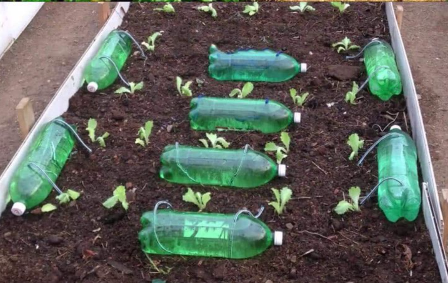
- Alternatively, position the bottle horizontally and poke holes along its length for multiple plants.
Step 4: Adjust for Longevity
To make the water last 15 days:
- Use larger bottles for bigger plants.
- Make smaller holes or fewer holes to slow the flow.
- Place bottles in shaded areas to reduce evaporation.
Pro Tips for Success 🌟
- For potted plants, use smaller bottles and fewer holes.
- Wrap bottles in foil to prevent algae growth.
- Add a pinch of Epsom salt for magnesium-rich water (beneficial for tomatoes and peppers).
Safety and Maintenance ⚠️
Expert Tip from Prof. Mark Benson: “Check the drip rate before leaving for an extended time. Too fast, and the bottle will empty early. Too slow, and plants may not get enough water.”
Clean bottles and caps after each use to prevent clogging. Replace if they become brittle from sun exposure.
Water Needs of Common Plants 🌿
| Plant Type | Daily Water Need | Bottle Size for 15 Days |
|---|---|---|
| Tomatoes | 1–1.5 liters | 20L total (multiple bottles) |
| Peppers | 0.8–1 liter | 15L total |
| Cucumbers | 1.2 liters | 18L total |
| Potted herbs | 0.3–0.5 liters | 5–8L total |
Frequently Asked Questions (FAQs) ❓
- Can I use this system for indoor plants? – Yes, just ensure bottles are stable and won’t tip over.
- How do I prevent mosquitoes from breeding in the bottles? – Keep caps on with only small holes.
- Will this work for large trees? – Not ideal; trees need deeper irrigation systems.
- What if my bottle empties too fast? – Use fewer or smaller holes.
- Can I add fertilizer to the bottle? – Yes, use water-soluble organic fertilizers for slow feeding.
- Will the system clog? – It can; clean the holes periodically.
- Can I bury the whole bottle? – Yes, but leave part above soil for refilling.
- How do I know if the drip rate is correct? – Test for 24 hours before leaving plants unattended.
- Does bottle color matter? – Dark bottles reduce algae growth.
- Is this safe for edible plants? – Yes, as long as bottles previously contained food-safe liquids.
With this DIY plastic bottle drip irrigation system, you can enjoy peace of mind knowing your plants will receive steady hydration for up to two weeks. Whether you’re going on vacation or simply want a low-maintenance garden, this eco-friendly hack is a must-try for every gardener. 🌱💧