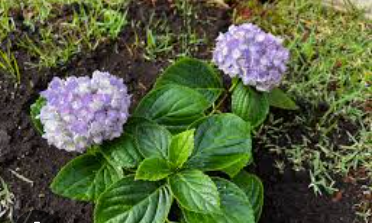
Growing Hydrangeas from Cuttings: A Step-by-Step Guide to Floral Success
There’s a special joy in watching a vibrant hydrangea bloom—especially when it started as a small cutting you propagated yourself. 💐 Whether you’re a gardening beginner or a seasoned grower, multiplying your hydrangeas at home is a cost-free, rewarding project. Here’s everything you need to know to get started!
🌿 Why Grow Hydrangeas from Cuttings?
Hydrangeas are beloved for their colorful, globe-like blooms and their ability to thrive in various climates. Propagating from cuttings is budget-friendly, sustainable, and a great way to gift living plants to friends or expand your own flower beds. According to Dr. Leila Nour, a plant biology specialist, “Hydrangeas root relatively quickly and respond well to propagation if the environment is moist and warm.”
🧪 Best Soil and Conditions for Hydrangea Rooting
| Soil Component | Benefit | Proportion |
|---|---|---|
| Potting Mix | Retains moisture and nutrients | 60% |
| Perlite | Improves drainage and aeration | 20% |
| Vermiculite | Helps retain moisture | 20% |
✂️ Step-by-Step Guide to Propagating Hydrangeas
1. Pick the Perfect Cutting
- Choose a healthy, non-flowering green stem about 5–6 inches long.
- Make sure it has at least two leaf pairs and no signs of disease or pests.
2. Prep for Success
- Cut the stem at a 45° angle just below a node using sterile scissors or pruners.
- Remove lower leaves, leaving only the top two.
- Dip the cut end in rooting hormone (optional but helpful).
3. Plant It Right
- Use a small pot filled with the soil mix above.
- Poke a hole in the center, insert the cutting, and gently firm the soil around it.
4. Create a Humid Haven
- Cover with a clear plastic bag or humidity dome.
- Keep the plastic off the leaves to prevent mold.
5. Nurture with Care
- Place in bright, indirect light—avoid harsh sun.
- Keep soil moist but never waterlogged.
- Ventilate occasionally to reduce condensation.
6. Watch for Signs of Growth
- After 2–4 weeks, gently tug the stem. Resistance means roots are forming.
- Visible new leaf growth also indicates rooting success.
7. Time to Transplant
- Once rooted, transplant into a larger pot or directly into your garden.
- Choose a spot with morning sun and afternoon shade.
- Water thoroughly after transplanting.
8. Be Patient—and Enjoy the Process
- Not every cutting will succeed, and that’s okay!
- Hydrangeas bloom best in the second season after rooting.
🌼 FAQs About Hydrangea Propagation
- What time of year is best for taking cuttings? Late spring to early summer.
- Do I need rooting hormone? It helps but isn’t required.
- Can I root cuttings in water? Possible, but soil tends to produce stronger roots.
- How long until I can plant outdoors? After 4–6 weeks when roots are well developed.
- How often should I water the cutting? Keep the soil consistently moist but not soggy.
- How do I prevent mold? Ensure air circulation and keep plastic from touching leaves.
- Can I use old stems? Fresh, green stems root better than woody ones.
- Will the new plant flower in its first year? Sometimes, but most bloom in their second year.
- Do cuttings need fertilizer? Not until they’re transplanted and established.
- Can I propagate in winter? Not recommended unless using indoor lights and heat.
🌸 Final Thoughts: Grow Beauty from a Simple Stem
Growing hydrangeas from cuttings is a fulfilling way to multiply your garden, share with friends, or just marvel at nature’s magic. With a little patience and the right steps, you can enjoy a thriving floral display—and it all starts with a single snip. Happy propagating! 🌿