Building a Hinged Hoophouse for Your Raised Bed Garden
Many gardeners reach a point where their raised beds are thriving—until the weather turns. Late spring frosts, heavy rains, intense summer sun, and early fall chills can quickly undo weeks of careful planning. If you’ve ever wished for a simple, flexible way to protect your crops without investing in a full greenhouse, you’re not alone.
A hinged hoophouse is one of the most practical, budget-friendly upgrades you can add to a raised bed. It extends your growing season, shields plants from unpredictable conditions, and gives you control over ventilation—all without permanent construction. In this comprehensive guide, you’ll learn how to design, build, and maintain a hinged hoophouse that works for your climate, budget, and garden goals.
🌿 What Is a Hinged Hoophouse and Why Build One?
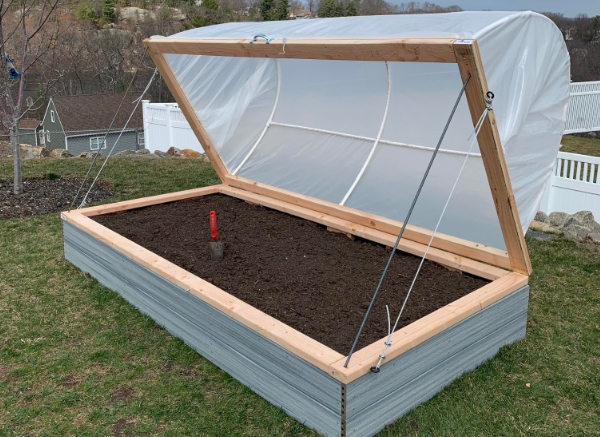
A hinged hoophouse is a lightweight, curved frame structure attached to one side of a raised bed with hinges. It allows you to lift the entire cover for easy access while still offering protection when closed.
- Protects plants from frost, wind, and heavy rain
- Extends spring and fall growing seasons
- Creates a mini greenhouse effect over your raised bed
Key takeaways:
- ✔️ Ideal for small- to mid-sized raised beds
- ✔️ More affordable than building a full greenhouse
- ✔️ Easy to ventilate thanks to hinged access
✨ Benefits of a Hinged Design vs. Fixed Hoops
Traditional hoop covers often require removing plastic or fabric entirely for access. Hinged designs eliminate that hassle.
- • Quick access for watering and harvesting
- • Better airflow control during warm days
- • Less wear on plastic coverings
🌿 Planning Your Hinged Hoophouse
Proper planning ensures durability, efficiency, and a good fit for your raised bed dimensions.
- Measure bed width, length, and height carefully
- Consider your USDA hardiness zone and seasonal temperature swings
- Choose covering material based on frost vs. insect protection needs
Key takeaways:
- ✔️ Accurate measurements prevent costly material waste
- ✔️ Climate determines plastic thickness or fabric choice
- ✔️ Strong hinges are essential for longevity
Dr. Leila Nour notes, “Season extension structures don’t need to be complicated. The most effective systems are those that balance airflow, light exposure, and structural stability.”
✨ Materials You’ll Need
Most hinged hoophouses can be built using affordable, easy-to-find materials at your local hardware store.
- • PVC pipes (½–¾ inch) or metal conduit for hoops
- • UV-resistant greenhouse plastic or frost cloth
- • Exterior-grade hinges and wood framing boards
Additional items may include pipe straps, screws, weather-resistant staples, and handles for lifting the frame.
🥄 Step-by-Step Routine
Follow these steps to build a functional and durable hinged hoophouse.
1. Measure and Mark
Measure the width of your raised bed and mark equal intervals (every 2–3 feet) for hoop placement.
2. Install Pipe Anchors
Secure short sections of pipe or rebar inside the bed frame to act as anchors for your PVC hoops.
3. Bend and Insert Hoops
Slide PVC pipes into anchors and bend them across the bed to form arches.
4. Build the Hinge Frame
Attach a wooden board along one long side of the raised bed. Secure the hoop structure to this board.
5. Install Hinges
Attach heavy-duty exterior hinges between the frame and the raised bed so the structure lifts easily.
6. Secure Covering Material
Stretch greenhouse plastic or frost fabric tightly over the hoops and fasten with staples or clamps.
🌿 Choosing the Right Covering Material
Your choice of covering directly impacts temperature control and plant health.
- Clear polyethylene traps maximum heat
- Frost cloth offers breathable protection
- Insect netting prevents pest damage
Key takeaways:
- ✔️ Plastic works best for cold-season extension
- ✔️ Fabric reduces overheating risk
- ✔️ Netting is ideal during peak pest season
✨ Common Mistakes to Avoid
Even simple structures can fail if basic design principles are ignored.
- • Skipping ventilation during sunny days
- • Using thin plastic that tears quickly
- • Overcrowding plants inside enclosed space
Prof. Mark Benson advises, “The biggest issue with small hoop systems is overheating. A hinged design solves this only if gardeners remember to use it.”
🌿 DIY vs. Store-Bought Hoophouse Kits
You can either build your own system or purchase a pre-made kit. Each option has pros and cons.
- DIY allows customization and lower cost
- Kits offer convenience and professional-grade materials
- DIY repairs are often simpler long-term
Key takeaways:
- ✔️ DIY suits hands-on gardeners
- ✔️ Kits reduce build time
- ✔️ Both can extend seasons effectively
🥄 Seasonal Use Strategy
Using your hinged hoophouse strategically maximizes its effectiveness.
1. Early Spring Warm-Up
Close structure at night to trap soil warmth.
2. Midday Ventilation
Lift cover during sunny afternoons to prevent overheating.
3. Summer Pest Shield
Swap plastic for insect netting.
4. Fall Protection
Reinstall greenhouse plastic to extend harvests.
5. Rainstorm Guard
Close structure during heavy storms to prevent soil erosion.
6. Winter Storage
Remove plastic and store to extend lifespan.
📊 Benefits & Use Table
Here’s a practical breakdown of what a hinged hoophouse provides in everyday gardening use:
| Benefit | Measurement/Quantity | Serving/Weight/Portion | Practical value |
|---|---|---|---|
| Season extension | 4–8 weeks | Per growing season | Earlier planting and later harvest |
| Frost protection | 5–10°F buffer | Per cold night | Reduced crop loss |
| Pest reduction | Up to 70% fewer insects | During peak season | Less manual pest control |
| Rain control | Full bed coverage | Per storm event | Prevents soil compaction |
❓ FAQs
Here are common questions gardeners ask before building a hinged hoophouse:
- How long does a hinged hoophouse last?
With quality materials, the frame can last 5–10 years. Plastic covering typically lasts 2–4 seasons. - Can I use it year-round?
Yes, but adjust covering material based on season and temperature. - Will it withstand strong winds?
Proper anchoring and strong hinges are essential for wind resistance. - Is it suitable for all vegetables?
Most cool-season crops thrive. Heat-sensitive crops require ventilation. - Does it replace a greenhouse?
It offers similar protection but at a smaller scale and lower cost. - How much does it cost?
DIY versions typically range from $50–$150 depending on materials. - Can beginners build one?
Yes, basic tools and simple carpentry skills are sufficient. - Does it increase watering needs?
Enclosed beds may require more monitoring for moisture balance. - Can I automate ventilation?
Automatic vent openers can be adapted for advanced setups. - Is it safe for organic gardening?
Yes, it complements organic practices by reducing pest pressure.
🌿 Premium Indoor Styling Transition
Beyond function, thoughtful garden structures reflect intentional living. A well-designed hinged hoophouse blends practicality with aesthetics, complementing modern outdoor spaces and elevating the visual rhythm of raised beds in curated landscapes.