The Plastic Bag Greenhouse Trick: How to Boost Indoor Plant Growth With This Simple Method
Keeping small plants alive and thriving indoors can be surprisingly tricky — especially when humidity levels drop or seedlings are just starting out. But there’s an easy, nearly free solution hiding in your kitchen: a simple plastic bag.
Yes, that humble, clear bread or produce bag can become a mini greenhouse for your herbs, seedlings, or tender houseplants. This guide will walk you step-by-step through the plastic bag trick — a method used by gardeners and growers to create a protective, humidity-rich environment that supports growth, reduces shock, and encourages healthy development.
🌿 What Is the Plastic Bag Trick?
The plastic bag trick mimics the greenhouse effect: it traps moisture and warmth around your plant, creating a controlled micro-environment. It’s perfect for:
- 🌱 Germinating seeds
- 🌿 Strengthening weak or newly transplanted seedlings
- ❄️ Protecting plants from cold or dry air indoors
- 💧 Increasing humidity for tropical or delicate plants
Plant Care Specialist Sarah Coleman says, “This method is one of the simplest ways to improve humidity for houseplants, especially in colder or dryer homes. It works great for herbs like mint or basil and costs nothing to try.”
🧰 What You’ll Need
Gather these basic items — all commonly found at home:
- 🛍️ A transparent plastic bag (from bread, produce, or packaging)
- 🌱 A small potted plant (like mint or basil)
- 🍽️ A plate or shallow tray
- 💦 A small amount of water
- ✂️ Optional: toothpick or fork (to make holes)
- 🧵 A twist tie or string
🪴 Step-by-Step Guide: Using the Plastic Bag Trick for Healthier Plants
Step 1: Prepare the Plant
Make sure your plant is properly potted in soil. Remove any dying or damaged leaves, and lightly brush away old debris on the soil surface.
Step 2: Add Water — But Not Too Much
Lightly moisten the soil with a small splash of water. The soil should be damp but never soggy. Avoid overwatering — too much moisture increases the risk of mold.
Step 3: Set the Pot on a Plate
Place your plant pot on a plate or shallow dish. If the plate has some extra water in it, that’s fine — it will help slowly boost humidity.
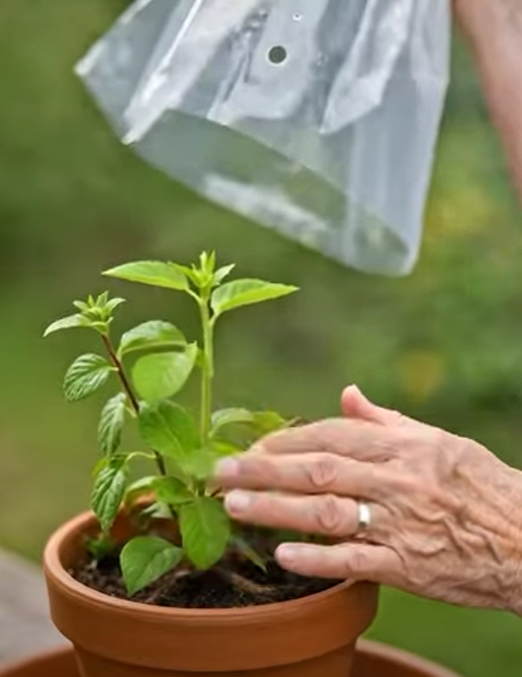
Step 4: Cover With the Plastic Bag
Carefully slide a clear plastic bag over the plant and pot, creating a dome. The bag should not press against the plant’s leaves — use small sticks or skewers to hold it up if needed.
Step 5: Seal the Bag at the Top
Gently close the top of the bag with a twist tie, rubber band, or string. Make sure it’s not completely airtight — the plant still needs some airflow.
Step 6: Add Small Holes
Use a fork, toothpick, or scissors to poke a few small holes in the bag. This prevents mold buildup and allows fresh air to circulate gently.
Step 7: Choose the Right Spot
Place the covered plant near a window where it can receive bright, indirect light. Avoid direct sunlight — this could overheat the mini greenhouse and damage the plant.
Step 8: Daily Monitoring
Open the bag each day for 10–15 minutes. This helps release excess moisture, check for mold, and allows fresh air in. If the soil begins to dry out, add a small amount of water.
📊 Plant Care Table: The Plastic Bag Trick
| Step | Action | Purpose | Best Practice |
|---|---|---|---|
| 1 | Prepare the plant | Removes weak leaves and debris | Use clean soil and healthy stems |
| 2 | Add light water | Maintains moisture | Moist, not soggy soil |
| 3 | Place on plate | Improves humidity from below | Optional extra water on plate |
| 4 | Cover with plastic bag | Creates mini greenhouse | Don’t let bag touch leaves |
| 5 | Seal and poke holes | Prevents mold, ensures airflow | Small holes, not fully sealed |
| 6 | Bright location | Supports photosynthesis | No direct sunlight |
| 7 | Open daily | Monitors plant health | Ventilate for 10–15 min/day |
⚖️ Plastic Bag Trick vs Other Indoor Humidity Solutions
💧 Plastic Bag Greenhouse
✅ Easy, zero-cost, high humidity effect. Portable and effective for single plants or seedlings.
🌫️ Humidifier
✅ Great for multiple plants, but costly and requires electricity. Less targeted than the bag method.
💦 Pebble Tray
✅ Supports gradual humidity but doesn’t offer full coverage like the bag trick.
🚿 Bathroom Placement
✅ High humidity environment, but not ideal for plants needing light or air movement.
✅ Benefits of the Plastic Bag Method
- 🧼 Cleaner, more stable environment for tender plants
- 💧 Maintains consistent humidity with minimal effort
- 🌡️ Protects from dry indoor air and cold drafts
- 💲 Zero-cost solution using everyday household materials
- 🌱 Speeds up seedling recovery and germination
- ♻️ Eco-friendly and reusable method
🚫 Common Mistakes to Avoid
- ❌ Using the bag with plants that dislike humidity (e.g., succulents, cacti)
- ❌ Leaving the bag sealed all day — causes mold or root rot
- ❌ Putting the setup in direct sun — overheats and burns plants
- ❌ Overwatering the soil inside the bag
- ❌ Not opening for daily air exchange
❓ Top 10 FAQs About the Plastic Bag Trick
- What plants work best with this method?
Mint, basil, parsley, baby tomatoes, lettuce, and indoor herbs or tropicals needing humidity. - How long can I keep the plant inside the bag?
Up to 1–2 weeks for recovery or germination. After that, slowly remove the bag over a few days. - Do I need to water the plant daily?
No. The bag retains moisture. Only water when soil starts drying out. - Will this make the plant grow faster?
It can help seedlings and transplants recover faster by reducing stress. - What if the bag touches the leaves?
It can lead to rot. Use sticks or skewers to prop the bag away from the plant. - Can I use this trick for seeds?
Yes — it’s perfect for seed germination, especially indoors during cool months. - What happens if mold appears?
Remove the bag immediately. Improve airflow and reduce moisture levels. - Can I do this with cuttings or propagations?
Yes — it boosts humidity, which helps roots develop. - Can I use a ziplock bag instead?
Yes, for small cuttings or seeds. Just don’t seal it completely. - Where can I find more eco-gardening tips?
Check out these indoor garden projects for more ideas!
🌼 Final Thoughts: A Tiny Greenhouse With Big Benefits
For a method that costs nothing and takes only minutes to set up, the plastic bag trick delivers surprising benefits. Whether you’re growing herbs in the kitchen or recovering a struggling plant, this easy DIY creates a gentle, supportive environment where plants can thrive.
So the next time you finish a loaf of bread or unpack your groceries, don’t toss that clear bag — reuse it to help your plants grow stronger, healthier, and happier.
✨ Try it today, and share this tip with a fellow plant lover!