How to Multiply Spider Plants in Water: The Easiest Step-by-Step Guide for Beginners 🌿
Ever looked at your lush spider plant and thought, “I wish I had more of these”? Whether you’re decorating a cozy apartment or gifting a friend something green and meaningful, propagating spider plants in water is the easiest—and most rewarding—way to multiply your indoor garden.
In this guide, we’ll walk you through everything you need to know about growing spiderettes in water—from choosing the right baby plant to transplanting it into soil. You’ll also learn expert-backed care tips, common pitfalls, and how to avoid costly mistakes that could ruin your chances of success.
🌱 Why Choose Water Propagation for Spider Plants?
Spider plants (Chlorophytum comosum) are ideal for beginner propagation thanks to their unique growth habit. They naturally produce offshoots—called spiderettes or “babies”—that can easily be rooted in water. It’s clean, simple, and doesn’t require any fancy tools.
✨ Benefits of Multiplying Spider Plants in Water
- ✔️ Low cost – No need for special pots or mediums
- 👁️ Visual rooting – Monitor growth progress clearly
- 🌿 Beginner-friendly – Easy to manage and fun to observe
- 🧼 Mess-free – No soil involved during early stages
🪴 Step-by-Step Guide: Multiply Spider Plants in Water
Step 1: Select Healthy Spiderettes
Look for spiderettes that are at least 2–3 inches long, with visible root nubs or bumps. These are the easiest to root successfully. Avoid pale or wilted ones.
Step 2: Snip with Care
Use clean, sharp scissors or pruning shears to cut the spiderette from the mother plant, just below the base. A clean cut reduces stress and risk of disease.
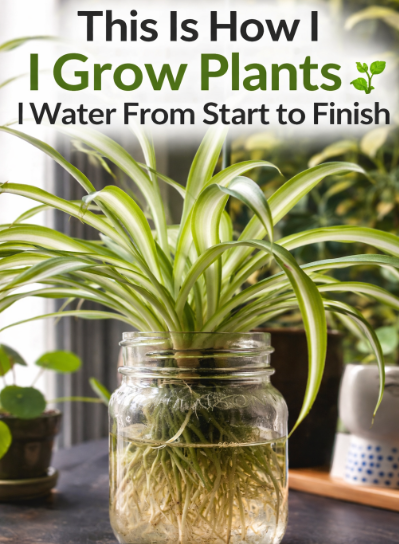
Step 3: Position in Water
Place the baby plant in a clear jar or glass filled with room-temperature water. Ensure only the base is submerged—keep leaves out of the water to prevent rot.
Step 4: Provide Light and Fresh Water
Set the glass near a bright window, but avoid direct sun. Change the water every 2–3 days. Roots will usually appear within two to three weeks.
Step 5: Transfer to Soil
Once the roots are 1.5 to 2 inches long, it’s time to plant. Use a small pot filled with well-draining potting mix. Water gently and return it to bright, indirect light.
🌞 Spider Plant Aftercare Guide
Lighting Conditions
Spider plants thrive in bright, indirect light but can tolerate lower-light areas. Avoid direct sun, which can scorch the leaves.
Watering Routine
Let the top inch of soil dry before watering. Overwatering is the top cause of root rot, so make sure your pot drains well.
Pruning and Maintenance
Trim off any brown or yellowing leaves. You can also cut back long runners to control the shape or encourage more spiderettes.
Fertilizing Schedule
Feed monthly during spring and summer with a balanced liquid houseplant fertilizer (like a 20-20-20 mix). Hold off during winter dormancy.
📊 Nutritional & Functional Benefits of Spider Plants
| Feature | Benefit | Measurement | Practical Value |
|---|---|---|---|
| Air Purifying | Removes formaldehyde and xylene | 1 mature plant / 100 sq ft | Improves indoor air quality |
| Low Maintenance | Requires little water and indirect light | Weekly watering | Ideal for busy lifestyles |
| Propagation | Produces multiple offshoots | Several spiderettes per mother plant | Expand your plant collection for free |
| Non-Toxic | Safe for pets and children | N/A | Family- and pet-friendly |
🧪 DIY vs Store-Bought Spider Plants: Which Is Better?
Here’s a comparison to help you decide whether to propagate your own or buy from a store:
Cost
DIY: Free if you already own a spider plant
Store-Bought: Typically $5–$25 depending on size and variety
Adaptability
DIY: Already adapted to your home environment
Store-Bought: May experience shock or adjustment period
Satisfaction
DIY: High satisfaction from growing it yourself
Store-Bought: Convenient but less rewarding
🚫 Common Mistakes to Avoid
- 💧 Overwatering: Let soil dry slightly between waterings to avoid rot.
- ☀️ Too Much Sun: Direct sunlight can burn the leaves—opt for filtered light.
- 🧴 Dirty Containers: Always use clean jars to prevent bacteria and algae buildup.
- 🐛 Ignoring Pests: Check regularly for spider mites, aphids, or whiteflies.
❓ 10 Spider Plant Propagation FAQs
- How much does it cost to propagate spider plants?
It’s essentially free if you already have a spider plant. You’ll only need a jar, water, and potting soil. - Is it safe to grow spider plants indoors?
Yes! They are non-toxic and safe around pets and children. - How long does it take spiderettes to root in water?
Typically 2–3 weeks under bright, indirect light with fresh water changes every few days. - Can I keep a spider plant in water permanently?
Not recommended. Long-term water-only growth limits nutrients and weakens the plant. - What kind of soil is best for spiderettes?
Use well-draining houseplant soil mixed with perlite or sand. - How often should I water a newly potted spider plant?
Once a week or when the top inch of soil is dry. Adjust for humidity and temperature. - Do spider plants need fertilizer?
Yes, feed once a month during spring and summer with a balanced 20-20-20 fertilizer. - What pests should I watch for?
Spider mites, aphids, whiteflies, and mealybugs. Use a damp cloth or mild soapy spray to treat them. - Why are my spider plant’s leaf tips turning brown?
Common causes include fluoride in tap water, over-fertilizing, or low humidity. Try switching to distilled water. - Can I root spiderettes without cutting them?
Yes! Let them root while still attached to the mother plant by placing the spiderette in a nearby pot of soil.
🌟 Final Thoughts: Multiply the Green Joy in Your Home
Propagating spider plants in water is one of the most beginner-friendly, budget-conscious ways to grow your indoor jungle. With just a few basic steps and a little care, you can turn one plant into many—perfect for gifts, home decor, or just more greenery to love.
Want more fun, easy propagation projects? Explore Gentplu’s indoor gardening guides and recipes for more ideas on growing your plant family.