Introduction: Why These Bars Belong on Your Dessert Table
There’s something deeply satisfying about a dessert that captures all the best parts of a pie — rich cherry filling, buttery crust, sweet glaze — but in a convenient bar form. With these Cherry Pie Bars, you get that nostalgic cherry‑pie experience in squares that are easy to slice, serve and share. Whether you’re baking for a family gathering, holiday dessert, or just craving something sweet and cherry‑forward, these bars are a winner. 😊
In this article we’ll take your provided ingredients and instructions, expand them with chef‑style insights, cover health & safety considerations, present a nutrition & health benefits table, provide internal links for further reading, and answer ten frequently asked questions that bakers often have about this type of dessert. Let’s get baking! 🍒
Hook: One Bite, and You’re Hooked on Cherry Bliss
Imagine pulling a warm pan from the oven: the edge squares golden and slightly crisp, the cherry filling bubbling just beneath the surface, that fragrant almond‑vanilla glaze already beckoning. You cut a square, lift it onto your plate, and that first bite brings tender crust, sweet‑tart cherry, and a hint of almond — it’s comfort meets elegance. That’s the magic this dessert brings. ✨
—
Ingredients & Preparation Overview
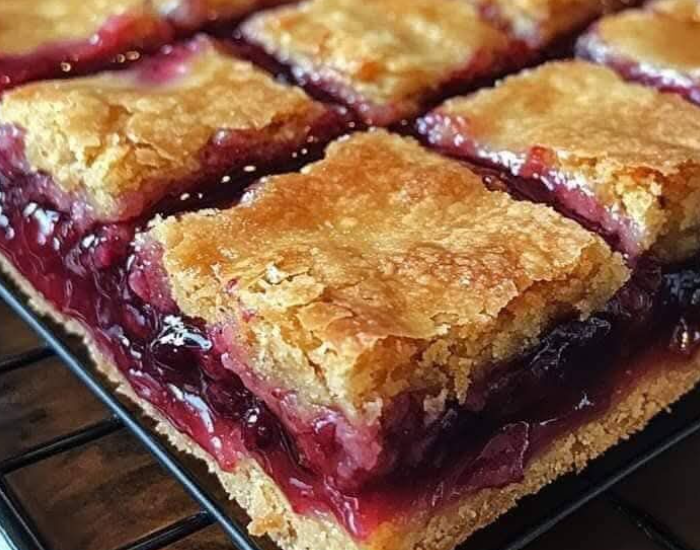
Ingredients
- Crust Ingredients: Butter, softened – 1 cup; Sugar – 2 cups; Eggs – 4; Vanilla extract – 1 tsp; Almond extract – ¼ tsp; All‑purpose flour – 3 cups; Salt – 1 tsp.
- Filling Ingredients: Cherry pie filling – 2 cans (21 oz each).
- Glaze Ingredients: Powdered sugar – 1 cup; Vanilla extract – ½ tsp; Almond extract – ½ tsp; Milk – 2 Tbsp.
How to Make Cherry Pie Bars
- Preheat & Prep: Preheat your oven to 350 °F (175 °C). Grease and flour (or spray with non‑stick spray) a 15×10×1‑inch baking pan.
- Cream Butter & Sugar: In a large bowl, cream together the softened butter and sugar until light and fluffy.
- Add Eggs & Extracts: Beat in the eggs one at a time, mixing well after each addition. Stir in the vanilla and almond extracts.
- Combine Dry Ingredients: In a separate bowl, whisk together the flour and salt. Gradually add the dry ingredients to the creamed butter mixture, mixing until just combined.
- Assemble Bars: Spread 3 cups of the batter evenly into the prepared pan. Spread the cherry pie filling evenly over the crust. Drop spoonfuls of the remaining batter over the cherry filling.
- Bake: Bake for 30–35 minutes, or until a toothpick inserted into the centre comes out clean. Note: If using a 9×13‑inch pan (smaller depth), baking time may be longer.
- Cool: Allow the bars to cool completely on a wire rack.
- Prepare Glaze: In a small bowl, whisk together the powdered sugar, vanilla extract, almond extract, and milk until smooth.
- Drizzle & Serve: Once cooled, drizzle the glaze evenly over the top. Let the glaze set, then cut into squares and serve.
—
Chef’s Tips from the Kitchen
Here are some professional insights and practical advice to make your Cherry Pie Bars turn out beautifully.
- Using almond extract amplifies cherry flavour: Many cherry‑bar recipes note that almond extract complements cherry filling exceptionally well and enhances the cherry aroma. :contentReference[oaicite:0]{index=0}
- Use a slightly larger pan for the depth called for: The original recipe uses a 15×10×1 pan; using a deeper or smaller pan may alter bake time and thickness. One recipe notes baking time may vary when pan size changes. :contentReference[oaicite:1]{index=1}
- Cool completely before glazing or cutting: The cherry filling continues to set and firm up as it cools. Cutting too early can lead to messy slices. :contentReference[oaicite:2]{index=2}
- Don’t over‑mix the crust batter: Over‑mixing can lead to a dense texture rather than light and tender bars. As one blogger advises, keep the dough just combined. :contentReference[oaicite:3]{index=3}
- Use a metal baking pan if possible: Some bar‑recipes recommend a metal pan (vs. glass) to ensure even baking and firm edges. :contentReference[oaicite:4]{index=4}
—
Health & Safety Considerations 🧂
While this is a dessert and meant to feel indulgent, it’s still smart to keep health and kitchen safety in mind.
- Allergens & dietary notes: Contains eggs, dairy (butter), and gluten (flour). For guests with allergies or dietary restrictions, use alternatives: egg substitute, dairy‑free butter, gluten‑free flour blend.
- Kitchen safety: When creaming butter and sugar, ensure butter is softened, not melted (to avoid greasy texture). Use proper oven mitts when removing the pan—bars get hot and cherry filling is molten underneath.
- Portion control: These bars are rich: sugary crust + cherry filling + glaze. Serve modest portions and pair with fresh fruit or light sides for balance.
- Storage & leftovers: Cool completely, then cover airtight. Many sources say the bars can be stored at room temperature briefly, or refrigerated for longer freshness. :contentReference[oaicite:5]{index=5}
- Freezing option: Some versions note these bars freeze well. Prepare, cool, wrap tightly, freeze. Thaw in fridge before serving. :contentReference[oaicite:6]{index=6}
—
Nutrition & Health Benefits Table
Here’s an approximate nutrition breakdown **per bar** (assuming ~12–16 bars from the full recipe) and some health/benefit notes. These are estimates — actual values will vary based on brands, portion size, glaze usage, etc.
| Component | Approx Amount | Health/Benefit Note |
|---|---|---|
| Energy (Calories) | ~ 300‑350 kcal | A satisfying dessert portion — treat mindful portion size. |
| Carbohydrates | ~ 40‑45 g | Primarily from flour, sugar, and cherry filling — yields quick energy. |
| Dietary Fibre | ~ 1‑2 g | Relatively low fibre — you could pair with fresh berries to boost fibre intake. |
| Sugar (total) | ~ 22‑28 g | High sugar load typical of a dessert — good to enjoy as part of a balanced meal. |
| Fat (total) | ~ 12‑15 g | From butter and eggs — provides flavour and texture. |
| Saturated Fat | ~ 7‑9 g | Moderate for a dessert; if desired, reduce butter slightly or use lighter butter alternative. |
| Protein | ~ 3‑4 g | Small protein component (from eggs) but not a significant source. |
| Sodium | ~ 120‑150 mg | Depends on salt used and filling brand — you can choose lower‑sodium filling brand. |
Note: These values assume standard ingredients and medium‑sized bars. If you apply substitutions (gluten‑free flour, reduced sugar, lighter butter), values will differ accordingly.
—
Why These Bars Work — And When to Serve Them
These cherry pie bars succeed because they combine multiple appealing elements:
- Convenience plus flavour: You get the cherry pie flavour in bar format — no pie crust rolling or whole pie fuss.
- Texture contrast: The buttery crust, chunky cherry filling, and drizzle of glaze provide multiple layers of taste and texture.
- Visual appeal: The vibrant cherry filling peeking through the crust and glaze makes these bars eye‑catching for dessert tables. :contentReference[oaicite:7]{index=7}
- Easy to slice and serve: Because the bars are fully cooled and glazed, slicing is cleaner than a soft‑crust pie. Cooling fully is key. :contentReference[oaicite:8]{index=8}
When to serve: These bars are perfect for holiday dessert spreads (Fourth of July, Christmas, family gatherings), potlucks, bake sales, or anytime you want a dessert with cherry charm and less fuss than pie. Pair with vanilla ice‑cream or whipped cream, or coffee/tea for a nice complement. 🍨
—
Internal Links for Further Reading
If you’d like to explore more dessert‑bar recipes, pie‑bar twists or seasonal sweet treats, check out: Pie Bar & Dessert Bar Recipes and Fruit‑Bar Desserts & Sweet Treats on our site. These will help you expand your dessert repertoire with similar crowd‑pleasers.
—
Frequently Asked Questions (FAQs)
- Can I use a single 9×13‑inch pan instead of 15×10×1‑inch?
Yes — many bakers adjust to a standard 9×13‑inch pan. However you may need to bake a little longer or check for doneness carefully. Some reviewers say if you use a smaller pan the bars will be thicker and may require extra time. :contentReference[oaicite:9]{index=9} - What if I only have one can of cherry pie filling instead of two?
You can reduce the filling amount or spread the single can more thinly. The crust will dominate more, so the texture will vary slightly. One source indicates versions with one can still work but flavour may be less cherry‑intense. :contentReference[oaicite:10]{index=10} - Can I use a different pie filling flavour instead of cherry?
Absolutely — many bakers adapt this recipe to apple, blueberry, peach or other pie fillings. The same crust and glaze technique work beautifully with different fruit fillings. :contentReference[oaicite:11]{index=11} - Can I omit the glaze?
Yes — the glaze is optional and adds sweetness and presentation. If you prefer a less sweet topping or less drizzle, you can skip or reduce the glaze. Many reviewers have done so. :contentReference[oaicite:12]{index=12} - Should I refrigerate these bars once cooled?
They can be stored at room temperature for short term (1–2 days) if your environment is cool and dry. If you’ll keep them longer, refrigerate to maintain quality. Freezing is also possible. :contentReference[oaicite:13]{index=13} - How do I get cleaner slices?
Ensure bars are fully cooled and the cherry filling has set. Some recommend chilling the pan (or placing it in freezer for 10–15 minutes) before slicing with a sharp knife. :contentReference[oaicite:14]{index=14} - My crust came out too dense/hard — what happened?
Possibly due to over‑mixing the batter, using melted butter instead of softened (affecting texture), or pressing too hard. Some recipes emphasise maintaining a crumbly texture. :contentReference[oaicite:15]{index=15} - How far ahead can I make these bars?
You can bake them ahead of time and store, then glaze shortly before serving. Many bakers report making them the day before and storing in airtight container. :contentReference[oaicite:16]{index=16} - Can I freeze them, and how?
Yes — after baking and cooling, wrap tightly (individual squares or whole pan) and freeze. Thaw in refrigerator then bring to room temperature before serving. Bar‑recipes note this works well. :contentReference[oaicite:17]{index=17} - Any tips for upgrading the flavour?
You can add a bit of lemon zest to the crust or filling for brightness, stir in chopped nuts to the drizzle or topping, or use a mix of vanilla and almond extracts (as your recipe does) to deepen the flavour. Many cherry‑bar recipes highlight the almond‑cherry combo. :contentReference[oaicite:18]{index=18}
—
Final Thoughts
Cherry Pie Bars are a dessert that brings together nostalgia, flavour and simplicity. With a buttery crust, luscious cherry filling and sweet glaze, they offer the best bits of cherry pie with less fuss and easier serving. Whether you’re baking for a special event or simply because you want something sweet, these bars make a delicious statement.
Taking your time with the bake, allowing full cooling, and using quality extracts and cherries will pay off in every bite. Serve with fresh berries, vanilla ice cream or a dollop of whipped cream for extra‑delight. 😊
Happy baking — and enjoy every cherry‑filled, glazed‑topped square of your creation! 🥂