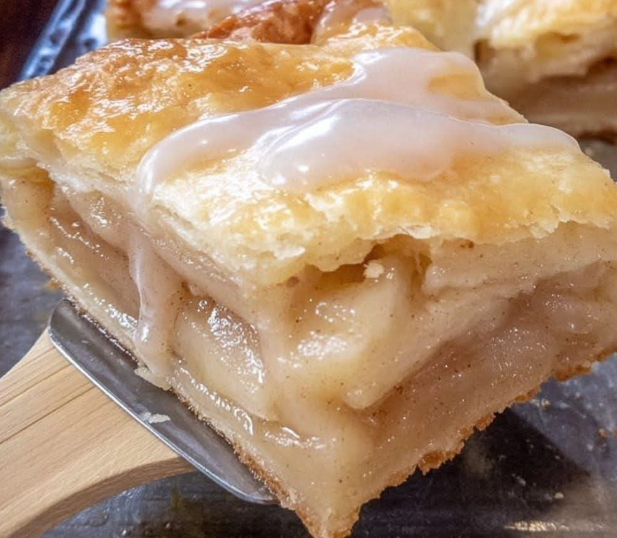
Chicago‑Style Bakery Apple Slices You Can’t Miss 😋
Classic, comforting, and full of flavor—these apple slices are everything you want in a bakery dessert. With a flaky crust, sweet‑spiced apples, and a soft vanilla glaze, this treat will have everyone reaching for seconds.
Introduction
When you think of Midwestern bakeries—especially those in Chicago—desserts are big, warm, and made with love. Apple slices (sometimes called “apple slab,” “apple slab pie,” or “bakery apple squares”) are a community favorite: easy to share, satisfying, and perfect any time of year. This recipe brings together buttery crusts, tender apples, cozy spices, and just the right glaze.
Ingredients
For the Crust
- All‑purpose flour — 3 cups
- Granulated sugar — 1 tablespoon
- Salt — 1 teaspoon
- Unsalted butter, cold and cubed — 1 cup
- Large eggs — 2
- Cold water — 5‑6 tablespoons
For the Apple Filling
- Apples, peeled, cored, and thinly sliced — 8 cups (≈ 6‑8 apples)
- Granulated sugar — ¾ cup
- Light brown sugar, packed — ¼ cup
- All‑purpose flour — 2 tablespoons
- Ground cinnamon — 1 teaspoon
- Ground nutmeg — ¼ teaspoon
- Lemon juice — 1 tablespoon
- Unsalted butter, melted — 1 tablespoon
For the Glaze
- Powdered sugar — 1 cup
- Milk — 2‑3 tablespoons
- Vanilla extract — ½ teaspoon
Equipment & Prep Notes
- 9×13‑inch baking pan, greased
- Pastry cutter or food processor for crust
- Plastic wrap to chill dough
- Rolling pin and lightly floured surface
How To Make Chicago‑Style Bakery Apple Slices
1. Prepare the Crust
In a large bowl, whisk together flour, sugar, and salt. Add cold cubed butter, cutting it in (using a pastry cutter or your fingers) until the mixture looks like coarse crumbs. In a separate bowl, beat eggs and mix with 5 tablespoons cold water. Gradually add this egg‑mixture to the flour + butter, stirring until dough starts to form. If needed, add the 6th tablespoon of water (do this 1 teaspoon at a time). Divide dough into two equal portions. Wrap each in plastic wrap and refrigerate for at least 30 minutes.
2. Preheat Oven & Prep Pan
Preheat your oven to 375°F (190°C). Grease a 9×13‑inch baking pan and set aside.
3. Prepare the Apple Filling
In a large bowl, toss the thinly sliced apples with granulated sugar, brown sugar, flour, cinnamon, nutmeg, and lemon juice. Make sure apples are evenly coated.
4. Assemble the Slices
Roll out one portion of dough on a lightly floured surface into a rectangle large enough to line the bottom and sides of the prepared pan. Press into the bottom and up the sides. Pour the apple mixture into the crust and spread evenly. Drizzle with melted butter. Roll the second portion of dough and carefully place it over the apples. Press the edges to seal. Cut several slits in the top crust to allow steam to escape.
5. Bake
Bake for 40‑45 minutes, or until crust is **golden brown** and apples are tender when pierced with a fork. If the crust edges brown too quickly, cover them loosely with aluminum foil.
6. Make the Glaze
While the apple slices cool slightly, whisk together powdered sugar, milk, and vanilla until smooth. If glaze is too thick, add more milk (1 teaspoon at a time) to reach desired consistency.
7. Glaze & Serve
Once the apple slices have cooled a bit (but are still warm), drizzle the glaze all over the top. Let the glaze set (about 10 minutes), then cut into squares. Serve warm or at room temperature. Best within 1‑2 days.
Tips for the Best Results
- Use a mix of apples: A combination of tart (e.g. Granny Smith) and sweet apples (e.g. Honeycrisp, Fuji) gives great flavor depth.
- Keep butter & dough cold: Cold butter means better flaky crust. Chill dough well before baking.
- Prevent soggy bottom: Optionally blind‑bake the bottom crust for ~10 minutes before adding apple filling.
- Watch oven position: Bake in the middle rack for even browning. If top browns too fast, tent with foil.
- Slice while warm or cooled: If you cut while too hot, the filling might be a little loose; waiting helps cleaner squares.
Nutrition & Health Benefits
| Component | Per Serving* (1 square, ~1/12 of recipe) | Health Benefit |
|---|---|---|
| Calories | ≈ 350‑400 kcal | Provides energy; pairing with protein (like yogurt or ricotta) balances meal. |
| Protein | ≈ 4‑5 g | Contributes to satiety; though not high, every bit helps. |
| Carbohydrates (sugars & starches) | ≈ 55‑60 g | Natural sugars from apples + added sugars; apples also bring fiber. |
| Dietary Fiber | ≈ 3‑4 g | Aids digestion, slows sugar absorption; apples are a good source. |
| Fat (mostly from butter) | ≈ 15‑18 g | Unsaturated components help absorb fat‑soluble vitamins; moderation is key. |
| Sodium | ≈ 200‑250 mg | Salt improves flavor; if watching sodium, you can reduce a bit. |
*Amounts are estimates and vary depending on exact brand/size of apples, thickness of slices, etc.
Authentic Chef Tips from the Experts 👩🍳
Chef Gordon Ramsay says: “Don’t rush cooling—warm apple juices are tempting, but letting them settle helps your slices hold shape rather than run together.”
Chef Ina Garten adds: “I love brushing a little melted butter over the top crust before baking; it encourages golden browning.”
Chef Bobby Flay suggests: “Play with apples—try adding a layer of thinly sliced pears or using a sprinkle of cardamom with your nutmeg for a twist.”
Safety & Health Considerations
- Ensure apples are thoroughly washed before peeling/coring to remove residues.
- Keep all dairy (butter, milk) refrigerated until just before use to avoid spoilage.
- Bake until internal juices bubble to avoid undercooked apple centers.
- If you or loved ones are sensitive to sugar, reduce the added sugar and add a sugar substitute or more spices.
FAQs
- Can I make this gluten‑free?
Yes—swap the all‑purpose flour for a gluten‑free blend and use gluten‑free verified oats or almond flour where needed. Texture may shift slightly. - What apples work best?
Use a combination of tart (like Granny Smith) and sweet (Honeycrisp, Fuji, Gala) to balance sweetness and texture. - Can I prepare ahead of time?
Yes—assemble up to just before baking, cover, and refrigerate overnight. Bake fresh the next day. - How do I prevent soggy crust bottom?
Blind‑bake bottom crust 10 minutes before adding filling; also drain excessive apple juices or toss apples with flour well. - Can I freeze this?
Yes—once cooled, wrap tightly and freeze. Thaw overnight in fridge; rewarm in oven before serving. - How do I store leftovers?
Cover tightly; keep at room temperature for 1‑2 days or refrigerate up to 4 days. - Can I reduce sugar?
Yes—use less granulated or brown sugar (e.g. ½ cup total), or swap to coconut sugar or sweetener. The apples and spices will still shine. - What if my crust burns the edges before center is done?
Tent edges with foil after 20‑25 minutes, or use a pan with higher sides so edges brown slower. - Can I make mini or individual servings?
Sure—use muffin tins or small square pans; adjust bake time down (≈ 25‑30 minutes) depending on size. - Why is my glaze not setting?
Likely too much milk—add a little powdered sugar to stiffen or reduce milk. Let glaze set in a cool place (not warm oven) for best results.
Related Recipes & Resources
Looking for similar treats? Try these:
- Apricot Almond Tart – a lighter fruit‑and‑nut tart with glazed topping.
- Classic Vanilla Cream Pie – if you love creamy fillings.
- Cinnamon Swirl Coffee Cake – with warm spices and sugar swirl like apple spice.
Conclusion
If you love bakery‑style desserts with flaky crusts, warm fruit fillings, and sweet glaze, these Chicago‑Style Bakery Apple Slices are made for you. They bring together contrasting textures and flavors in every bite—sweet, tart, crisp, soft, buttery. Whether for dessert, coffee time, or a potluck, they’re guaranteed to impress. Give them a try and bake with love, patience, and a touch of flair. 🍏