🌱 No Need Watering: Recycle Plastic Bottles to Grow Vegetables Effectively at Home 🥕
Have you ever wished you could grow fresh vegetables at home without the constant worry of watering them daily? Imagine a garden that takes care of itself, saving both time and water, while also making use of materials you already throw away. Sounds too good to be true? With a simple DIY self‑watering system made from recycled plastic bottles, you can do just that!
This guide will walk you through an easy, sustainable method to transform plastic waste into productive vegetable planters that water themselves — perfect for beginners, busy gardeners, or anyone looking to grow fresh produce at home with minimal effort.
🌍 Why Use a Self‑Watering System Made from Recycled Plastic Bottles?
Recycling plastic bottles into planters does more than help your garden; it also:
- Reduces plastic waste going to landfills
- Conserves water with efficient irrigation
- Provides a stable environment for healthy plant growth
- Is low‑cost and easy to make with household items
Whether you live in an apartment, have a small balcony, or a backyard space, these self‑watering planters give you the freedom to grow without daily watering chores.
🧠 Expert Insights on Self‑Watering Planters
Dr. Leila Nour, an urban agriculture specialist, explains that self‑watering systems “help maintain consistent soil moisture levels, which is critical for seed germination and strong root development.” Consistent moisture means vegetables grow faster and healthier, and fewer plants succumb to stress from under‑ or over‑watering.
Home gardening expert Prof. Mark Benson adds that “recycling materials like plastic bottles not only supports sustainable practices, but it also makes gardening more accessible to everyone.”
📋 What You’ll Need
- Plastic bottles (1–2 liters recommended)
- Sharp scissors or utility knife
- String or cotton wicks
- Potting soil
- Your favorite vegetable seeds or seedlings
- Optional: stakes or stakes for support
🌿 How This Self‑Watering System Works
The idea is simple: a reservoir of water is held in the lower part of the bottle, and through a wick or capillary action, water gradually travels up into the soil where your plants can use it as needed. This mimics how nature waters plants from the ground up, leading to healthier root systems and less water waste.
📊 Benefits of Self‑Watering Bottle Planters
| Benefit | How It Helps | Practical Outcome |
|---|---|---|
| Water Conservation | Delivers only what plants need | Reduced water use and fewer watering cycles |
| Consistent Moisture | Prevents dry soil stress | Stronger, healthier plants |
| Waste Reduction | Reuses plastic bottles | Less plastic in landfills |
| Convenience | Less frequent watering | Great for busy gardeners or travel |
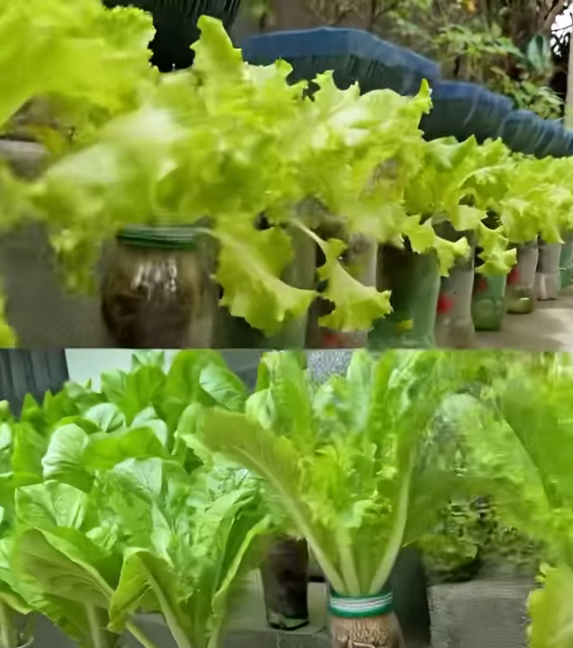
🔧 Step‑by‑Step: Make Your Self‑Watering Bottle Planter
1. Prepare the Bottle
Start with a clean, empty plastic bottle. Remove any labels and rinse it out thoroughly.
- Using scissors or a utility knife, cut the bottle about one‑third from the top.
- Turn the top half upside down — like a funnel — and place it into the lower bottle portion.
2. Add the Wick
This wick draws water up from the reservoir into the soil.
- Thread a piece of cotton string or rope through the bottle cap hole (or directly between soil and water).
- Make sure at least 2–3 inches of the wick are touching the water below.
3. Add Soil and Seeds
Fill the top portion of the bottle (the inverted funnel) with potting soil.
- Plant your seeds or seedlings according to their spacing and depth requirements.
- Firm the soil gently around the plants.
4. Add Water to the Reservoir
Pour water into the bottom half of the bottle until it reaches just below the soil level. The wick will pull water up as the soil dries.
5. Place in Sunlight
Put your planter where it will receive proper sunlight based on plant needs.
Leafy greens like lettuce or herbs may need partial sunlight, while tomatoes and peppers often need fuller sun.
🌿 Best Vegetables to Grow in Bottle Planters
Not all vegetables are equally suited for bottle planters. Here are great options:
- Lettuce and other salad greens
- Spinach
- Herbs like basil, parsley, or mint
- Radishes
- Small tomato varieties
- Peppers (small to medium size)
These plants have relatively shallow roots and thrive with regular moisture, making them ideal for self‑watering systems.
🆚 DIY Bottle Planter vs Traditional Pots
Not sure whether DIY planters are right for you? Let’s compare:
- Cost: Bottle planters are free or low cost, traditional pots may be expensive.
- Watering: DIY bottles water themselves; traditional pots need daily watering.
- Mobility: Both can be moved, but lighter bottles are easier to relocate.
- Waste: Bottle planters reuse plastic; traditional pots do not.
⚠️ Common Mistakes to Avoid
Even with simple systems, mistakes can slow plant growth or reduce yields. Here’s what to avoid:
- Using bottles that are too small — some vegetables need more root room.
- Not adding a proper wick — without it, water won’t move up to the soil.
- Poor drainage — ensure excess water doesn’t stagnate or rot roots.
- Overcrowding seeds — small spaces need proper plant spacing.
- Ignoring sunlight needs — plants need the right amount of light to thrive.
❓ Frequently Asked Questions (FAQs)
1. How often do I need to refill the water reservoir?
Depending on plant size and weather, every 7–10 days is common in warmer conditions. Check water levels every few days at first.
2. Can this system work indoors?
Yes! Just place near a sunny window or use grow lights for best results.
3. Will the plastic bottle harm my plants?
Food‑grade plastic bottles are safe. Avoid bottles that held hazardous chemicals.
4. How many plants can I grow in one bottle?
Smaller vegetables or herbs: 1–2 per bottle; larger plants: one per bottle.
5. Can I grow fruiting vegetables like tomatoes?
Yes! Choose smaller varieties and larger bottle sizes if possible.
6. Do I need fertilizer?
Adding a gentle, organic fertilizer every few weeks can boost growth, but it’s optional.
7. What if the wick doesn’t draw water?
Ensure the wick touches both water and soil. Natural fibers work best.
8. Can I paint or decorate the bottles?
Absolutely! Just avoid blocking light where roots need it.
9. How long will the planter last?
With proper care, bottles can last through several growing seasons before replacing them.
10. Can I use this system for flowers?
Yes! Many ornamental flowers thrive with self‑watering setups.
🌟 Final Thoughts
Recycling plastic bottles into self‑watering planters is one of the easiest, most sustainable ways to grow vegetables at home — even if you have limited space or a busy schedule. With just a few materials and a little creativity, you’ll be harvesting fresh produce and reducing waste at the same time.
Whether you’re a beginner or experienced gardener, this system saves time, conserves water, and brings more greenery into your daily life. Ready to get started? Grab those bottles and plant your first crop today!