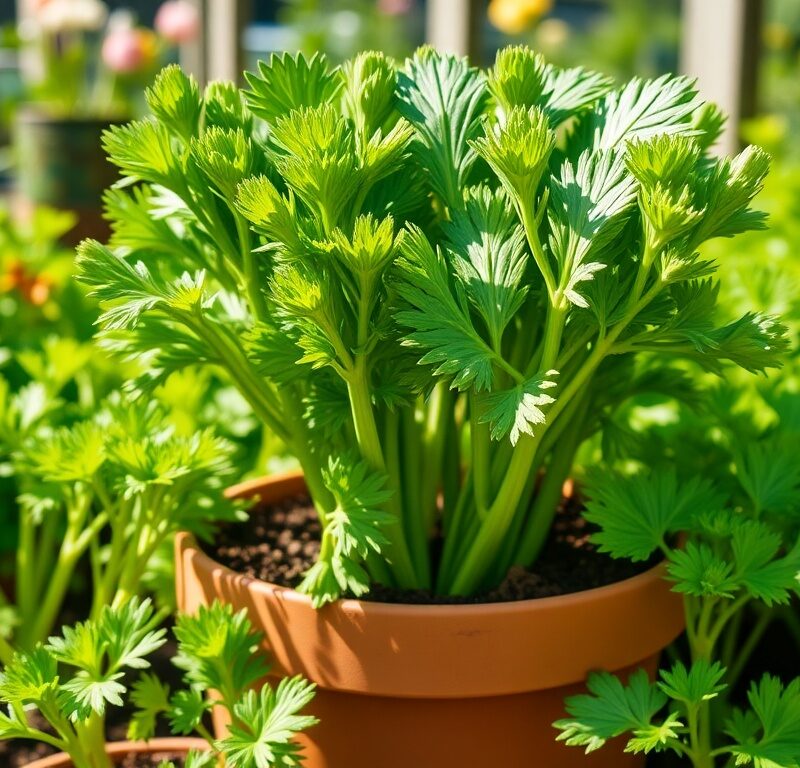
How To Grow An Endless Supply Of Celery In A Pot – Step-By-Step Guide
Imagine never having to buy celery again, or at least significantly reducing your trips to the grocery store for this versatile vegetable. The idea of regrowing celery from its humble base might sound like a kitchen magic trick, but it’s a wonderfully simple and rewarding gardening project that anyone can master. This guide will walk you through transforming a discarded celery stub into a continuous source of fresh greens, right in your own home.
Beyond the sheer novelty, there are numerous benefits to cultivating your own celery supply. It’s incredibly cost-effective, turning what would typically be kitchen waste into a sustainable and fresh harvest. You’ll have crisp, flavorful celery leaves and small stalks readily available for your culinary adventures, from enhancing soups and stews to adding a refreshing crunch to salads or a vibrant garnish to dishes. It’s also an immensely satisfying and fun project, connecting you more closely with your food source and adding a touch of green to your living space.
It’s important to set realistic expectations for your regrown celery. While you might not produce the giant, thick stalks found in supermarkets (which are often commercially blanched and grown under very specific conditions), you will consistently grow an abundance of tender leaves and smaller, flavorful stalks. These are perfect for adding depth to your cooking, boosting nutritional value, and ensuring you always have a fresh, organic supply on hand. Get ready to embark on a journey that’s good for your wallet, good for the planet, and good for your palate!
What You’ll Need: Gathering Your Supplies
- Fresh Celery Base: Choose a firm, healthy, organic celery stalk for the best starting material. Look for a pale green/yellow core, avoiding any bases that are brown or mushy.
- Shallow Dish or Bowl: A small plate, shallow bowl, or even a wide-mouthed jar lid will work for the initial sprouting phase.
- Water: Fresh tap water is perfectly fine.
- Pot with Drainage Holes: A container at least 6-8 inches deep and wide is ideal for one celery plant. Ensure it has ample drainage holes to prevent waterlogging.
- High-Quality Potting Mix: A well-draining, nutrient-rich potting mix is crucial. Consider adding some compost or worm castings for an extra boost of organic matter and nutrients.
- Watering Can or Spray Bottle: For gentle and consistent watering.
- Sharp Knife or Scissors: Essential for both preparing the celery base and for harvesting.
- Optional: Balanced liquid fertilizer (e.g., 5-1-1 or 5-10-10) for feeding, and a grow light if natural light is insufficient, especially for indoor winter growing.
The Initial Setup: Sprouting Your Celery Base
- Prepare the Celery Base: Take your fresh celery stalk and use a sharp knife to cut off the bottom 1-2 inches. Make sure the cut is clean and straight. You should see a visible “core” in the center of this base. This is where the new growth will emerge.
- Place in Water: Position the cut celery base, cut-side down, into your shallow dish or bowl. Add just enough water to cover the very bottom of the base, about 1/2 inch. It’s critical that the entire base isn’t submerged, as this can lead to rot.
- Choose a Location: Place your dish in a bright spot. A sunny windowsill that receives indirect light, or direct morning sun, is ideal. Avoid intense, direct afternoon sun during this initial stage, as it can be too harsh for the delicate new growth.
- Monitor and Change Water: This step is vital for success. Change the water daily, or at least every other day, to prevent the growth of mold, bacteria, and algae. Fresh water ensures a healthy environment for root development.
- Observe for Growth: Within 3-7 days, you should start to see small, pale green leaves emerging from the very center of the celery base. Simultaneously, tiny white roots will begin to form from the bottom of the base. This is a sign that your celery is ready for the next stage. Continue to allow roots to develop until they are about 1-2 inches long and the new leaves are actively growing. This usually takes 1-2 weeks.
Transplanting and Growing: Nurturing Your Celery Plant
- Prepare the Pot: Fill your chosen pot with the high-quality potting mix, leaving about an inch or two from the rim. If you’re mixing in compost or worm castings, do so now to ensure even distribution.
- Create a Planting Hole: Gently make a small depression in the center of the potting mix, large enough to accommodate your celery base and its new roots.
- Transplant the Celery Base: Carefully lift the sprouted celery base from the water. Place it into the prepared hole in the pot.
- Planting Depth: Position the base so that the top of the original base (where the new leaves are emerging) is just at or slightly above the soil level. Do not bury the new green growth. Gently backfill with potting mix around the base, ensuring the roots are covered and the plant is stable.
- Initial Watering: Water the plant thoroughly immediately after transplanting. Ensure water drains from the bottom of the pot.
- Consistent Moisture is Key: Celery is an incredibly thirsty plant and absolutely requires consistent moisture. Check the soil daily. If the top inch feels dry to the touch, it’s time to water. Never allow the soil to dry out completely. You can place a saucer under the pot to catch excess water, but avoid letting the pot sit in standing water for prolonged periods after the initial drainage, as this can lead to root rot.
- Light Requirements: Move your potted celery to a location where it will receive at least 6-8 hours of bright, direct sunlight per day. If growing indoors and natural light is scarce, especially during winter months, supplement with a grow light to ensure robust growth.
- Fertilizing: Celery is a heavy feeder. Once the plant is well-established and showing vigorous new growth (typically 2-3 weeks after transplanting), begin feeding it with a balanced liquid fertilizer. Dilute the fertilizer to half strength and apply every 2-4 weeks. A fertilizer with a slightly higher nitrogen content (like a 5-1-1 or 5-10-10) is beneficial for leafy growth.
Harvesting for an “Endless Supply”: The Cut-and-Come-Again Method
The beauty of growing celery in a pot, especially from a regrown base, lies in its “cut-and-come-again” harvesting method. This technique allows you to continuously harvest fresh leaves and stalks without harming the plant, ensuring a steady supply for your kitchen.
- When to Start Harvesting: You can typically begin harvesting once your celery plant is well-established and has developed several healthy, mature outer stalks. This usually occurs about 3-4 weeks after transplanting, when the plant has a good number of leaves and a strong core.
- Select the Outer Stalks: For continuous production, always target the outer stalks. These are the oldest and most mature parts of the plant. The inner stalks and the central core are where the new growth continually emerges, so leaving them intact is crucial for future harvests.
- How to Harvest: Using a sharp knife or a clean pair of scissors, carefully cut the desired outer stalks close to the base of the plant. Make a clean cut to minimize damage to the plant. You can harvest individual stalks as needed.
- Harvest Only What You Need: Avoid over-harvesting. Taking too many stalks at once can stress the plant and reduce its ability to regrow efficiently. Harvest selectively, taking just enough for your immediate culinary needs. This encourages the plant to put its energy into producing more new growth from the center.
- Regular Harvesting Encourages Growth: Regular, selective harvesting actually stimulates the plant to produce more leaves and stalks. Think of it as a gentle pruning that keeps the plant productive and healthy.
- Rejuvenation (If Needed): If your celery plant starts to look leggy, tired, or significantly less productive over time, you have the option to “rejuvenate” it. You can carefully cut the entire plant down to about an inch above the soil level, similar to how you initially cut the base. With proper care (consistent watering and light), the plant may regrow again from the remaining base, giving you a fresh start. This isn’t always guaranteed, but it’s a worthwhile experiment before discarding the plant entirely.
Troubleshooting & Tips for Success: Maximizing Your Yield
Bolting (Going to Seed)
If your celery plant sends up a tall flower stalk with small white flowers, it’s “bolting.” This is usually triggered by extreme heat, prolonged cold snaps, or significant stress. Once celery bolts, the stalks become tough, stringy, and develop a bitter flavor. To mitigate this, you can trim off the flower stalk as soon as you see it emerging, which might encourage more leaf growth. However, the quality of the stalks will likely still be diminished. To prevent bolting, ensure consistent temperatures (60-75°F is ideal) and avoid sudden environmental changes.
Yellowing Leaves
Yellowing leaves are a common sign that something isn’t quite right. The most frequent culprits are nutrient deficiency (especially nitrogen, as celery is a heavy feeder) or inconsistent watering. Ensure you are fertilizing regularly with a balanced liquid feed and that the soil remains consistently moist, never waterlogged or allowed to dry out completely. Sometimes, older outer leaves will naturally yellow and die back; this is normal. Just remove them to keep the plant tidy and redirect energy to new growth.
Pests
While indoor celery is generally less prone to severe pest infestations than outdoor plants, it can occasionally attract common houseplant pests like aphids or spider mites. Regularly inspect the undersides of leaves and new growth. If you spot pests, treat them promptly with an organic insecticidal soap or neem oil spray, following product instructions carefully. A strong spray of water can also dislodge many pests.
Lack of Growth
If your celery isn’t growing as vigorously as you’d like, review its growing conditions. Is it getting enough light (6-8 hours of bright, direct sun or supplemental grow light)? Is it being watered consistently? Are you fertilizing regularly? Celery needs ample light, water, and nutrients to thrive. Also, ensure the pot isn’t too small, restricting root development.
Flavor Variations
Don’t be surprised if your home-grown celery has a slightly different flavor profile than store-bought varieties. Regrown celery often has a more pronounced, sometimes stronger, or even earthier flavor than commercially grown, blanched celery. This is natural and can vary based on the specific variety and your growing conditions. Embrace the unique taste of your fresh harvest!
Succession Planting for a Truly Endless Supply
For an uninterrupted and truly “endless” supply of celery, consider starting a new celery base every few weeks. This staggered planting approach ensures that as one plant matures and might slow down in production, another young plant is ready to take its place, keeping your kitchen stocked.
Winter Care for Indoor Celery
If you’re growing celery indoors during the colder months, pay extra attention to light and temperature. Ensure it continues to receive plenty of light, supplementing with a grow light if natural daylight hours are short or intensity is low. Protect your plant from cold drafts from windows or doors, as celery prefers consistent, moderate temperatures.
Humidity for Happy Celery
Celery naturally thrives in environments with higher humidity. Indoor heating or air conditioning can dry out the air, which isn’t ideal for your plant. Misting the leaves with water occasionally can be beneficial, especially in dry indoor environments. You can also place the pot on a saucer filled with pebbles and water (ensure the pot itself isn’t sitting directly in the water) to create a microclimate with increased humidity around the plant.
Storage and Reheating
Harvested Celery Storage
Once you’ve harvested your celery stalks and leaves, treat them as you would store-bought celery. For optimal freshness, wrap the stalks loosely in a damp paper towel and place them in an airtight container or a plastic bag in the crisper drawer of your refrigerator. This helps maintain moisture and keeps them crisp for up to 1-2 weeks. You can also place the cut ends of stalks in a glass of water in the fridge, much like a bouquet, to keep them hydrated.
Freezing Celery
If you have an abundance of celery, especially leaves and smaller stalks, freezing is an excellent option. Wash and chop the celery into desired sizes. For best quality, blanch the celery briefly (about 2-3 minutes in boiling water, then immediately plunge into ice water) before freezing. This helps preserve color and texture. Drain thoroughly, pat dry, and then spread on a baking sheet to freeze individually before transferring to freezer-safe bags or containers. Frozen celery is best used in cooked dishes like soups, stews, or casseroles, as it loses some of its crispness once thawed.
Reheating Dishes with Celery
When celery is incorporated into cooked dishes like soups, stews, or stir-fries, reheating is straightforward. Simply reheat the entire dish on the stovetop over medium heat, in the microwave, or in an oven until thoroughly warmed through. If the dish seems a bit dry, you can add a splash of water or broth during reheating. Note that celery in reheated dishes might become softer, but its flavor will remain.
Frequently Asked Questions
How long does it take for celery to regrow?
New leaves will typically emerge from the celery base within 3-7 days of being placed in water. Once transplanted into soil, you can usually start harvesting outer stalks and leaves within 3-4 weeks, with continuous production thereafter as long as the plant is healthy and well-cared for.
Can I grow thick, crunchy celery stalks like those from the grocery store?
While you can grow a continuous supply of fresh celery, regrown celery in a pot usually produces thinner stalks and an abundance of flavorful leaves, rather than the large, thick, commercially blanched stalks found in supermarkets. These thinner stalks and leaves are excellent for cooking, salads, and garnishes, offering a fresh, homegrown flavor.
Why are my celery stalks becoming bitter?
Bitterness in celery is often a sign of stress, most commonly caused by extreme heat or inconsistent watering. Celery is a cool-season crop and prefers consistent moisture and temperatures between 60-75°F (15-24°C). If your plant is bolting (going to seed), the stalks will also become bitter and tough.
Can I grow celery year-round indoors?
Yes, with adequate light, water, and nutrients, you can successfully grow celery indoors year-round. If natural light is limited, especially during winter months, supplementing with a grow light will be essential to ensure your plant receives the 6-8 hours of bright light it needs for continuous growth.