How to Make a Simple Water Purifying Filter Using Natural Materials
Clean water isn’t a luxury — it’s a necessity. Whether you’re camping, preparing for an emergency, or teaching sustainability at school, knowing how to build a basic water filter can be both life-saving and educational.
This guide will show you how to create a simple DIY water filter using natural materials like rocks, sand, and charcoal. While this method won’t make water fully safe to drink without boiling or additional treatment, it dramatically improves clarity and helps remove visible debris, odors, and some impurities.
💧 Why Learn DIY Water Filtration?
From emergency preparedness to environmental education, homemade water filters offer practical benefits:
- 🏕️ Useful in outdoor survival or camping situations
- 🏡 Educational for teaching water safety and science at home or school
- 🆘 Important in emergencies where clean water may be limited
- 🌍 Promotes sustainable thinking by using natural, low-waste materials
Dr. Leila Nour, a public health educator, explains: “Learning how water filtration works is empowering — especially for children and outdoor enthusiasts. Even basic knowledge can make a big difference in critical situations.”
🔧 What You Need to Build a DIY Water Filter
Most of these materials can be found outdoors, in your garden, or at home:
- 🪨 Large rocks
- 🪵 Small rocks or pebbles
- ⚪ Gravel
- 🏖️ Fine sand (clean and rinsed)
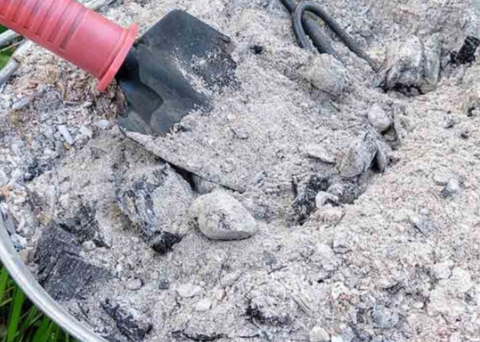
- 🖤 Activated or black charcoal (crushed)
- 🧵 Cotton or clean fabric (such as a T-shirt or coffee filter)
- 🥤 A clean plastic bottle or container (cut in half)
- 🪣 A container to collect filtered water
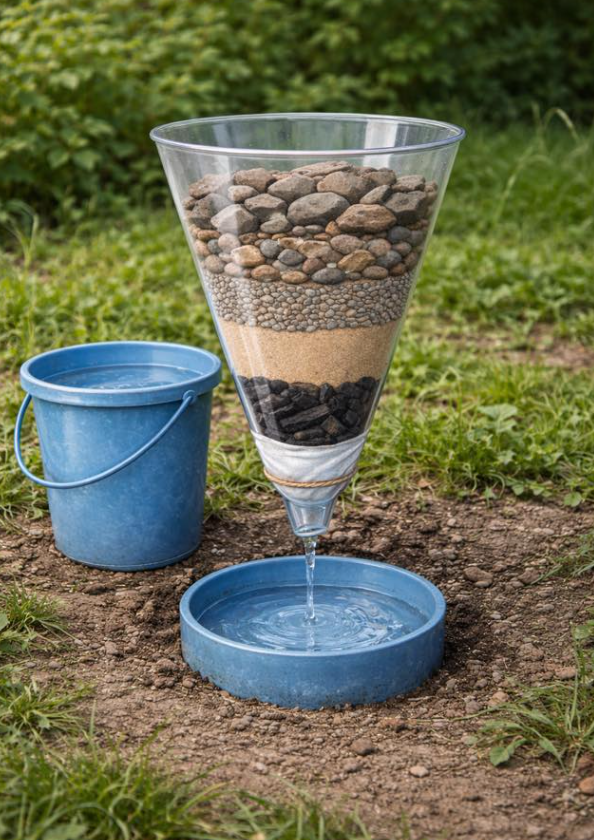
🛠️ Step-by-Step: How to Assemble Your Natural Water Filter
Step 1: Prepare the Container
Cut a clean plastic bottle in half. Use the top part as a funnel and turn it upside down inside the bottom half (or over a cup/bucket).
Step 2: Add a Fabric or Cotton Layer
This bottom layer helps keep the other materials in place and prevents them from falling through. Use clean cotton, a piece of cloth, or even a coffee filter.
Step 3: Add Charcoal
Add a thick layer (about 2–3 inches) of crushed black charcoal. Charcoal helps absorb odors, chemicals, and some bacteria.
Step 4: Add Fine Sand
Next, add 2–3 inches of clean fine sand. This helps filter out tiny sediments and cloudy particles.
Step 5: Add Gravel
Above the sand, add a layer of gravel. This supports the sand and traps medium-sized particles.
Step 6: Add Small Rocks
Place small rocks or pebbles to slow water flow and catch larger impurities.
Step 7: Add Large Rocks
Top the filter with larger stones or broken pieces. These block leaves, twigs, and visible debris from entering the filter layers.
Step 8: Pour Water Slowly
Pour dirty water through the top. Let it slowly drip through each layer. The cleaner water will collect in the bottom container.
📊 Filtration Materials and Functions Table
| Material | Main Purpose | Recommended Thickness | Effectiveness |
|---|---|---|---|
| Large Rocks | Block leaves, sticks, large debris | 1–2 inches | Improves clarity |
| Small Rocks | Slow flow, catch medium particles | 1–2 inches | Stabilizes upper layers |
| Gravel | Trap small dirt and grit | 1–2 inches | Supports sand filtration |
| Fine Sand | Remove fine sediments, clarify water | 2–3 inches | Highly effective for clarity |
| Crushed Charcoal | Absorb odors, chemicals | 2–3 inches | Reduces smell and taste |
| Cotton or Fabric | Final filtration layer | 1 piece at bottom | Prevents material leakage |
⚖️ DIY Natural Filter vs Commercial Filters
💸 Cost
DIY Filter: Free to under $5 using natural materials.
Commercial Filters: Range from $20–$150+ for portable options.
🧪 Effectiveness
DIY Filter: Improves clarity, odor, and some particles. Not safe for drinking without boiling.
Commercial Filter: Often removes viruses, bacteria, and chemicals. Certified for drinking use.
🏞️ Use Case
DIY Filter: Great for education, emergencies, camping prep.
Commercial Filter: Best for travel, long-term use, or unknown water sources.
🚫 Common Mistakes to Avoid
- ❌ Not using clean sand or gravel — always rinse materials first
- ❌ Using wet or contaminated charcoal — use fresh activated charcoal if possible
- ❌ Pouring water too quickly — slow filtration = better results
- ❌ Assuming it’s safe to drink — always boil or purify filtered water
- ❌ Forgetting to secure the bottom layer — fabric or cotton must be tight
❓ 10 FAQs About DIY Water Purifiers
- Does this make water safe to drink?
No. It improves clarity and smell but does not remove all bacteria or viruses. Always boil or treat further. - Can I use beach sand?
Yes, if thoroughly rinsed and dried. Avoid salty or oily sand. - What kind of charcoal should I use?
Use activated charcoal if possible. BBQ charcoal can work if it’s pure and uncoated (no chemicals). - How long does filtration take?
Usually a few minutes per cup — slower is better. - Can kids make this?
Yes, under supervision. It’s great for science projects or survival skills learning. - How do I make the bottle stable?
Use a jar or container as a base or secure with tape or rocks. - Can this filter be reused?
Yes, but materials should be cleaned or replaced regularly. - Is the water drinkable after filtering?
Only after additional purification, such as boiling for at least 1 minute. - Where can I use this filter?
Backyards, campsites, schools, or emergency shelters. - Are there related DIY projects?
Yes! Check out these eco DIY garden and survival ideas to build your off-grid skills.
🌿 Final Thoughts: Learning Water Filtration the Natural Way
Building your own water purifier isn’t just useful — it’s empowering. Whether you’re a gardener, teacher, outdoor enthusiast, or prepping for emergencies, this simple method teaches the basics of filtration and the importance of clean water.
Just remember: this filter is for clarity, not complete safety. Always boil or use certified purification tablets before drinking filtered water.
Try building one this weekend as a family project or emergency prep drill — and share it with others who care about self-sufficiency and sustainability!