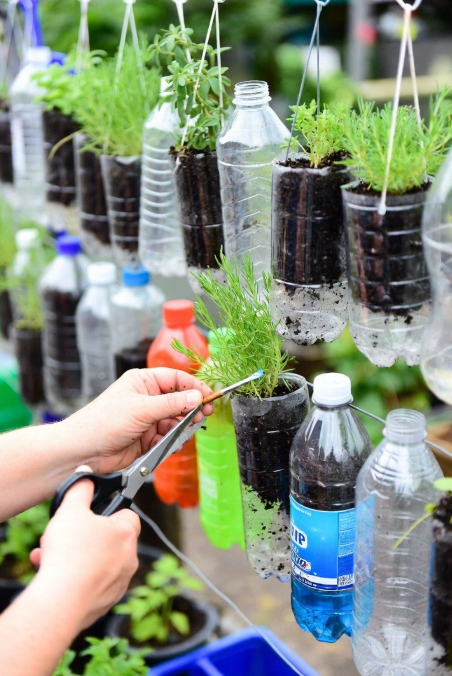
Turn Plastic Bottles Into Beautiful Garden Planters: A Step-by-Step Eco Garden Guide
Every year, billions of plastic bottles end up in landfills — but what if you could turn them into something beautiful and useful for your garden?
Welcome to the world of DIY plastic bottle planters: a simple, sustainable, and incredibly effective way to grow herbs, flowers, and small plants while reducing waste. Whether you have a big backyard, a small patio, or just a sunny windowsill, this guide will show you exactly how to make your own recycled bottle planters with materials you already have at home.
♻️ Why Use Plastic Bottles as Planters?
Plastic bottle gardening is more than just a fun DIY project — it’s a smart, eco-conscious choice with real benefits:
- 🌍 Reduces plastic waste in landfills and oceans
- 🌿 Saves money on garden pots and containers
- 🪴 Great for small-space and vertical gardening
- 🎨 Offers a creative outlet for kids and adults
- 💧 Allows for easy water control and drainage
According to Environmental Educator Carla Mendes, “Plastic bottle planters are one of the most accessible ways to teach sustainability while actually growing your own food or flowers. It’s simple, affordable, and perfect for all ages.”
🧰 Materials You’ll Need
You probably already have everything you need at home:
- 🥤 Empty plastic bottles (water, soda, or oil bottles)
- ✂️ Scissors or a box cutter
- 🎨 Acrylic or spray paint (optional for design)
- 🪛 Small nail, needle, or screwdriver (for drainage holes)
- 🌱 Potting soil or compost
- 🌼 Herbs or small plants (e.g., basil, mint, flowers)
📋 Step-by-Step Guide to Making Plastic Bottle Planters
Step 1: Clean the Bottle
Wash the bottle with soap and water. Remove any labels or residue, and let it dry completely before cutting.
Step 2: Cut the Bottle
You have two main style options:
- Top-open Planter: Cut the bottle in half horizontally.
- Side-open Planter: Cut a rectangular opening on one side while keeping the rest of the bottle intact.
Step 3: Paint the Bottle (Optional)
Customize your planter with colors that match your garden. Use non-toxic acrylic paint or spray paint. Let it dry completely before adding soil.
Step 4: Add Drainage Holes
Use a small nail, screwdriver, or hot metal pin to poke holes in the bottom. This prevents overwatering and root rot.
Step 5: Add Soil and Plants
Fill the planter with potting mix or compost. Plant herbs like mint, basil, or small flowers like marigolds or pansies.
Step 6: Place or Hang Your Planters
Place the planter on a garden bed, balcony, or porch. For vertical gardens, hang them using twine, wire, or hooks on fences or walls.
🌱 Nutritional & Functional Benefits of Common Plants
| Plant | Main Benefits | Recommended Soil Depth | Ideal Serving or Use |
|---|---|---|---|
| Mint | Fresh aroma, aids digestion | 4–6 inches | Teas, salads, garnishes |
| Basil | Rich in antioxidants, aromatic leaves | 6–8 inches | Cooking, sauces, fresh use |
| Parsley | High in vitamin K, supports flavor balance | 4–6 inches | Salads, garnish, green sauces |
| Marigold | Natural pest repellent, brightens garden | 4–6 inches | Ornamental use, garden borders |
| Lavender | Fragrant, pollinator-friendly | 6–10 inches | Aromatherapy, decoration |
⚖️ DIY Bottle Planters vs Store-Bought Containers
💸 Cost
DIY plastic bottle planters: Practically free. You use materials already at home.
Store-bought planters: Range from $5–$50 depending on material and size.
🌿 Environmental Impact
DIY: Upcycles plastic that might otherwise pollute landfills or oceans.
Store-bought: May be made from non-renewable or plastic-based materials.
🎨 Design Options
DIY: Completely customizable with color, shape, and placement.
Store-bought: Pre-designed, may not match your garden theme.
🧰 Skill Level
DIY: Easy for beginners, fun family activity.
Store-bought: No assembly needed but no personalization.
🚫 Common Mistakes to Avoid
- ❌ Forgetting to add drainage holes — can lead to root rot
- ❌ Using thin bottles that collapse under soil weight
- ❌ Skipping paint — UV rays can break down clear plastic faster
- ❌ Overwatering without checking soil moisture
- ❌ Placing bottles in full sun without insulation — roots may overheat
❓ Top 10 FAQs About Plastic Bottle Gardening
- What size bottle works best for planters?
1-liter to 2-liter bottles are ideal for herbs and small flowers. - How long do plastic bottle planters last?
With care, they can last 6 months to 2 years depending on exposure. - Can I grow vegetables in them?
Yes — leafy greens and herbs do well. Avoid deep-rooted plants like carrots. - Are these planters safe for food plants?
Yes, if bottles are food-grade plastic (e.g., water or soda bottles) and cleaned well. - Should I paint the outside or inside?
Paint the outside to prevent chemical leaching and increase UV protection. - What’s the best soil to use?
Use high-quality potting mix with good drainage, not garden soil. - How do I hang plastic bottle planters?
Use wire, twine, or zip ties through holes made in the top or sides. - Do I need to fertilize the plants?
Yes, especially after a few weeks. Use mild liquid fertilizer or compost tea. - Can kids make these?
Absolutely! Just supervise the cutting step. Painting and planting are great for kids. - Are there companion garden projects?
Yes! Check out these related upcycled garden ideas to create a full DIY space.
🌸 Final Thoughts: A Greener Garden Starts with Simple Choices
Plastic bottle planters are more than just a fun afternoon project — they’re a way to connect with nature, reduce your waste, and add life to any corner of your home or garden. Whether you’re growing fresh herbs for your kitchen or teaching kids about sustainability, these planters are a practical and inspiring place to start.
Try it for yourself — and enjoy a garden that’s not only beautiful but better for the planet.
✨ Don’t forget to save this guide for your next weekend DIY and share it with your gardening friends!