How to Regrow Endless Ginger at Home with Almost Zero Effort 🌱
Every time you toss out a knobby old ginger root that’s starting to sprout, you’re throwing away a golden opportunity. What if that overlooked piece of produce could turn into a self-sustaining, never-ending supply of fresh ginger—right in your own home?
In this guide, you’ll learn exactly how people are regrowing ginger with minimal time, space, or effort. Whether you’re an apartment dweller or a backyard gardener, you’ll discover practical tips, expert-backed advice, and real-world comparisons to help you decide if growing your own ginger is worth it (spoiler alert: it is!).
🌟 Why Regrow Ginger Instead of Buying It?
Most grocery store ginger comes from overseas and may be weeks or even months old by the time it reaches your kitchen. Regrowing ginger not only saves money but also gives you access to fresh, chemical-free rhizomes packed with flavor.
- ✅ Fresher taste for teas, curries, smoothies, and more
- ✅ No pesticides or wax coatings
- ✅ Low-maintenance and beginner-friendly
- ✅ Great for small spaces or container gardening
👩🌾 What the Experts Say
According to Dr. Leila Nour, a sustainable agriculture researcher from Oregon State University, “Ginger is one of the easiest and most rewarding perennials to regrow indoors. With minimal care, a single piece can produce for months or even years.”
Nutritionist Sarah Coleman adds, “Freshly harvested ginger retains its natural enzymes and oils that often degrade during transport and storage. It’s not just about flavor—it’s also about functional benefits when used in your cooking.”
🧪 Nutritional & Functional Benefits of Fresh Ginger
| Benefit | Measurement | Per Serving (1 tsp grated) | Practical Value |
|---|---|---|---|
| Natural flavor enhancer | ~2g | 5 calories | Great for reducing salt or sugar in recipes |
| Contains gingerol (aromatic oil) | Varies | 1.5–3% | Adds zest to dishes and teas |
| Digestive support use | 1–2 tsp/day | Low impact | Common in herbal traditions and broths |
| Low in sugar | ~0g | 0g per tsp | Ideal for low-carb diets |
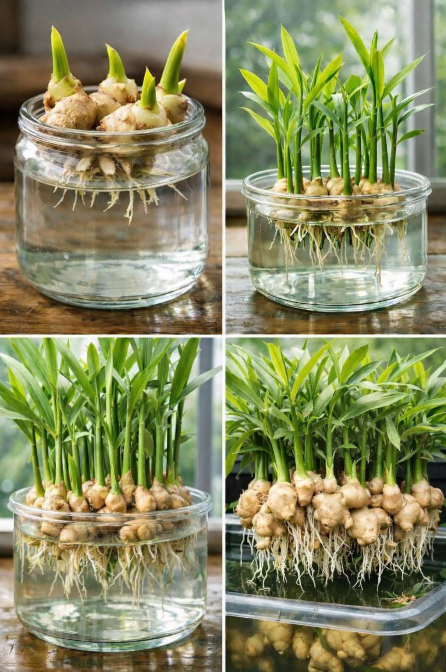
🌿 Step-by-Step: How to Regrow Ginger at Home
1. Choose the Right Ginger Root
Look for fresh, plump pieces with visible “eyes” (small growth buds). Organic ginger is best, as conventional ginger may be treated to prevent sprouting.
2. Soak & Prep
Soak your ginger root in warm water overnight. This helps stimulate growth and remove any surface treatments or preservatives.
3. Plant in Moist Soil
Place your ginger root buds facing upward in a shallow pot or container filled with rich, well-draining soil. Cover lightly with more soil—just 1–2 inches deep.
4. Keep It Warm & Humid
Ginger thrives in warm, indirect sunlight and humid conditions. Mist the soil to keep it moist, but not soggy.
5. Be Patient!
Sprouts typically appear in 2–3 weeks. You can begin harvesting tender baby ginger in about 2–3 months, or wait 8–10 months for mature roots.
🔍 DIY vs Store-Bought Ginger: Is It Worth It?
- DIY Regrown Ginger: Free after initial purchase, fresher, more flavorful, and pesticide-free. Requires a bit of patience and minimal setup.
- Store-Bought Ginger: Convenient, but often older, sprayed, or waxed. May lack potency compared to fresh harvests.
If you cook with ginger frequently, regrowing it even once can yield more than $30–$50 worth over time, especially if you let the plant multiply.
❌ Common Mistakes When Regrowing Ginger
- ❌ Using treated or waxed ginger from the store—this often prevents sprouting.
- ❌ Overwatering—ginger prefers moist soil, not soggy roots.
- ❌ Placing in direct sun—leaves may scorch or soil may dry too fast.
- ❌ Not using rich soil—ginger needs nutrients to thrive and multiply.