Exciting Ways to Build Your Own DIY Egg Incubator at Home! 🥚🌱
Creating a DIY egg incubator is more than just a fun weekend project—it’s a hands-on lesson in biology, sustainability, and engineering. Whether you’re a backyard homesteader, a science enthusiast, or a curious student, hatching eggs at home can be incredibly rewarding. With a few basic supplies and an understanding of temperature, humidity, and care, you can successfully build your own incubator and experience the miracle of life right from your living room.
🥚 Why Build a DIY Egg Incubator?
While commercial incubators are available, they can be expensive and often more than hobbyists need. A DIY incubator allows for:
- 💰 Cost-effective solutions using materials you likely already have
- 🛠️ Full control over the design and features
- 📚 An educational experience perfect for home learning or science projects
- 🌱 A deeper connection to nature and the life cycle of birds
🔧 Necessary Materials
Before you begin building, gather the following items:
- A 5-liter or larger plastic bottle (like a water jug)
- Small light bulbs or low-watt heat lamps
- A thermometer and hygrometer (can be analog or digital)
- Egg cartons or foam padding for stabilization
- Scissors, a utility knife, and optionally a drill
- Aluminum foil (to help reflect heat)
- Small dish or sponge (to control humidity)
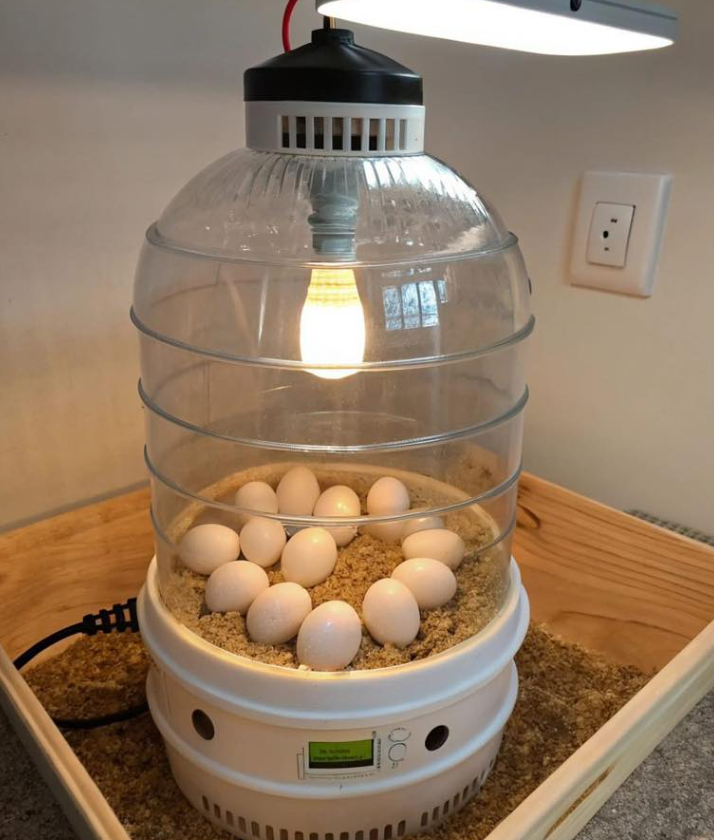
🛠️ Step-by-Step: How to Build Your Own Egg Incubator
1. Prepare the Bottle
Clean the bottle thoroughly to remove labels and residue. Lay it on its side and cut a rectangular opening near the smaller end to create a door. This gives you access to place or turn the eggs.
2. Install the Heat Source
Position your light bulb(s) or heat lamps inside or directly outside the bottle, focusing heat toward the interior without touching the eggs. Secure any wiring and use a lamp timer if available. Your goal is to maintain an internal temperature of 37.5°C (99.5°F).
3. Add Egg Support
Line the base of the bottle with foam padding or cut-up egg cartons. This keeps the eggs from rolling and provides thermal insulation.
4. Install Monitoring Tools
Place your thermometer and hygrometer where you can easily read them through the opening. Monitor temperature and humidity daily. Optimal ranges are:
- 🔆 Temperature: 37.5°C (99.5°F)
- 💧 Humidity: 45%–55% for the first 18 days
- 💦 Humidity: Increase to 65%–75% for the last 3 days (hatching period)
5. Create Ventilation
Drill or cut several small holes (around 0.5 cm wide) near the top and bottom of the bottle. This allows for fresh air circulation, which is vital for the developing embryos. Avoid drafts near the heat source.
6. Manage Humidity
Place a small dish of water or a damp sponge inside the incubator to maintain proper humidity. Replace or refill it daily, especially during the last few days before hatching. Adjust size or number of sponges based on your humidity readings.
7. Turn the Eggs Regularly
Use a marker to label each side of the egg with an “X” and an “O”. This helps you track rotation. Turn the eggs manually at least three times per day to ensure proper development and prevent sticking of the embryo to the shell.
📊 Functional Benefits Table
| Component | Function | Recommended Measurement | Value in Incubation |
|---|---|---|---|
| Temperature | Promotes embryo growth | 37.5°C / 99.5°F | Prevents under/overheating |
| Humidity (days 1-18) | Prevents shell dehydration | 45%–55% | Ensures moisture balance |
| Humidity (days 19-21) | Aids in hatching | 65%–75% | Softens shells for chicks |
| Ventilation Holes | Allows oxygen in and CO₂ out | 0.5 cm wide, multiple holes | Supports embryo respiration |
| Turning Frequency | Prevents sticking | 3–5 times per day | Promotes even development |
🚫 Common DIY Incubator Mistakes
- 🌡️ Not monitoring temperature closely enough
- 💧 Ignoring humidity adjustments during the final 3 days
- 🌀 Poor ventilation leading to weak or unhatched embryos
- 🚫 Overhandling eggs or skipping manual rotation
- 🔥 Placing heat sources too close to the eggs, causing hotspots
🔟 FAQs About Homemade Egg Incubators
- How much does it cost to build a DIY incubator?
Most people can build one for under $20 using household materials. - Can I incubate any type of egg?
Most small bird eggs (chicken, quail, duck) can be incubated, though times vary. - How long does incubation take?
Chicken eggs take 21 days. Quail: 17 days. Duck: 28 days. - Do I need to turn the eggs every day?
Yes, at least 3 times a day until the final 3 days. - Is there a risk of bacteria in the incubator?
Yes—always wash hands and sanitize materials before use. - Can I use a thermostat?
Yes. It helps maintain stable temperature levels. - What if the power goes out?
Try to insulate the incubator and keep eggs warm using hot water bottles temporarily. - Can I see inside the eggs?
You can candle them with a flashlight after day 7 to check development. - Should I leave the eggs alone during hatching?
Yes. Chicks may take hours to hatch. Do not help unless absolutely necessary. - What if none of the eggs hatch?
Reevaluate temperature, humidity, turning, and egg fertility for future attempts.
🌟 Conclusion: Witness Life Unfold at Home
Building a DIY egg incubator offers a fascinating glimpse into the early stages of animal life. With simple tools, careful monitoring, and a bit of patience, anyone can turn their home into a mini hatching lab. It’s a powerful educational tool and a deeply rewarding experience for all ages.
Looking for more DIY or nature-inspired projects? Discover creative homestead guides and sustainable living recipes at this curated resource hub and start your next adventure today!