Don’t Throw Plastic Bottles Away — Turn Them Into Genius Self‑Watering Planters That Transform Plant Care 🌿
If you love plants but struggle with watering — either overwatering, underwatering, inconsistent watering, or plants stressed by dry indoor air — then this simple plastic bottle trick could completely change your plant game.
Imagine a watering system that:
- ✅ Keeps soil moist but not soggy
- ✅ Helps roots grow stronger and deeper
- ✅ Prevents root rot — even if you forget to water sometimes
- ✅ Reduces plant stress during heat waves or travel
- ✅ Uses recycled materials — your plastic bottles!
Most plants struggle because of watering problems. Too much water → root rot. Too little water → dry soil and stunted growth. This smart method fixes both issues by letting your plant “drink” water slowly from below only when it actually needs it — thanks to a simple fabric wick.
In this article, we’ll cover everything from how this system works, why it’s so effective, common mistakes to avoid, plant‑by‑plant recommendations, and expert tips to make sure your indoor or outdoor plants thrive.
🌱 What Is a Self‑Watering Bottle Planter?
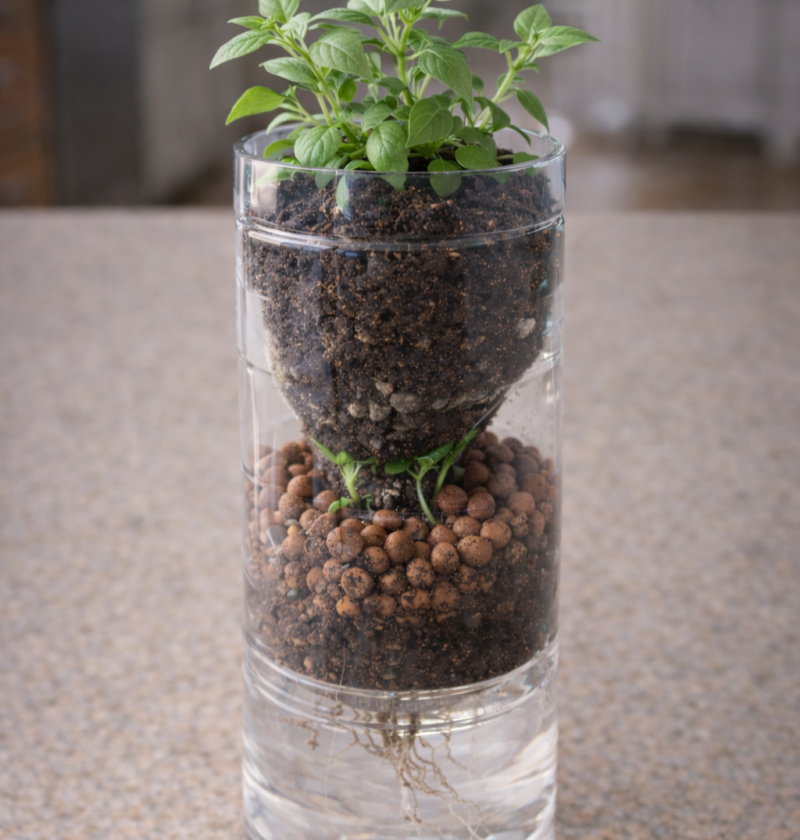
A self‑watering bottle planter is a DIY system made from a recycled plastic bottle that feeds water to your plant slowly through a wick (usually cotton string or fabric). The top part of the bottle holds your plant and soil, while the bottom holds water. The wick connects the soil to the water reservoir, letting moisture travel upward only when the plant needs it.
This mimics how plants naturally take up water through their roots — gradually, in response to demand — so they never sit in water nor dry out completely.
🌟 Why This Method Works
To understand why this simple trick is so effective, let’s break down the common watering challenges plant owners face and how this system solves them:
- Inconsistent watering: Instead of sporadic waterings that flood soil then dry it completely, this system keeps soil evenly moist.
- Root rot: Occurs when roots sit in waterlogged soil. A bottom reservoir with a wick prevents saturation while still supplying moisture.
- Dry indoor air & heat stress: Especially in winter or hot climates, air dries soil quickly. This system provides moisture reserves so plants stay happy.
- Forgetting to water: If you go on short trips, your plants can still get water without needing someone else to care for them.
It’s essentially like giving your plants a tiny, gravity‑powered irrigation system — no timers, no pumps, no electricity.
🛠️ What You’ll Need
- 1 plastic bottle (1L or 2L bottle works great)
- Scissors or a small knife (adult supervision recommended if you’re under 18)
- One cotton string wick (cotton string, shoelace without metal ends, or a strip of cotton fabric)
- Potting soil (suitable for the plant you’re growing)
- Water
- Optional (but highly recommended):
- Clay pebbles (LECA) or small stones — these help improve airflow
- Perlite — to improve soil drainage and aeration
🧠 How It Works — A Simple Science Explanation
The secret is capillary action: water naturally travels up through narrow spaces (like your cotton wick) from a wetter area to a drier one. When soil around the wick becomes dry, it “pulls” water up from the reservoir. When soil is moist, it doesn’t need water — so the flow stops. This creates a self‑regulating watering pattern that responds to your plant’s actual needs.
📖 Step‑by‑Step: Bottle Self‑Watering Planter
Step 1: Cut the Bottle
Cut your plastic bottle around the middle. The top half will hold the soil and plant, and the bottom half will be the water reservoir.
Step 2: Prepare the Wick
Make a hole in the bottle cap that’s just big enough to pull the cotton string through. One end of the wick will be in the top (soil area) and the other end will hang down into the bottom reservoir.
💡 The longer the wick, the better water access — but don’t make it so long that you can’t reach the water below!
Step 3: Assemble Your Planter
Turn the top half (with cap and wick) upside down and place it into the bottom half. The cotton wick should reach down into the water while the top part holds soil above.
Step 4: Add Optional Drainage Layer
If you’re using clay pebbles or stones, add a layer at the bottom of the top section before soil. This improves airflow and prevents soggy soil near the roots.
Step 5: Fill With Soil and Plant
Fill the top section with potting soil (mixed with perlite if desired), then plant your seedling or transplant. Water lightly until the soil feels slightly moist.
📊 The Benefits Table — What This System Does for Your Plants
| Benefit | How It Helps | Plant Care Outcome |
|---|---|---|
| Moisture Control | Soil stays evenly moist | Healthier roots, less stress |
| Reduced Overwatering | Water available only when needed | Prevents root rot |
| Reduced Underwatering | Bottom reservoir supplies water over time | Fewer wilted plants |
| Time Savings | No daily watering required | Better for travel and busy schedules |
| Recycled Materials | Uses plastic bottles that might otherwise be trash | Environmentally friendly |
| Improved Root Growth | Roots grow toward consistent moisture | Stronger, more resilient plants |
🌿 Which Plants Thrive With This Setup?
Almost any houseplant can benefit from a self‑watering system — especially:
- 🌿 Pothos
- 🌿 Spider plants
- 🌿 Peace lilies
- 🌿 Herbs like basil, mint, oregano
- 🌿 Ferns
- 🌿 African violets
These plants often suffer from irregular watering and will be much happier with steady moisture.
🧪 Expert Insights: What Professionals Say
According to horticulturalist Dr. Leila Nour, “Plants respond best to consistency. Rapid swings from dry to wet soil shock the root system, slowing growth and making them more susceptible to pests.” When watering is gradual and predictable, plants allocate more energy into growth and flowering.
Plant scientist Prof. Mark Benson adds, “A bottom‑feeding approach mimics how many plant roots naturally forage for water in the wild — starting at deeper soil levels and working outward as needed.”
And herb expert Gardening Specialist Sarah Coleman notes that “Using recycled materials like plastic bottles not only benefits the environment but also teaches sustainable gardening habits that are especially valuable for young growers.”
❌ Common Mistakes to Avoid
- Using synthetic rope as the wick: It won’t absorb water well. Always choose natural cotton.
- Cutting the bottle unevenly: Make sure the top sits flat inside the reservoir for a stable planter.
- Overstuffing soil: Compact soil prevents airflow. Keep it light and mixed with perlite.
- Ignoring water levels: Check your reservoir once a week at first until you understand how often it needs refilling.
- Placing in direct hot sun: Bottles can heat up water quickly, which can harm roots. Place in bright, indirect light.
🌞 Placement Tips — Where Your Bottle Planter Does Best
For most houseplants using this setup:
- 🌅 Bright, indirect sunlight is ideal
- 🪟 Near windows with morning light
- 🚫 Avoid harsh midday sun that heats the water reservoir
- 🌡️ Keep away from heaters or drafts
❓ In‑Depth FAQs
1. How often do I refill the water reservoir?
It depends on your plant and environment. Most need a refill every 5–10 days. Check moisture weekly until you learn your plant’s rhythm.
2. Can I use this system outdoors?
Yes! But protect it from extreme heat or rain that could overflow the reservoir.
3. What size bottle should I use?
1L bottles are great for small plants. 2L bottles work better for larger plants or longer watering intervals.
4. Can seeds sprout in this system?
Yes — but start seeds in regular pots first until they have roots, then transfer them to the self‑watering bottle.
5. Does every plant like bottom watering?
Most do, but plants that require very dry conditions (like cacti and succulents) might not need this system.
6. How do I clean the system?
Every few months, empty the water, untie the wick, rinse the bottle sections, and replace the wick if it gets clogged.
7. Can I skip the wick?
No — the wick is the key to controlled water delivery. Without it, water won’t travel upward reliably.
8. What if my plant still looks dry?
Check that the wick is properly saturated and reaching down into the water. If it’s dry, the system won’t work.
9. Do I need special soil?
Any good‑quality potting mix is fine. Adding perlite improves drainage and airflow.
10. Can multiple plants share one bottle planter?
Only if they’re small and have similar water needs. Too many plants compete for water and can overtax the system.
🌼 Final Tips for Success
- 🎯 Start with easy plants like pothos or herbs to get comfortable with this system.
- 📅 Keep a simple watering schedule in your phone to track how often you refill.
- 🪴 Label your plants — different species need slightly different moisture levels.
- 🌍 Teach others! This is a great project for classrooms or family activities.
🌎 Wrap‑Up: Water Smarter, Not Harder
This recycled plastic bottle planter trick isn’t just cheap and eco‑friendly — it’s a smart way to let your plants hydrate only when they need it. No more soggy soil, no more wilted leaves, and no more guesswork.
Whether you’re a beginner or a seasoned gardener, this method brings consistency and simplicity to plant care — and it helps you create stronger, healthier plants with less stress on both you and them.
Ready to grow? Grab a bottle and start building your self‑watering planter today! 🌱💧