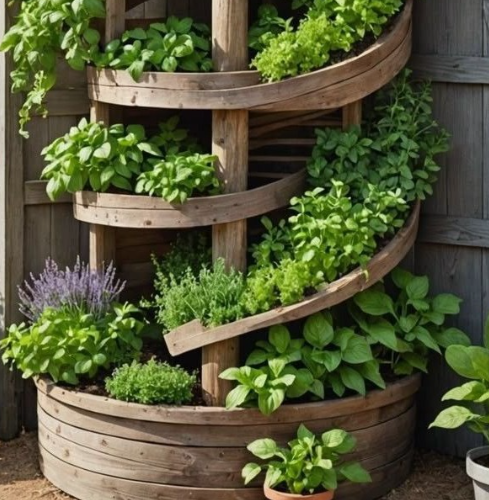
Why an Herb Spiral is the Ultimate Garden Solution for Small Spaces 🌿✨
Do you dream of a garden that’s **compact, beautiful, highly productive**, and makes smart use of every inch of space? Meet the herb spiral — a brilliant, three‑dimensional raised-bed design that turns a small patch of land into a lush, multi‑layered herb & veggie garden. Whether you’re gardening on a tiny yard, a patio, or just want a diversified kitchen garden without sprawling beds — the herb spiral delivers. In this article, we’ll explore why herb spirals work, how to build one, what to grow, and how to maintain it for years of harvests.
What Is an Herb Spiral — And Where Did It Come From?
An herb spiral is a raised garden bed shaped like a spiral (or coil), built up with stones, bricks, or other materials, then filled with soil and compost. The spiral rises to a center high point, creating a slope around which plants are arranged according to their water, light, and soil needs. :contentReference[oaicite:2]{index=2}
The concept originates from the world of permaculture — it was popularized by Bill Mollison, one of permaculture’s founders. In his book, the herb spiral is presented as a way to mimic natural growing conditions while maximizing space and efficiency. :contentReference[oaicite:4]{index=4}
Unlike a typical flat raised bed, a spiral bed gives you **vertical diversity** — different heights, sun exposures, drainage, and microclimates. This allows you to grow a wide variety of herbs and plants with different needs — all in a compact footprint. :contentReference[oaicite:5]{index=5}
Why Herb Spirals Are So Powerful — Benefits Galore 🪴
Herb spirals offer many advantages over traditional garden beds. Here are the main ones:
- Maximize growing space in small areas: Because the spiral coils upward, you get more “plantable area” than a flat bed of the same footprint. Great for small yards, patios, or urban gardens. :contentReference[oaicite:6]{index=6}
- Create multiple microclimates: The top of the spiral is dry and well‑drained — ideal for Mediterranean herbs like rosemary, thyme, and sage. The middle offers moderate moisture and soil depth. The bottom stays more moist and sheltered — perfect for water‑loving herbs or plants that prefer humidity. :contentReference[oaicite:7]{index=7}
- Efficient water use & drainage: Watering from the top lets water trickle down through the spiral, watering plants according to their needs. Excess drains away, reducing waterlogging and waste. :contentReference[oaicite:8]{index=8}
- Heat retention & extended growing season: If you build the spiral with stones or bricks, they absorb heat during the day and release it slowly at night — a mini heat‑sink effect. This can help herbs (especially heat‑loving ones) thrive, even in cooler weather. :contentReference[oaicite:9]{index=9}
- Easy access and maintenance: Because the spiral bed is elevated and accessible from all sides, you don’t have to bend much or step on soil. Planting, watering, harvesting — everything becomes easier and more ergonomic. :contentReference[oaicite:10]{index=10}
- Great visual and landscaping appeal: Spiral beds are visually interesting — they break the monotony of rectangular beds and add a sculptural, natural feel to the garden. A well‑designed herb spiral can become a focal point. :contentReference[oaicite:11]{index=11}
- Diverse planting in one compact bed: Because of the microclimates and planting zones, you can grow Mediterranean herbs, moisture‑loving herbs, and even some veggies or flowers — all in the same bed. Excellent for small-scale edible landscaping or kitchen‑garden setups. :contentReference[oaicite:12]{index=12}
- Water & energy efficient — aligned with permaculture principles: You get more yield per square meter, less water waste, and a sustainable, eco‑friendly garden design. :contentReference[oaicite:13]{index=13}
How to Build an Herb Spiral — Step‑by‑Step Guide
Building an herb spiral doesn’t require fancy skills — just a little planning, some basic materials, and a bit of labor. Here’s a simple, tried‑and‑true method:
Step 1: Choose the Right Location
Pick a spot that gets ample sunlight (ideally 6–8 h per day) — herbs generally love sun. Also pick a place that’s visible and convenient (near the kitchen door is popular!) so you’ll enjoy tending it. :contentReference[oaicite:14]{index=14}
If possible, choose a level area. If on lawn/grass, remove turf, or lay cardboard/newspaper under the spiral base to suppress weeds before building. :contentReference[oaicite:15]{index=15}
Step 2: Gather Materials & Tools
You’ll need:
- Stones, bricks, rocks, or building blocks (to form the spiral wall)
- Gravel or small stones (for drainage at the base center) — optional but helpful for water flow/drainage. :contentReference[oaicite:16]{index=16}
- Soil + compost or good garden mix — enough to fill the spiral bed. A mix of topsoil + compost is recommended. :contentReference[oaicite:17]{index=17}
- Basic tools: shovel, rake, wheelbarrow, trowel, measuring tape or string + stakes (to mark out spiral) :contentReference[oaicite:18]{index=18}
- Optional: mulch (straw, leaves, bark) to cover the soil after planting
- Plants / herbs / herbs seedlings
Step 3: Plan & Mark Out the Spiral Base
Use a rope and stake (or a garden hose laid in a spiral) to trace the base circle. A typical herb spiral is around 1.5–2 m (5–6.5 ft) in diameter — but you can scale based on available space. :contentReference[oaicite:19]{index=19}
Also think about orientation: in many gardens, placing the spiral so its south-facing side is exposed to sun maximizes light and warmth for heat‑loving herbs. :contentReference[oaicite:20]{index=20}
Step 4: Build the Spiral Wall/Foundation
Lay the first layer of bricks or stones in a circle following your marking. Then, begin spiraling inward: each new “course” of bricks is placed slightly offset so that as you spiral toward the center, the wall gradually rises. The wall forms the structural backbone of your spiral garden. :contentReference[oaicite:21]{index=21}
Leave about 8–12 inches (≈ 20–30 cm) of planting space between the stone walls on the outside and the inner wall — this ensures enough soil depth for herbs to root. :contentReference[oaicite:22]{index=22}
At the center base, you can add a layer of gravel or small stones — this improves drainage, helps water percolate, and prevents waterlogging at the core. :contentReference[oaicite:23]{index=23}
Step 5: Fill with Soil and Compost
Once the spiral wall is built, fill the bed with a good mixture of soil and compost (about 50/50 is common). If you expect sandy or poor soil, add compost or leaf mold generously to boost fertility. :contentReference[oaicite:24]{index=24}
Fill in layers if you like — heavier compost at bottom, lighter soil near top — to mimic soil profiles and improve drainage at higher, drought‑exposed zones. Some gardeners also add extra organic matter or mulch to improve water retention lower down and deter weeds. :contentReference[oaicite:25]{index=25}
Step 6: Plant According to Zone — Use the Microclimates
One of the biggest strengths of an herb spiral is that it offers different microclimates. But you also need to place plants where they’ll thrive:
- Top (highest point, driest and most drained): Ideal for drought‑tolerant, sun‑loving, Mediterranean herbs like Rosemary, Thyme, Sage, Oregano. :contentReference[oaicite:30]{index=30}
- Middle zone (moderate moisture and sunlight): Good for most culinary herbs, mixed herbs, herbs that like moderate soil moisture — e.g. Basil, Parsley, Chives, Cilantro, etc. :contentReference[oaicite:35]{index=35}
- Bottom / base (moist, shaded or semi‑shaded, with more moisture retention): Perfect for water‑loving or moisture‑tolerant herbs and small edibles — Mint (though watch its spread), Lemon balm, Cilantro (in humid climates), leafy greens, edible flowers, or moisture‑loving herbs. :contentReference[oaicite:39]{index=39}
By planting appropriately according to these zones, you significantly increase the success and diversity of the plants you can grow in a single spiral. :contentReference[oaicite:40]{index=40}
Step 7: Mulch, Water & Maintain
After planting, add a layer of mulch (straw, bark, leaves, compost) to suppress weeds and retain moisture. Mulching also helps soil stay cool and reduces evaporation — especially useful in hotter climates. :contentReference[oaicite:41]{index=41}
When watering, pour water at the top — this mimics natural rainfall, letting water trickle down the spiral, hydrating plants along the way. Because of gravity drainage, you’ll rarely have waterlogging if your spiral is well-built. :contentReference[oaicite:42]{index=42}
Harvest herbs regularly to encourage growth, prune as needed, and top up soil or compost annually (or every few years) to keep fertility high. :contentReference[oaicite:43]{index=43}
What to Grow in Your Herb Spiral — Ideas & Suggestions 🌱
The beauty of a spiral bed is in its versatility. You can grow a mix of herbs, some small vegetables or leafy greens, and even flowers — all in one compact structure. Here are planting ideas based on zones:
| Zone | Best Plants / Herbs | Why They Thrive Here |
|---|---|---|
| Top (dry, sun, well‑drained) | Rosemary, Thyme, Oregano, Sage, Lavender | Prefer dry soil, full sun, minimal water retention |
| Middle (moderate moisture & sun) | Basil, Parsley, Cilantro, Chives, Dill, Tarragon | Need moderate moisture, partial/ full sun, more fertile soil |
| Bottom (moist, shaded/ partial shade) | Mint, Lemon Balm, Parsley (in warm climates), Leafy greens (lettuce, arugula, spinach), Watercress, Basil (in hot/dry climates) | Prefer moisture, cooler soil, partial shade |
| Edging / Sides | Nasturtiums, Calendula, Marigolds, Edible flowers | Add aesthetics, attract pollinators, deter pests; trailing herbs over edges |
Because of the diversity of microclimates, you get a **kitchen‑garden mix** — aroma herbs, cooking herbs, herbs for teas, salad greens, edible flowers — all in one bed. It’s perfect for culinary gardeners, permaculture enthusiasts, or anyone wanting a rich, functional, and beautiful garden in limited space. :contentReference[oaicite:44]{index=44}
Potential Challenges & How to Handle Them
No garden design is perfect, and herb spirals come with a few caveats. But with planning, you can avoid or mitigate most issues:
- Soil drying too fast (top zone): Because the top is well‑drained and exposed, drought‑tolerant herbs perform well here — but you need to avoid overwatering or under‑mulching. Use mulch or organic matter to retain some moisture if your climate is dry.
- Root‑invasive plants (like mint): Mint and similar herbs can spread aggressively. It’s often better to plant them in a pot and bury that pot into the base of the spiral, or use a root barrier. :contentReference[oaicite:45]{index=45}
- Heavy or deep‑rooted veggies: Deep‑rooted or large vegetable plants may not thrive in shallower spiral zones — the design works better for herbs, shallow‑rooted veggies, and small greens. Select plants accordingly.
- Initial labor & soil requirement: Building a spiral, gathering stones/bricks, and filling with soil/compost takes time and material — more effort than planting a flat ground bed. But once built, maintenance is relatively low.
- Uneven watering or drainage issues: Ensure base drainage (gravel/rocks) and proper filling with good soil mix to avoid water accumulation at corners or base points.
Herb Spiral Vs. Traditional Raised Bed: What’s the Difference?
While herb spirals are a type of raised bed, they differ from typical rectangular/flat raised beds in several key ways — and they offer unique advantages:
- Vertical vs. Horizontal Space Utilization: Traditional raised beds spread soil horizontally — the planting area is horizontal and shallow. An herb spiral uses vertical stacking plus horizontal spiral, expanding usable area without occupying more ground footprint.
- Microclimates & Plant Diversity: A flat bed offers uniform conditions; an herb spiral creates zones of varying sun exposure, drainage, and soil depth — enabling more varied planting (sun, shade, moisture‑loving, drought‑tolerant) in one bed.
- Water Efficiency and Drainage: Spiral design mimics natural slopes — water flows down, waterlogging is minimized, and plants can benefit according to their moisture needs. Traditional beds may require more careful watering/drainage.
- Visual & Landscape Impact: Herb spirals offer shape, elevation, and aesthetic appeal — a garden feature rather than just a flat planting bed. For small gardens, that’s a huge plus.
- Space Flexibility: Spirals work even on small yards, patios, or poor soil — you can build them on concrete, lawn, or compact ground. Raised beds often require digging or soil preparation below. :contentReference[oaicite:46]{index=46}
Step‑By‑Step Build Plan — Try This in Your Garden
- Pick a sunny, accessible spot — at least 6 h of sun per day, near the kitchen if you want easy herb access. :contentReference[oaicite:47]{index=47}
- Mark out the base: Grab a rope + stake (or a flexible garden hose) to trace a spiral or circular base about 1.5–2 m (5–6.5 ft) in diameter. :contentReference[oaicite:48]{index=48}
- Build the spiral wall: Use bricks, stones, or blocks — stack them in a spiral toward the center, gradually raising the wall. Leave ~20–30 cm planting space between walls. :contentReference[oaicite:49]{index=49}
- Add drainage at base: Place gravel or small rocks at center bottom — helps drainage and water flow. :contentReference[oaicite:50]{index=50}
- Fill with soil + compost mix: A good mix — half topsoil, half compost — ensures fertility and decent soil structure. Fill generously; soil settles over time. :contentReference[oaicite:51]{index=51}
- Plan your planting map: Decide which herbs go top, middle, bottom, and edges based on moisture/light preference. :contentReference[oaicite:52]{index=52}
- Plant herbs/greens/edibles: Place drought‑tolerant herbs on top, general herbs in middle, moisture‑loving herbs or greens at base. Add decorative or trailing herbs/flowers at edges if you like.
- Mulch and water: Mulch soil surface to conserve moisture and suppress weeds. Water from top — let water trickle down for natural irrigation. :contentReference[oaicite:53]{index=53}
- Maintain & harvest: Harvest herbs regularly, trim as needed, add compost/mulch annually, watch out for aggressive spreaders like mint (use root barrier or pot them).
Sample Planting Plan: What to Grow in Your Herb Spiral 🌿
Here’s a sample layout for a small‑to‑medium herb spiral — mix of herbs, greens, and edible flowers. Adjust based on your climate, sun exposure, and taste.
- Top / Dry Zone (sunny): Rosemary, Thyme, Sage, Oregano, Mediterranean herbs — heat & drought tolerant
- Middle Zone: Basil, Parsley, Chives, Dill, Tarragon, Tarragon, Coriander (Cilantro)
- Base / Moist Zone: Mint (in pot or root‑barrier), Lemon Balm, Chervil (if climate permits), Watercress (if damp enough), Small salad greens (lettuce, arugula), Edible greens or microgreens
- Edges & Fillers: Edible flowers & companions like Nasturtiums, Calendula, Marigolds; trailing herbs like creeping Thyme or Oregano over edges; small vegetables with shallow roots (radish, baby carrots, spinach) in lower‑moisture middle areas
This mix gives you: aromatic herbs for cooking, fresh salad greens, edible flowers, and a dynamic, ever‑changing garden — all from a single spiral bed. 🌱
Maintenance Tips & Best Practices for Longevity
- Water from top, especially after hot/dry periods: This keeps the flow going and nourishes all levels. Monitor drainage — if water pools at base, ensure drainage gravel or tweak soil mix.
- Harvest herbs regularly: Frequent harvest encourages bushy growth, discourages bolting, and keeps herbs fresh.
- Mulch annually: Apply organic mulch (straw, leaves, compost) to retain moisture, suppress weeds, and feed soil as it decomposes.
- Check aggressive plants: Herbs like mint spread fast. Consider containment (root barrier or pot buried), or plant them outside the spiral if you don’t want invasion. :contentReference[oaicite:54]{index=54}
- Top up soil every 1–2 years: Soil settles, nutrients deplete — periodically add compost or organic matter for continued fertility.
- Use companion planting & diversity: Mix herbs, edible flowers, greens — diversity reduces pests, improves soil health, and boosts biodiversity (pollinators, beneficial insects, etc.). :contentReference[oaicite:55]{index=55}
Is an Herb Spiral Right for You? — Who It’s Great For
An herb spiral is especially suited for:
- Small gardens, patios, or urban yards: If you lack space for large in‑ground beds but still want a productive garden.
- Herb lovers and kitchen gardeners: Easy access to a variety of herbs, fresh at hand whenever cooking.
- People who like efficient, low‑maintenance gardening: Once established, herb spirals need relatively little upkeep compared to large beds.
- Permaculture and sustainable gardening enthusiasts: The spiral leverages natural shape, water flow, and microclimate — embodying permaculture principles. :contentReference[oaicite:56]{index=56}
- Mixed-use gardens (herbs + edibles + flowers): The diversity of zones supports a varied planting palette — culinary herbs, salad greens, edible flowers, pollinator plants, and more.
Common Mistakes & How to Avoid Them
Even a great design like the herb spiral can fail if not built or managed properly. Here are common pitfalls and how to avoid them:
- Using poor soil or not enough compost: Herbs may struggle if soil is heavy or nutrient-poor. Solution: mix good compost or organic matter into soil when filling.
- Poor drainage / waterlogging at base: If base drains poorly, bottom herbs may rot. Solution: add gravel base, ensure spiral wall allows drainage, avoid compacted soil. :contentReference[oaicite:57]{index=57}
- Over‑watering top zone / under‑watering bottom plants: Water distribution needs balance — water from top is best, but adjust frequency depending on season and rainfall.
- Planting aggressive herbs without barrier (like mint): Mint may overrun your spiral. Use a pot or barrier if planting mint or other invasive herbs. :contentReference[oaicite:58]{index=58}
- Neglecting mulching and soil replenishment: Without mulch/compost, soil may dry or degrade over seasons — reducing productivity over time.
- Building in a shady spot: Herbs typically need sun — avoid placing spiral where it gets too little light.
Final Thoughts — A Garden Idea That Grows on You 🌿
An herb spiral isn’t just another garden bed — it’s a rethinking of what a garden can be. It transforms limited space into layered, living, edible landscapes. It invites biodiversity, conserves water, maximizes yield, and gives you easy access to fresh herbs, leafy greens, and edible plants. It blends function and beauty, structure and nature. And most importantly — it works.
If you’ve ever thought your yard is too small for a proper garden — or that gardening is tiring, messy, or inefficient — the herb spiral is your answer. With a bit of effort and planning, you can build a perennial, productive, lush garden feature that serves your kitchen, your health, and your enjoyment of nature. 🌱✨