Brownie Cupcakes – Crispy on the Outside, Chewy on the Inside
Do you ever fight over the corner brownie pieces, wishing every serving had that crackly edge and fudgy middle? 🍫 If so, you’re in for a treat. This recipe transforms brownies into individual “cupcakes” baked in muffin tins, giving everyone their coveted crisp-yet-chewy bite. In this article, we walk you through the science behind the texture, share expert tips from renowned chefs, provide nutritional insights, safety advice, and even internal links to related content on FreshTonerHungar. By the end, you’ll have a foolproof, crowd-pleasing recipe plus answers to your top questions.
—
Introduction: Why Brownie Cupcakes?
Traditional brownie pans yield edges and middles with varying textures — the corners are crisp, the center gooey, and the rest somewhere in between. But what if every single piece was a perfect balance of crisp exterior and chewy interior? That’s the magic of brownie cupcakes. Baking in muffin tins ensures even edge exposure, while extra tweaks—like adding an extra egg—help with chewiness and richness.
Chef Bobby Flay once noted that texture is what elevates a dessert from good to unforgettable. By converting brownies into cupcake form, you get that coveted edge on every unit without compromising softness. The added advantage? Portion control, fun presentation, and easier serving.
—
🍴 Ingredients & Equipment
Ingredients
- 2 boxes of your favorite **brownie mix** (choose a high-quality, fairly fudgy mix)
- Ingredients called for on the box (usually water, oil, eggs, etc.)
- 1 extra large egg (this boosts richness and chewiness)
- Nonstick cooking spray (or butter/oil + flour, if you prefer)
Equipment
- Two 12-cup muffin tins
- Mixing bowls and whisk or spoon
- Measuring cups/spoons
- Toothpick or tester
- Cooling rack
- Butter knife (for gently releasing cupcakes)
—
Step‑by‑Step Instructions
Step 1: Preheat the Oven
Preheat your oven to **350°F (175°C)**. Position the oven rack in the center to ensure even heat distribution.
Step 2: Mix the Batter
Follow the directions on the brownie mix box: combine water, oil, eggs (as specified), and mix until smooth. Then whisk in the **extra egg**. This additional egg helps give the brownie cupcakes a richer, chewier texture by adding extra protein and moisture to the batter.
Step 3: Prep the Pans
Spray both 12‑cup muffin pans generously with nonstick spray. Be thorough, getting into corners and around edges so removal is easy. Optionally, you can lightly flour the cups after oiling, but this is usually unnecessary with a good nonstick spray.
Step 4: Fill the Cups
Divide the brownie batter evenly between the 24 muffin cups. A scoop or small measuring cup helps keep portions uniform. Fill each cup about **¾ full** — leaving a little headspace for rise.
Step 5: Bake
Bake at 350°F for about **20 minutes**. Keep an eye on them — the tops should look set, slightly crackly, and the edges beginning to pull away. You can test by inserting a toothpick: aim for a few moist crumbs (not raw batter). For **extra gooey centers**, you can reduce time by 1–2 minutes.
Step 6: Cool & Remove
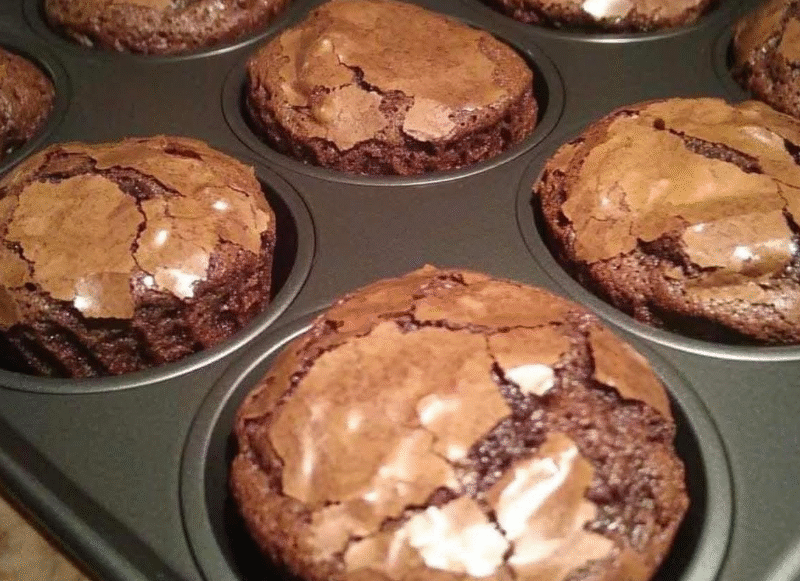
Let the cupcakes rest in the pan for about **5 minutes**. Then, gently run a butter knife tip around each edge and pop them out. Transfer to a wire rack to cool completely (or close to it) before adding any toppings.
—
Chef-Recommended Tips & Variations
Here are some creative tweaks from culinary minds like Gordon Ramsay, Ree Drummond, and Ina Garten to elevate your brownie cupcakes:
- Extra mix-ins: Stir in chocolate chips, chopped nuts (walnuts, pecans), or swirl in peanut butter or Nutella before baking.
- Salted contrast: Sprinkle a pinch of flaky sea salt atop each brownie cupcake right after baking to heighten flavor complexity.
- Flavor infusions: Add a teaspoon of espresso powder, orange zest, or cinnamon to the batter for subtle depth.
- Decorative finish: Once cooled, dust with powdered sugar, drizzle with caramel, melted chocolate, or top with whipped cream.
- Freezing tips: Once completely cooled, wrap individual brownie cupcakes tightly with plastic foil or store in a zip-top bag with parchment between layers. Thaw at room temperature; warm slightly before serving for best texture.
- Alternate pans: You can use silicone muffin pans — just ensure they’re well-greased, as releasing fudgy brownies can be trickier.
Chef Ina Garten emphasizes the value of simplicity: “Let each ingredient shine.” In this recipe, the extra egg is a small tweak that makes a big difference without overcomplicating the process.
—
Why This Texture Works: Science of Crisp & Chewy
Understanding why these brownie cupcakes turn out crispy on the outside, chewy inside helps you tweak further:
- Edge exposure: Each muffin cup side creates a “corner” on all sides, so there’s more exposed edge to crisp up.
- Protein and moisture: The extra egg adds protein and moisture-binding structure, promoting chewiness.
- Sugar crystallization: As the batter bakes and cools, sugar partially recrystallizes, creating the crackly top layer.
- Heat conduction: The metal muffin tin conducts heat well into the edges, accelerating crisping compared to central bulk in a regular pan.
—
Nutrition & Health Benefits
Brownie cupcakes are indulgent treats, so moderation is key. Below is an approximate nutrition table per brownie cupcake (based on 24 servings). Exact values depend on your specific brownie mix and add-ins.
| Nutrient | Per Brownie Cupcake (approx.) | Notes / Context |
|---|---|---|
| Calories | ~ 180 kcal | Depends heavily on mix and toppings |
| Total Fat | 8–10 g | From oil or butter in mix |
| Saturated Fat | 2–4 g | Varies with chocolate content |
| Cholesterol | ~ 25 mg | From eggs |
| Sodium | ~ 100–150 mg | Depends on mix and salt additions |
| Total Carbohydrates | 20–25 g | Main energy source |
| Sugars | 14–18 g | Includes natural and added sugar |
| Protein | 2–3 g | From eggs and flour |
| Fiber | – 1 g | Negligible unless whole grain or nuts added |
Health Tips:
- Use a brownie mix with reduced sugar or use dark chocolate versions.
- Swap half the oil for unsweetened applesauce (if compatible with the mix) to reduce fat.
- Add nuts or seeds (e.g., walnuts) to up healthy fats and fiber.
- Keep portion size in check—these are rich treats.
- Pair with fresh fruit or Greek yogurt to balance sweetness.
—
Authentic Safety & Baking Tips
To ensure your brownie cupcakes come out flawless and food-safe, heed these professional pointers:
- Avoid underbaking: Don’t shy away from letting edges set; underdone centers may not be safe to eat, especially given eggs.
- Even batter distribution: Unequal filling leads to varied bake times—use a scoop or measuring device.
- Cup spacing: If your oven has hot spots, rotate pans mid-bake for even cooking.
- Cool before storing: Let brownies cool fully to avoid condensation (which softens edges) before sealing.
- Storage: Store in airtight containers. If stacking, place parchment between layers to prevent sticking.
- Freezer safety: Label with date; consume within 2–3 months for best quality.
—
Serving & Presentation Ideas
Once your brownie cupcakes are ready, here are fun ways to present or serve them:
- Dust with **powdered sugar**, cocoa, or edible glitter ✨.
- Drizzle with **melted caramel**, chocolate ganache, or peanut butter sauce.
- Top with whipped cream or a small scoop of vanilla ice cream.
- Serve on cupcake liners or mini dessert plates for easy noshing.
- Make them “mini brownie sundaes” by adding fruit or nut toppings.
For related dessert ideas, check out our Chocolate Dessert Recipes page for more inspiration.
—
10 FAQs (Frequently Asked Questions)
1. Can I use a from‑scratch brownie batter instead of boxed mix?
Absolutely. Use a dense, fudgy recipe, then add an extra egg (or a yolk) to boost chewiness. The same muffin-pan method applies.
2. Can I reduce the sugar or fat in the mix?
Sometimes. You might replace part of the oil with applesauce or cut sugar slightly, but be cautious—too much substitution can affect texture and structure.
3. Why did some cupcakes stick or fall apart?
Likely due to inadequate greasing or underbaking. Always grease well and allow a slight cooling time before removal.
4. How do I make them more cake-like instead of chewy?
You can bake a bit longer, add an extra egg white or reduce fat slightly. But this recipe is optimized for chewy texture.
5. Can I make mini brownie cupcakes (bite-size)?
Yes, use a mini muffin tin, reduce baking time (approx 10–12 minutes), and check early for doneness.
6. How do I store leftovers?
Store at room temperature in airtight containers (for 2–3 days), or freeze individually wrapped for up to 2–3 months.
7. Can I add fruit or vegetables (e.g. zucchini)?
Small amounts of grated zucchini or mashed bananas might work, but they’ll add moisture—reduce other liquids to compensate.
8. How do I reheat them?
Warm at 300°F (150°C) for 5–8 minutes, or microwave 10–20 seconds—just enough to soften the center without melting the edges.
9. Can I double or half the recipe?
Yes. For half, use one box of mix and one muffin tin. For double, use four muffin tins (or bake in batches).
10. Why is my top not crackly?
It’s often because the surface was too moist or the oven temperature too low. Next time, ensure batter is well mixed (but not overmixed) and bake at full 350°F.
—
Tips for Perfect Brownie Cupcakes Every Time
To elevate consistency and delight in every bite, keep these professional habits:
- Use an oven thermometer to verify accurate temperature.
- Bring all ingredients to room temperature for better mixing.
- Don’t overmix — stir just until combined.
- Stagger baking times if using multiple pans, and rotate as needed.
- Test early — better underdone than overbaked (you can always bake a minute more).
—
Conclusion
The beauty of brownie cupcakes lies in their clever twist: turning every bite into that coveted crispy corner meets chewy center. With nothing more than your favorite brownie mix and an extra egg, you can create a batch of delightful treats that are easy, shareable, and utterly satisfying. Whether you’re baking for a party, school treat, or just to satisfy your chocolate craving, this method is a winner.
Don’t forget to explore related dessert ideas on FreshTonerHungar Dessert Ideas, and feel free to experiment with flavors, mix-ins, and finishes. Happy baking — and may every cupcake be the perfect bite! 🍰