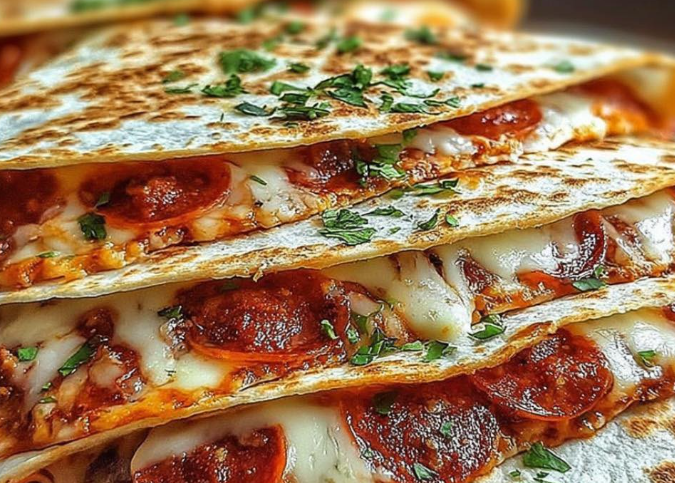
Pepperoni Pizza Quesadillas
Want pizza flavor in minutes? **Pepperoni Pizza Quesadillas** deliver all the melty cheese, savory pepperoni, and tangy sauce of your favorite pie—without the long bake time. This recipe gives you a crisp tortilla shell with warm, gooey insides, perfect for lunch, dinner, or a snack. Below is a fully detailed guide: ingredients, method, chef tips, variations, nutrition, food safety, troubleshooting, and FAQs.
Why This Recipe Works
This dish is a “pizzadilla” hybrid: it combines the crisp, golden texture of a quesadilla with the flavors of pizza. Because the ingredients are layered between tortillas and cooked on a skillet or griddle, you get quick cooking, minimal cleanup, and no need to preheat an oven.
Popular recipe sites like Snixy Kitchen emphasize pan-frying the pepperoni first so it crisps and reduces grease, giving better texture and flavor. :contentReference[oaicite:0]{index=0} Barefeet in the Kitchen recommends a light butter layer on tortillas to help crisp and flavor the exterior. :contentReference[oaicite:1]{index=1}
What You’ll Get from This Guide
- A master recipe with full proportions (US + approximate metric)
- Step‑by‑step instructions with technique notes
- Chef tips & tricks for crispness and flavor
- Variations & customization ideas
- Nutrition estimates & health considerations
- Food safety & storage advice
- Troubleshooting common issues
- 10 FAQs you’re likely to ask
Ingredients & Why They Matter
Base Ingredients (for 4 quesadillas)
- 4 (8‑inch) flour tortillas (or your preferred tortilla size)
- ½ cup shredded mozzarella cheese (≈ 2 oz; about ¼ cup per quesadilla)
- 1 cup pizza sauce (≈ ¼ cup per quesadilla)
- Pepperoni slices (amount depends on preference; see notes below)
Optional Extras / Seasonings
- Butter or oil (for cooking the tortilla exterior) — many recipes lightly butter the tortilla surface. :contentReference[oaicite:2]{index=2}
- Garlic powder, Italian seasoning, or oregano for extra flavor
- Additional cheeses (Parmesan, provolone) or cheese blends for depth
- Other pizza toppings: sliced olives, mushrooms, bell peppers, cooked sausage, etc.
- Fresh basil or parsley for garnish
- Extra pizza sauce or marinara for dipping
Approximate Metric Conversions
- Flour tortillas: ~ four 20 cm tortillas (or whatever your 8‑inch equivalent is)
- Mozzarella: ~ 56 grams
- Pizza sauce: ~ 240 mL
Ingredient Roles & Tips
- The **tortillas** form the crisp “shell” around the filling—choose ones that toast well.
- **Mozzarella** provides the melt and stretch; use good quality, freshly shredded if possible.
- **Pizza sauce** brings the tomato flavor and moisture—spread a thin layer so the tortilla doesn’t get soggy.
- **Pepperoni** gives flavor and texture; crisping them first removes excess grease and enhances bite. :contentReference[oaicite:3]{index=3}
- **Butter/oil** helps the tortilla crisp and prevents sticking when cooking.
- Seasonings (garlic powder, oregano) boost flavor without much effort.
Step‑by‑Step Instructions
Pre‑Prep Steps
- If desired, **pan‑fry the pepperoni** briefly in a hot skillet until edges curl and crisp. This helps reduce grease inside the quesadilla and improves texture. :contentReference[oaicite:4]{index=4}
- Lay out your tortillas. If you’re using butter or oil on the exterior, lightly spread or brush one side of each tortilla.
Assemble the Quesadillas
For each quesadilla:
- Place one tortilla (buttered side down if using butter) on your work surface.
- Spoon ~¼ cup of pizza sauce onto half of the tortilla; spread in a thin layer (you want it to cling, not drip).
- Sprinkle mozzarella over the sauce.
- Add pepperoni slices (and any additional toppings) on top of the cheese.
- Optionally, sprinkle a little more cheese on top of the toppings (this helps “glue” the top tortilla).
- Fold the tortilla over (or place a second tortilla on top) so the fillings are sandwiched.
Cook the Quesadillas
Using a skillet or griddle, follow these steps:
- Preheat a nonstick or cast-iron skillet over **medium** heat.
- Place the assembled quesadilla in the pan.
- Cook **2–4 minutes** on one side until golden and the cheese begins to melt. Use a spatula to peek underneath and check color. :contentReference[oaicite:5]{index=5}
- Flip carefully (use a large spatula), and cook another 2–4 minutes until the other side is golden and cheese is fully melted. :contentReference[oaicite:6]{index=6}
Finish & Serve
- Remove the quesadilla from the pan and let it rest ~1 minute (this helps the cheese set slightly so it doesn’t ooze when slicing).
- Slice into wedges (e.g. 4 or 6) using a sharp knife or pizza cutter.
- Serve hot, with a side of warm pizza sauce or marinara for dipping.
- Garnish with fresh basil or parsley if desired.
Chef Tips & Techniques
- **Don’t overload** – too much sauce or toppings can prevent crisping and cause sogginess.
- **Crisp the pepperoni** first to reduce grease and enhance texture. :contentReference[oaicite:7]{index=7}
- **Butter the exterior lightly** for crispness, but don’t overdo it (too much fat equals soggy). :contentReference[oaicite:8]{index=8}
- **Peep under the tortilla** occasionally to monitor browning; adjust heat if it’s browning too quickly or barely browning.
- **Use a heavy skillet** (cast iron, etc.) to get even browning and heat distribution.
- **Let it rest briefly before cutting** so the cheese holds together better.
- **Adjust heat on the fly** – if one side is browning too fast, lower heat or shift pan off direct heat briefly.
Variations & Customizations
Cheese Blends
Instead of just mozzarella, try blending in provolone, cheddar, fontina, or Parmesan for depth. Many pizza quesadilla recipes recommend four-cheese blends. :contentReference[oaicite:9]{index=9}
Extra Toppings
Add your favorite pizza toppings (thinly sliced) inside: mushrooms, onions, bell peppers, olives, cooked sausage, spinach, etc. Just slice thinly so they cook quickly. :contentReference[oaicite:10]{index=10}
Spicy or Flavored Variation
Add red pepper flakes, chopped jalapeños, pepper jack cheese, or a swirl of chili sauce inside. You could also brush the exterior with garlic butter or herb butter before cooking.
Grilled or Panini Pressed Version
If you have a panini press or grill pan, you can press the quesadilla for extra grill marks and crisping. Just preheat and cook until cheese melts and tortilla crisps.
Baked Version
Assemble the quesadillas, place them on a baking sheet, brush lightly with oil or butter, and bake at ~375 °F (190 °C) for 8–10 minutes, flipping halfway, until golden and cheese melted. Many pizza‑quesadilla recipes allow this. :contentReference[oaicite:11]{index=11}
Air Fryer Variation
You can also air fry quesadillas: preheat air fryer to ~ 400 °F (≈ 200 °C) and cook for ~5 minutes, pressing the quesadilla gently to keep it together. One recipe for “Quick & Easy Pizza Quesadilla” suggests pressing the ingredients so the two tortillas stick together, to prevent the top from flying. :contentReference[oaicite:12]{index=12}
Nutrition & Health Considerations
Below is a rough nutrition estimate per quesadilla (assuming 4 quesadillas total). Use your ingredient labels for more accurate values.
| Nutrient | Estimate per Quesadilla |
|---|---|
| Calories | ≈ 300‑400 kcal |
| Protein | ~ 12‑18 g |
| Total Fat | ~ 10‑18 g |
| Saturated Fat | ~ 4‑8 g |
| Carbohydrates | ~ 25‑35 g |
| Fiber | ~ 1‑2 g |
| Sugar | ~ 2‑5 g (from sauce, if sweetened) |
| Sodium | Moderate to high (depends on pepperoni & sauce) |
Health Tips & Notes:
- Use whole wheat or lower-carb tortillas to boost fiber and reduce refined carbs.
- Opt for low-moisture mozzarella and less-sugary pizza sauce to reduce moisture and excess sugar.
- Choose leaner pepperoni or reduce the amount, or use turkey pepperoni. :contentReference[oaicite:13]{index=13}
- Go easy on butter or oil on the exterior to keep it lighter.
- Serve with a fresh salad or steamed vegetables to balance richness.
Food Safety, Storage & Reheating
Storage
- Allow quesadilla to cool slightly, then wrap in foil or store in airtight containers.
- Refrigerate and consume within **1–2 days** for best quality (cheese may begin to get rubbery or the tortilla softens).
- You can also freeze the quesadillas individually (wrapped) for 1‑2 months. Thaw and reheat as below.
Reheating
- Reheat in a skillet or griddle over medium heat until crisp again and cheese remelts.
- Alternatively, use air fryer at ~ 350 °F for a few minutes to crisp the tortilla and warm the inside.
- Avoid microwaving too much—it tends to make the tortilla chewy and cheese rubbery.
Food Safety Tips
- Use safe handling practices for pepperoni and any meats. Although pepperoni is cured, cross‑contamination should be avoided.
- Don’t leave quesadillas at room temperature longer than ~2 hours (or less in hot climates).
- Ensure cheese melts fully and the interior gets warm for safe enjoyment.
Troubleshooting & Common Mistakes
- Tortilla burns before cheese melts: Reduce heat, use a heavier pan, or partially melt cheese first in microwave then brown tortilla.
- Tortilla soggy / limp: Use a thin layer of sauce, crisp pepperoni first, avoid overcrowding, and cook until both sides crisp.
- Filling spills out when flipping: Don’t overfill; press gently when cooking; use a wide spatula to flip.
- Cheese doesn’t melt: Use good-quality melty cheese, allow enough heating time, consider covering or pressing lightly.
- Tortilla doesn’t crisp: Add a little butter or oil to exterior, ensure pan is properly preheated.
FAQs (10 Common Questions)
1. Can I use corn tortillas instead of flour?
You can, but corn tortillas are less flexible and may crack when folded. They also crisp differently. Use ones that are fresh and pliable, or consider using two for support.
2. How many pepperoni slices per quesadilla?
It depends on your appetite and tortilla size. A good starting point is 6–8 slices (or enough to cover the surface). If slices are large, you can quarter them.
3. Do I need to cook the pepperoni first?
Not strictly, but frying it briefly helps crisp the edges and reduce excess grease, improving texture. Many recipes recommend this step. :contentReference[oaicite:14]{index=14}
4. Can I prepare these ahead of time?
You can assemble quesadillas and refrigerate for a short time, then cook just before serving. However, tortillas may absorb moisture and soften. It’s best to cook soon after assembly.
5. What if my quesadilla browns too fast?
Lower the heat slightly and use a heavier pan or move off direct heat briefly. You can also pre-melt cheese or partially microwave first, then crisp tortilla. :contentReference[oaicite:15]{index=15}
6. Can I bake these instead?
Yes — assemble and place on a baking sheet, brush surfaces lightly with oil or butter, and bake at ~375 °F (190 °C) for ~8–10 minutes (flipping halfway) until golden and cheese melted. :contentReference[oaicite:16]{index=16}
7. How do I make them more filling?
Add extra protein (chicken, sausage), vegetables, or serve with a side (salad, soup, veggies). You can also use thicker tortillas or double up the filling slightly.
8. Are these good for kids?
Yes! They’re often kid-friendly and quick to make. You can reduce spiciness, omit extra toppings, and cut into fun shapes.
9. Can I make this gluten-free?
Yes — use gluten-free tortillas and ensure your pizza sauce and pepperoni are gluten-free. Most other ingredients (cheese) are naturally gluten-free.
10. How to reheat without making them soggy?
Use a skillet or air fryer to crisp the outside while warming the inside. Avoid microwaving too much. You can also wrap in foil in an oven and re-crisp.
Serving Ideas & Presentation
- Serve wedges on a platter with small bowls of warm pizza or marinara sauce for dipping.
- Garnish with fresh basil, parsley, or a sprinkle of Parmesan.
- Pair with a simple salad or steamed veggies for a balanced meal.
- For a fun twist, serve with flavored ranch or garlic butter drizzle.
- Stack several on a plate with parchment between layers to keep them crispy.
Conclusion & Final Thoughts
Pepperoni Pizza Quesadillas (aka pizzadillas) are a delightful, speedy way to enjoy pizza flavors without waiting for an oven. With crisp tortillas, melted cheese, and savory pepperoni, they’re ideal for lunch, dinner, or a snack. Use the tips, variations, and troubleshooting above to make them your own. Let me know if you’d like a printer‑friendly version, or a shorter “quick reference” you can keep near your stove!