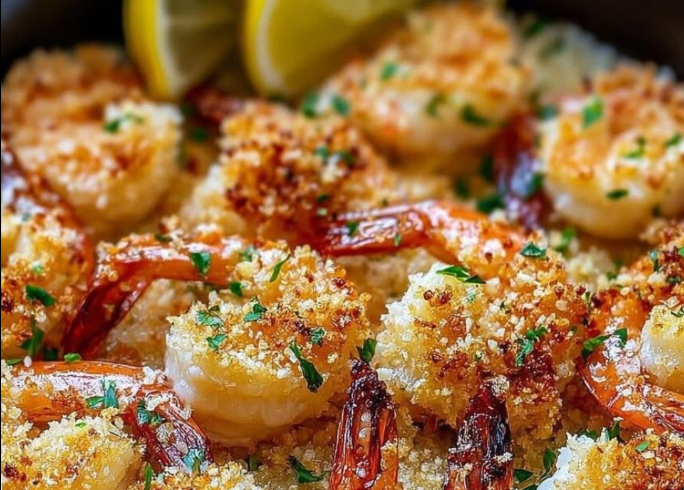
Air Fryer Garlic Parmesan Shrimp: Crispy, Flavorful & Easy
Seafood night just got easier—and more delicious. Imagine juicy shrimp coated in garlic, olive oil, and Parmesan, crisped to perfection in your air fryer. This Air Fryer Garlic Parmesan Shrimp recipe delivers bold flavor, minimal fuss, and great texture. It’s perfect as a quick weeknight dinner, appetizer, or elegant dish for entertaining. In this guide, you’ll find a full ingredient breakdown, step‑by‑step instructions, chef insights, variations, nutrition info, food safety tips, and FAQs to guide you to success.
Why This Recipe Works
The air fryer is ideal for shrimp because it uses circulating hot air to crisp without deep frying. Shrimp cook very quickly, so the environment of the air fryer ensures even cooking, crisp edges, and minimal oil. The combination of garlic and Parmesan gives a savory, nutty crust that sticks well and enhances the shrimp’s natural sweetness.
Many air fryer garlic Parmesan shrimp recipes follow similar principles: pat the shrimp dry, toss with oil and seasonings, coat with cheese (and sometimes breadcrumbs), and air fry ~5–10 minutes. :contentReference[oaicite:0]{index=0} For instance, Love Bakes Good Cakes gives a version for 12 oz shrimp, olive oil, garlic, salt, pepper, and Parmesan, cooked ~10 minutes. :contentReference[oaicite:1]{index=1} Meanwhile, Cooks Well With Others presents a breaded version with panko, egg, garlic powder, and Parmesan, also air fried ~10 minutes at 400 °F. :contentReference[oaicite:2]{index=2}
What You’ll Learn Here
By the end of this guide, you’ll have:
- A master recipe (with full metric/imperial breakdowns)
- Chef’s tips & tricks to avoid overcooking or soggy shrimp
- Several creative variations (breaded, spiced, citrusy, etc.)
- Complete nutrition estimates and health considerations
- Food safety and storage guidelines
- 10 FAQs to solve common issues
Ingredients & Their Roles
Here’s a refined and expanded ingredient list, based on your initial ingredients plus additions to round out the flavor and texture.
Core Ingredients (Imperial / US Units)
- 1 lb (≈ 450 g) large raw shrimp — peeled and deveined (tails on or off, your choice)
- 1 tablespoon olive oil — helps the seasonings and Parmesan adhere
- 1 teaspoon sea salt — basic seasoning baseline
- ½ teaspoon freshly cracked black pepper — adds mild heat
- 2–4 cloves garlic, minced (or ½ teaspoon garlic powder) — for robust garlic flavor
- ½ cup freshly grated Parmesan cheese — gives the crusty, savory coating
- Optional enhancements:
- ½ teaspoon smoked paprika or paprika — for extra depth and color
- ½ teaspoon Italian seasoning or dried herbs (oregano, basil)
- ¼ teaspoon red pepper flakes or cayenne — for a spicy kick
- Lemon juice (1 teaspoon or more) or lemon zest — brightens the dish
- Fresh herbs (parsley, cilantro) for garnish
Metric / Approximate Conversions
- 450 g shrimp
- 15 mL olive oil
- 5 g salt
- 2–3 g black pepper
- 2–4 garlic cloves (~6–12 g), or 2–3 g garlic powder
- ~50 g freshly grated Parmesan
- Optional:
- 1–2 g smoked paprika or paprika
- 1–2 g dried herbs
- 1 g red pepper flakes (if using)
- Lemon juice / zest as desired
Role & Interplay of Ingredients
- The shrimp is your protein base; it cooks fast and takes on flavors readily.
- Olive oil helps bind seasonings and aids in browning without saturating the shrimp in fat.
- Salt and pepper provide essential seasoning and balance the richness.
- Garlic is the flavor star—minced fresh gives pungency, while garlic powder provides convenience and consistency.
- Parmesan forms a flavorful crust that crisps in the air fryer; freshly grated is best for texture.
- Optional seasonings (paprika, herbs, red pepper) let you customize the flavor profile (smoky, herby, spicy).
- Lemon juice or zest adds brightness and counterpoint to the savory cheese and garlic.
Step‑by‑Step Instructions
1. Prep & Dry Shrimp
Begin by ensuring your shrimp are peeled, deveined, and thoroughly rinsed (if from shell). Pat them **very dry** with paper towels. Excess moisture is the enemy of crispiness—moist shrimp steam instead of crisp.
2. Season & Coat
- In a mixing bowl, toss the shrimp with olive oil, salt, pepper, and minced garlic (or garlic powder). Ensure even coating.
- Add the grated Parmesan (and optional paprika, herbs, etc.), then toss again gently so each shrimp is coated. If you like a thicker crust, you can press the shrimp into the cheese mixture to adhere more.
- If using lemon juice, drizzle it over and toss again briefly.
- Let the shrimp rest for 2–5 minutes so flavors meld (optional but helpful).
3. Preheat the Air Fryer
Preheat your air fryer to **350 °F (175–180 °C)** (or per your model’s “shrimp” or “seafood” setting). Some recipes use 360 °F or 400 °F depending on desired crispness. :contentReference[oaicite:3]{index=3}
Lightly spray or brush the air fryer basket with oil or nonstick spray to prevent sticking.
4. Arrange Shrimp in Basket
Place the shrimp in a **single layer**, without overlapping. Crowding reduces air circulation and leads to uneven cooking. If needed, cook in batches.
5. Air Fry the Shrimp
Cook for about **5–7 minutes**, flipping once halfway (after ~2.5–3 minutes). Shrimp are done when they turn opaque and pink, and the Parmesan crust is golden and crisp. Avoid overcooking — overcooked shrimp become rubbery.
Depending on the shrimp size or your air fryer model, some recipes call for up to 10 minutes at slightly higher temps. :contentReference[oaicite:4]{index=4}
6. Finish & Serve
- Once cooked, remove shrimp and immediately serve.
- Garnish with freshly chopped herbs (like parsley) and a light squeeze of lemon.
- If desired, drizzle a little melted butter + garlic for extra richness.
Chef Tips & Tricks for Best Results
- Dry thoroughly: Pat shrimp dry multiple times; moisture will ruin crispiness.
- Use freshly grated Parmesan: Avoid pre-shredded, as it often has anti-caking additives that prevent good adherence.
- Don’t overcoat: A moderate coating yields crispness without burning.
- One layer only: Avoid stacking shrimp in the basket.
- Flip midway: Helps both sides crisp evenly.
- Watch cooking time carefully: Shrimp cook fast; start checking a bit early.
- Let them rest briefly: A 1–2 minute rest helps the crust set.
- Adjust seasoning to taste: Parmesan and garlic are strong—taste your mix first if unsure.
Variations & Creative Twists
Breaded “Crunchy” Version
For more crunch, you can adopt a breading step: beat one egg, dip shrimp in egg, then dredge in a mix of panko + Parmesan + garlic powder + herbs. Then air fry ~10 minutes at 400 °F. This version is described by Cooks Well With Others. :contentReference[oaicite:5]{index=5}
Keto / Low‑Carb Option
Skip the panko or breadcrumbs and rely solely on Parmesan + garlic + oil for a crust-like effect. Sweet C’s Designs gives such a version, focusing on Parmesan to deliver crispness without carbs. :contentReference[oaicite:6]{index=6}
Spicy Garlic Parmesan Shrimp
Add red pepper flakes, a dash of cayenne, or chili powder to the seasoning mix for heat. You can also drizzle with hot garlic butter afterward.
Citrus & Herb Burst
Mix in lemon zest into the Parmesan mix, and finish with fresh basil or cilantro after cooking. A light lemon vinaigrette drizzle also brightens the dish.
Italian Herb & Sun‑Dried Tomato Version
Add dried Italian herbs (oregano, basil, thyme), a bit of garlic powder, and finely chopped sun-dried tomato bits into the coating for Mediterranean flair.
Shrimp Scampi Style
After cooking, toss shrimp in melted butter with garlic and parsley, then serve over pasta or crusty bread. It becomes a hybrid of garlic Parmesan and scampi flavors.
Nutrition, Health Considerations & Estimates
Below is an estimated nutrition table for ~4 servings based on this recipe. Use your specific ingredient labels for precise values.
| Nutrient | Estimate per Serving (¼ of recipe) |
|---|---|
| Calories | ~ 180‑240 kcal |
| Protein | ~ 20–25 g |
| Total Fat | 8–12 g |
| Saturated Fat | 2–4 g |
| Carbohydrates | 1–3 g (mostly from Parmesan/seasonings) |
| Sugar | 0–1 g |
| Cholesterol | Moderate (from shrimp) |
| Sodium | Moderate to high (from shrimp + Parmesan + salt) |
Health Notes & Tips:
- Shrimp is a lean, high-protein seafood with beneficial nutrients.
- Because Parmesan and salt contribute sodium, adjust salt downward if your cheese is salty.
- Use extra garlic, herbs, or citrus to boost flavor without calories.
- If you make a breaded version, the carbs and calories increase—keep portions in mind.
Food Safety, Storage & Serving Advice
Storage & Refrigeration
- Once cooked and cooled, store shrimp in an airtight container in the refrigerator. Use within **2–3 days**.
- Reheat gently in the air fryer (low temp, ~2–3 minutes) or in microwave just until warmed. Too much heat will overcook them.
- Freeze cautiously: shrimp texture changes when frozen and thawed; best to freeze raw (seasoned) shrimp and cook fresh later.
Food Safety Tips
- Use fresh, high-quality shrimp; avoid ones with off smell or sliminess.
- Always wash hands, utensils, and surfaces after handling raw shrimp to prevent cross‑contamination.
- Don’t leave shrimp or seafood out at room temperature for extended periods (max ~1–2 hours). In warm climates, shorten that period.
- Make sure shrimp is cooked through (opaque and pink) — translucent or greyish means undercooked.
Troubleshooting: Common Issues & Fixes
- Shrimp turns rubbery / chewy: Overcooking is the most frequent culprit. Start checking a little early.
- Parmesan coating doesn’t stick: Shrimp too wet, or insufficient oil or pressing. Pat dry well and press cheese onto shrimp gently.
- Uneven crisping: Crowded basket or no flip. Use one layer and flip halfway.
- Burnt cheese bits: Heat too high, or too much cheese on edges. Reduce temp or time slightly or shake basket early.
- Shrimp stays pale or under-browned: Increase temperature slightly or extend time by 1–2 minutes, watching closely.
10 FAQs You Might Ask
1. Can I use frozen shrimp?
Yes, but fully thaw and pat dry before seasoning. Frozen shrimp contain extra moisture, which can prevent crisping.
2. Should I leave shrimp tails on or remove them?
Either works. Leaving tails adds presentation and a handle; removing tails is easier for eating, especially for kids.
3. What size shrimp works best?
“Large” or “jumbo” shrimp are ideal; smaller shrimp cook too fast and risk overcooking. Adjust time slightly for size.
4. Do I need to preheat the air fryer?
Yes — preheating ensures the basket is hot and crisping begins immediately. Usually 3–5 minutes is enough.
5. What is the internal temperature for done shrimp?
Shrimp don’t have a strict “safe” internal temp like poultry, but they’re done when opaque, pink, and no longer translucent. Overcooking yields a tight “O” shape and tough texture.
6. Can I skip Parmesan or reduce it?
You can, but you’ll lose the signature crustiness and flavor. You can reduce it or mix with breadcrumbs or almond meal if desired.
7. How do I reheat shrimp without making them rubbery?
Use low heat (e.g. air fryer set to 300 °F for 2–3 minutes) or microwave in short bursts. Avoid overcooking.
8. Can I double the recipe?
Yes, but you likely need to do multiple batches so you maintain a single layer in the basket each time.
9. What sides go well with this shrimp?
Excellent with garlic butter pasta, green salad, steamed vegetables, rice pilaf, or sautéed greens. Also perfect as tapas or appetizer.
10. Can I make this gluten‑free?
If you use a breaded version, substitute gluten-free panko or breadcrumbs. Parmesan + garlic version is already very low in carbs. Always check labels.
Serving & Presentation Ideas
- Serve the shrimp over linguine tossed in garlic butter or olive oil.
- Plate with lemon wedges and sprinkle fresh parsley or chives.
- Use as topping for a fresh green salad, grain bowl, or pasta bowl.
- Arrange on a serving platter as an appetizer, with a small garlic-lemon dipping sauce.
- Stack shrimp into skewers and serve as elegant hors d’oeuvres.
Conclusion & Final Thoughts
This Air Fryer Garlic Parmesan Shrimp recipe strikes a beautiful balance between simplicity and flavor. With just a handful of ingredients and a few minutes in the air fryer, you can elevate shrimp into a crisp, garlicky, savory delight. Use the chef tips, variations, and troubleshooting above to adapt it to your taste and equipment. Whether you’re short on time or want an elegant dish with minimal effort, this recipe won’t let you down.
Would you like me to convert this into a printable recipe card, or a shorter “quick summary” version? Or perhaps a Spanish or metric-only version? Just tell me and I’ll get it ready for you.