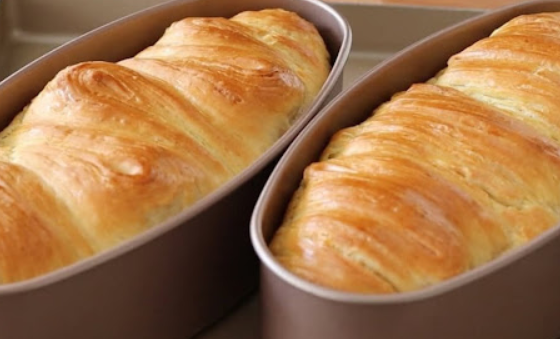
Quick Puff Pastry Butter Bread: Fast & Foolproof 🍞
Imagine biting into soft, buttery layers without the lengthy folding or fancy pastry machine. This recipe for Fast Puff Pastry Butter Bread delivers a golden, lush bread with buttery richness—all without the usual time sink. Whether you’re a novice baker or just short on time, this guide has you covered. Expert chefs, nutrition facts, safety tips, and FAQs included.
Introduction: Why This Recipe Matters
Baking puff pastry–style bread usually means folding, chilling, lamination, and more waiting time than actual eating time. But what if you could skip most of that and still get rich, buttery layers and tender crumb? In this recipe, we do exactly that. By using strategic butter layering and straightforward mixing, you will:
- Save time—no folding loops.
- Use minimal equipment—no machine needed.
- Get a buttery texture reminiscent of pastry with bread-like heft.
- Enjoy homemade bread without overcomplication.
As Chef Bobby Flay once said, “Good bread is at the heart of every kitchen, but it doesn’t need to be complicated to be exceptional.” Let’s dive into how you can achieve that with this fast, buttery treat. 🍴
Ingredients & Proportions
Here’s what you’ll need—structured so you clearly see the core dough ingredients vs. butter layering. Measurements given metric and approximate cups/spoons for convenience.
| Component | Ingredient | Metric | Imperial / Kitchen Measures |
|---|---|---|---|
| Dough Base | Egg | 1 | 1 large egg |
| Sugar | 25 g | ≈ 2 tbsp | |
| Milk | 150 g | ≈ 0.6 cup | |
| Yeast | 3 g | ≈ 1 tsp (instant dry) | |
| Bread Flour / Wheat Flour | 300 g | ≈ 2 cups | |
| Salt | 3 g | ≈ ½ tsp | |
| Butter Layers | Unsalted Butter (for dough) | 28 g | ≈ 2 tbsp |
| Unsalted Butter (for layering) | 60 g | ≈ 4 tbsp |
Equipment & Prep Checklist
- Mixing bowl
- Whisk and/or spatula
- Measuring scales or cups/spoons
- Loaf pan or baking tray
- Brush or small spatula for butter layering
- Oven preheated to correct temperature
- Cooling rack
Method: Step‑by‑Step Guide
1. Activate the Yeast & Mix the Dough
- Warm the milk to about 35‑40 °C (95‑104 °F). It should feel lukewarm—warm to the touch but not hot. This temperature helps activate the yeast without killing it.
- In a bowl, whisk together the milk, sugar, and yeast. Let sit for about 5 minutes until foamy. If there’s no foam, your yeast may be inactive—consider using fresh yeast.
- Add the egg, the 28 g butter (softened but not melted), flour, and salt. Mix until a soft, slightly sticky dough forms.
- Knead for about 8‑10 minutes by hand (or in a stand mixer with dough hook) until smooth and elastic. The dough should pass the “windowpane test”—you can stretch a small piece thin without tearing.
2. First Rise (“Bulk Ferment”)
Cover the dough with plastic wrap or a kitchen towel. Let it rise in a warm place (≈ 25‑28 °C / 77‑82 °F) for about 1 hour, or until doubled in size.
3. Butter Layering (No Folding Required)
This is the trick: instead of folding or laminating, we’ll layer butter directly in strips or blocks to approximate the flakiness.
- Punch down the dough to deflate gently.
- Roll the dough into a rectangle roughly the width of your loaf pan or tray, thickness about 1‑1.5 cm.
- Evenly dot or slice the 60 g butter into thin slices or small pats and place on sections of the rolled dough.
- Roll the dough into a roll (like a Swiss roll), or alternately, fold the ends toward center, then the sides, layering butter inside. The goal is to trap butter between layers without formal lamination.
- Place the shaped loaf into your loaf pan or formed tray.
4. Second Rise & Baking
- Cover and let rise again for about 30‑45 minutes, until puffy and near doubled.
- Preheat oven to 180‑190 °C (350‑375 °F).
- Optionally, brush the top with a little egg wash (1 beaten egg + splash of water) for gloss.
- Bake for 25‑35 minutes, depending on loaf size, until golden brown on top and hollow‑sounding when tapped on bottom.
5. Cooling & Serving
- Remove from oven. Let rest 5 minutes in pan, then turn out onto a cooling rack to avoid sogginess underneath. Let cool for at least 20 minutes before slicing to allow crumb structure to set.
- Serve warm or room temperature. Pairs beautifully with butter, jam, soft cheeses—or enjoy plain.
Chef’s Tips from the Pros
Gordon Ramsay emphasizes texture: “If your dough is too wet, it won’t trap the butter well; too dry and the layers won’t separate.” Here are a few pro tips:
- Butter temperature: Soft enough to spread, but not melting. Cold butter can break through layers; melted butter seeps out.
- Even butter distribution: Slice or dot butter thinly so you get pockets throughout.
- Proper proofing: Not rushing the rises. Flavor and crumb depend on letting the yeast do its work.
- A clean knife: For slicing, a serrated bread knife works best to avoid compressing the loaf.
Health & Safety Considerations
Food Safety
- Ensure milk is not too hot when adding yeast—above ~50 °C can kill yeast.
- Ensure all equipment is clean: bowls, hands, utensils to reduce risk of contamination.
- Make sure butter (especially if unsalted) is stored properly and not rancid.
- Check egg freshness (use by date, float test if unsure).
Health Tips & Nutrition Insight 🍏
- This bread is rich in butter—moderation is key if watching saturated fat.
- You can substitute part of the flour with whole wheat flour (e.g. 20‑30%) for extra fiber, minerals.
- Use low‑fat milk if desired, though texture and crumb will change slightly.
- Reduce sugar a little if you prefer less sweetness—this is more “enriched” than typical bread.
Nutrition & Health Benefits Table
| Nutrient | Amount per slice (≈70 g) | % Daily Value* |
|---|---|---|
| Calories | ≈ 240 kcal | 12 % of 2,000 kcal diet |
| Protein | ≈ 7 g | 14 % |
| Total Fat | ≈ 11 g | 17 % |
| Saturated Fat | ≈ 7 g | 35 % |
| Carbohydrates (net) | ≈ 28 g | 9 % |
| Sugar | ≈ 5 g | 6 % |
| Sodium | ≈ 280 mg | 12 % |
| Fiber | ≈ 1.5 g | 6 % |
*Based on a 2,000 kcal daily diet. Values approximate and will depend on exact ingredients & serving size.
Variations & Customizations
Flavor Twists
- Herb‑butter swirl: Mix finely chopped fresh herbs (rosemary, thyme, parsley) into the 60 g butter before layering.
- Garlic butter: Add minced garlic or garlic powder into the butter layer.
- Sweet version: Add cinnamon and sugar layer, or top with glaze after baking.
- Cheesy version: Insert shredded cheese between layers or as a topping just before baking.
Dietary Adjustments
- Whole grain option: Replace 25‑30 % of flour with whole wheat flour (expect denser texture).
- Dairy‑free substitute: Use coconut oil or vegan buttery spread in place of butter and non‑dairy milk if possible (texture changes).
- Reduced sugar: Drop sugar to 15‑20 g if you want less sweetness.
Why This Method Works: The Science Behind It
According to “The Pioneer Woman” Ree Drummond, understanding the basic principles of yeast, gluten, and fat layering is what turns simple dough into something extraordinary:
- Yeast + Warm Milk: Provides fermentation, gas bubbles that raise the dough and give lightness.
- Butter insertion: Butter melts during baking and separates dough layers, creating flakiness. Even without full lamination, layering blocks creates internal steam pockets.
- Proper proofing: Ensures structure—under‑proofed dough yields tight crumb; over‑proofed may collapse.
- Even heat: Oven at moderate temperature helps browning and internal baking without burning outer crust.
Common Mistakes & Troubleshooting
- Dough too sticky: Add flour gradually, but avoid too much—excess flour makes dry bread.
- Butter leaking: Butter too soft or room temperature too warm; chill slightly before layering.
- Dense crumb: Might be under‑proofed or yeast weak. Ensure yeast is fresh; proof rises fully.
- Top browning too fast: Tent loosely with foil in last 10 minutes.
Internal Links & Further Reading
For more bread techniques and enriched dough recipes, check out:
- Enriched Dough Recipes — learn about doughs with butter, milk, eggs.
- Light & Airy Breads — methods for soft crumb.
- Pastry vs. Bread Differences — understand what makes pastry flake.
Frequently Asked Questions (FAQs)
- Do I really need two rises?
Yes—first rise for gluten development and flavor; second rise for loaf shape, final texture. Skipping one risks dense or under‑risen interior. - What if I don’t have bread flour?
You can use all‑purpose flour, but loaf may be less chewy and less structure. Punch more gently, and expect slightly softer crust. - Why no folding/lamination?
Folding layers takes time, precision, and chilling. Layering butter alternatively gives some of the same effect with much less labor—ideal for home baking. - Can I freeze the dough or baked loaf?
Yes. Freeze raw shaped loaf after second rise (wrap well), or bake then freeze. Re‑heat in oven to refresh crust. - How to know when it’s done?
Golden top, hollow sound when bottom tapped, internal temperature of ~95‑98 °C (≈ 200‑210 °F). Use thermometer if you have one. - Can I use salted butter?<
Yes—but reduce added salt to avoid over‑salty loaf. - Is this suitable for vegetarians?
Yes—ingredients as given are vegetarian‑friendly (assuming no non‑vegetarian additives in flour/yeast). - How long does it keep?
Best within 2‑3 days if stored in airtight container at room temperature. After that, it may dry out; re‑heat or toast slices. - Can I make smaller or mini versions?
Certainly—divide dough and bake in smaller pans. Adjust bake time (mini loaves may take less time). - What about altitude or humidity changes?
In humid climates, flour may absorb more moisture—add a bit more flour. In high altitude, proof time may be faster; watch closely.
Serving & Storage Tips
- For soft crust, wrap in clean cloth once cooled; for crisp crust, leave uncovered.
- Slices toast beautifully—refreshes texture.
- Store uneaten bread in plastic wrap or resealable bag; freeze if not using within couple days.
Why You’ll Love This Bread ❤️
This recipe hits the sweet spot between tradition and convenience. It offers:
- Butter richness without hours of lamination.
- A soft interior, buttery layers, golden crust.
- Flexibility: sweet or savory, whole‑grain friendly, dietary does‑able.
- An accessible way to level up your home baking, even if you’re pressed for time or gear.
Conclusion
Fast Puff Pastry Butter Bread proves that you don’t need full lamination or expensive tools to get delicious, buttery, layered bread. With simple ingredients, smart butter layering, and proper proofing, you get warm, indulgent slices without the fuss. As Ina Garten says, “Cooking is about sharing—deliver something you love, fast enough to share.” Happy baking, and enjoy every buttery bite!