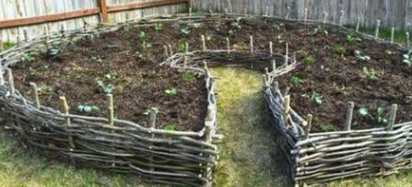
DIY Wattle Raised Garden Bed: Eco-Friendly & Rustic Backyard Project 🌿
Date Published: 8 October, 2024
For centuries, wattle weaving has been celebrated as a time-honored craft for creating strong, rustic, and naturally beautiful structures. By intertwining flexible branches—traditionally willow or hazel—you can build a raised garden bed that is not only sturdy and functional but also blends seamlessly into the natural landscape of your backyard. This guide will walk you through every step, from planning to planting, so you can create your very own wattle raised garden bed that’s sustainable, eco-friendly, and visually stunning.
Why Choose a Wattle Raised Garden Bed? 🌱
According to Dr. Leila Nour, Environmental Design Specialist, “Wattle weaving is a perfect example of functional beauty in the garden. It requires no synthetic materials, and when done right, it can last for years while contributing positively to the surrounding ecosystem.”
- ✅ Eco-Friendly: Uses renewable natural materials like willow or hazel.
- ✅ Cost-Effective: Many materials can be sourced from your own property or local trimmings.
- ✅ Rustic Aesthetic: Adds timeless charm to your garden.
- ✅ Durable: With proper care, a wattle bed can last up to 7–10 years.
Materials You’ll Need 🛠️
- 🌿 Flexible branches or twigs (willow or hazel are ideal)
- 🪵 Sturdy stakes (about 2 feet longer than the desired height of the bed)
- 🔨 Hammer or mallet
- ✂️ Pruning shears
- 🧤 Garden gloves
- 📏 Measuring tape
- 🪴 Soil and compost mix
Expert Tip from Prof. Mark Benson, Horticulture Expert: “Always work with freshly cut branches when possible—they’re more flexible and much easier to weave without breaking.”
Step-by-Step Guide to Building Your Wattle Raised Garden Bed
1. Planning and Design 📐
Start by determining the size and location of your bed. Ideally, choose a spot that gets at least 6–8 hours of sunlight daily, depending on your chosen plants. Create a simple sketch of your design, noting dimensions and shape—rectangular, circular, or even keyhole designs work beautifully for wattles.
2. Preparing the Site 🧹
- Clear weeds, rocks, and debris from the area.
- Level the ground to prevent uneven settling.
- Mark your bed’s outline with string or chalk.
3. Gathering Materials 🌿
Collect long, flexible branches or twigs. Willow and hazel are preferred, but you can also use alder, dogwood, or even grapevines. Cut them into uniform lengths, allowing for some extra length for trimming during the weaving process.
4. Installing Stakes 🪵
Cut your stakes to the desired height plus an additional 2 feet for anchoring in the ground. Hammer them at regular intervals (6–8 inches apart) along your marked perimeter. Ensure they are firmly embedded for stability.
5. Weaving the Wattle 🧶
- Start at one corner and weave your first branch between the stakes.
- Alternate weaving directions for each branch to lock the structure in place.
- Gently bend branches to avoid breakage, trimming excess as you go.
6. Building Up the Walls 🏗️
Continue weaving layers until you reach your desired height. For most gardens, 18–24 inches works well, but deeper beds may require extra weaving for stability.
7. Securing the Top 🔒
Tuck the ends of your final branches into the weave. Optionally, you can cap the top with a thicker, straighter branch for a polished finish.
8. Filling with Soil and Compost 🪴
Mix garden soil with rich compost to create a nutrient-dense growing medium. Fill the bed evenly, leaving a small gap at the top to prevent overflow during watering.
9. Planting Your Garden 🌼
Choose plants based on your climate, sun exposure, and soil type. Wattle beds work well for herbs, leafy greens, flowers, and even root vegetables.
10. Maintenance Tips 🛡️
- Water regularly but avoid overwatering.
- Mulch to retain moisture and reduce weeds.
- Repair or replace branches as needed to maintain structural integrity.
Safety & Sustainability Tips ⚠️
- Wear gloves to prevent cuts from sharp twigs.
- Use a stable ladder or step stool for taller structures.
- Source branches from responsible pruning rather than cutting down healthy trees.
Nutritional & Health Benefits of a Wattle Garden Bed Produce 🍅
| Crop | Avg. Weight per Plant (grams) | Nutrition Highlights | Health Benefits |
|---|---|---|---|
| Tomatoes | 1500g | Vitamin C, Lycopene | Boosts immunity, supports heart health |
| Spinach | 500g | Iron, Vitamin K | Supports bone health, aids blood production |
| Carrots | 800g | Beta-Carotene, Fiber | Improves vision, supports digestion |
| Strawberries | 400g | Vitamin C, Antioxidants | Promotes skin health, reduces inflammation |
Frequently Asked Questions (FAQs) ❓
- How long does a wattle raised bed last?
With proper care, 7–10 years is common before major repairs are needed. - Can I use any type of wood?
Preferably use willow, hazel, or other flexible woods for weaving; hardwoods can be too brittle. - Do I need special tools?
No—basic garden tools like pruning shears, a mallet, and gloves will suffice. - Can wattle beds handle heavy rains?
Yes, if built tightly and with proper soil drainage. - Will the wood rot?
Eventually, yes, but proper drying and maintenance can extend its life. - Do I need to line the inside?
Not necessarily, but lining with burlap can help retain soil. - Can I grow root vegetables in a wattle bed?
Absolutely—just ensure the soil is deep and loose enough. - Is this project beginner-friendly?
Yes—wattle weaving is simple to learn and forgiving for beginners. - How much does it cost to make?
Costs vary, but if you source branches locally, it can be nearly free. - Can I make curved or circular beds?
Yes—wattle weaving is highly adaptable to various shapes.
Final Thoughts 🌻
Building a wattle raised garden bed is more than just a weekend project—it’s a way to connect with traditional craftsmanship, reduce waste, and create a functional, beautiful centerpiece for your garden. With a little time, patience, and creativity, you can build a structure that will nourish plants, wildlife, and your own sense of accomplishment for years to come.
Happy gardening and happy weaving! 🌿